
Springboot3
SpringBoot3
从SpringBoot2开始web编程分为了两个流派,
一个使用Servlet技术栈,可以称为传统派,一个使用Reactive技术栈,也就是响应式技术栈,使用Servlet编程的话,会使用ServletAPI规范,配上Servlet容器,比如Tomcat再配合Spring一系列技术栈,比如Spring MVC,SpringSecurity,SpringData来构建web应用,这种称为阻塞同步的BIO模型。
一个使用响应式技术栈,按照Reactive和Stream规范,搭配上Netty和Tomcat在Servlet3.1+标准上也支持异步请求。有了这些容器搭配Spring SecurityReactive框架做安全验证,SpringWebFlux框架做MVC,SpringDataReactive做数据处理。这样就能挖掘CPU的能力处理大量并发


前置知识
- java17
- Spring、SpringMVC、MyBatis
- Maven、IDEA
环境要求
| 环境&工具 | 版本 |
|---|---|
| SpringBoot | 3.0.4+ |
| IDEA | 2021+ |
| jAVA | 17+ |
| Maven | 3.5+ |
| Tomcat | 10.0+ |
| Servlet | 5.0+ |
| GraalVM Community | 22.3+ |
| Native Build Tools | 0.9.19+ |
SpringBoot是什么
SpringBoot帮我们简单、快速的创建一个独立的、生产级别的Spring应用,大多数SpringBoot应用只需要编写少量配置,整合Spring平台以及第三方技术。
特性
- 快速创建独立Spring应用
- SSM:导包、写配置、启动运行
直接嵌入Tomcat、Jetty or Undertow(无需部署war包)【Servlet容器】
- linux java tomcat mysql:war放到tomcat的webapp下
- 现在应用里嵌入这些容器打包成jar包,然后运行java -jar就好了,前提是都要有java环境啊
提供可选的 starter,简化应用 整合
- 场景启动器(starter):web、json、邮件、oss(对象存储)、异步、定时任务、缓存
- 以前开发导包一堆,控制好版本。
- 为每一种场景准备了一个依赖坐标,比如导入web-starter、mybatis-starter这些依赖,相关的都依赖上了。
- 按需自动配置Spring 以及 第三方库
- 如果这些场景我们要使用(生效),这个场景的所有配置都会自动配置好。
- 约定大于配置:每个场景都有很多默认配置。
- 自定义:在配置文件中修改几项就可以。
- 提供 生产级别特性:如 监控指标、健康检查、外部化配置等。
- 监控指标、健康检查(k8s)、外部化配置(也就是说配置可以不用写在jar包里面,只用重启就能读取到配置了)
- 无代码生成、无xml。
总结:简化开发、简化配置、简化整合、简化部署、简化监控、简化运维。
SpringBoot3核心特性
如果想要Springboot2就https://start.aliyun.com这个网址
如果想要Springboot3就https://start.spring.io
其次创建之后该Maven配置
1、快速入门
第一步首先创建POM文件
1 | <!--所有的spring-boot项目都需要继承spring-boot-starter-parent--> |
第二步 改YML 这里不用
第三步主启动
1 |
|
第四步 业务类 这里也不用
第五步 控制类 这里写个demoController
1 | //@Controller + @ResponseBody |
这里就部署好了
然后SpringBoot给我们提供了打包jar的插件,然后改POM文件
1 | <build> |
然后在右边Maven然后运行package就能打包了。
打包好后运行java -jar就能运行了。
现在假设想要改端口号,以前要打开项目然后修改YML然后重新打包,重新发布,然后重新启动。
现在只用在外面新建个application.properties
然后在里面编写配置server.port=8888
然后重新启动就可以更换端口号了
然后官方和第三方支持很多场景了官方提供的场景一般命名为
spring-boot-starter-xxx啥的。
第三方提供的场景一般命名为*.spring-boot-starter
SpringBoot两个机制
Springboot能这么方便配置主要是两个机制
1、依赖管理机制
为什么导入starter-web所有关联的依赖都导入进来?
- 开发什么场景,导入什么 场景启动器就好
- maven依赖传递原则,A依赖B,B依赖C,那么A就依赖C
为什么版本号都不用写?
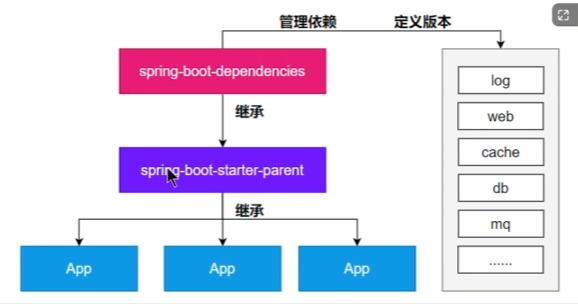
- 每个boot项目有一个父项目
spring-boot-starter-parent - parent父项目是
spring-boot-dependencies - 父项目 版本仲裁中心,把所有常见的依赖版本都声明好了。
自定义版本号
- 利用maven的就近原则,有就用自定义的,没有就默认的。
- 然后在原本的POM里面自定义或者用
<properties/>中声明版本
2、自动配置机制
初步理解后面再理解完整流程。
自动配置的Tomcat、SpringMVC等。
- 以前:写DispatcherServlet来拦截所有请求,ViewResolver处理页面跳转,CharacterEncodingFilter处理字符编码

- 现在:自动配置好的这些组件
- 验证:在主入口里面的
SpringApplication.run进去看,然后发现这个方法给我们返回ConfigurableApplicationContext,这个其实是IOC容器,然后我们只需要验证这个IOC容器里面有没有这些组件就可以了。
1
2
3
4
5
6
7
8
9
10
11
12
public class MainApplication {
public static void main(String[] args) {
//java10 新特性:局部变量类型的自动推断
var ioc = SpringApplication.run(MainApplication.class, args);
//1、打印IOC容器中的所有Bean定义名称
String[] beanDefinitionNames = ioc.getBeanDefinitionNames();
for (String beanDefinitionName : beanDefinitionNames) {
System.out.println(beanDefinitionName);
}
}
}现在导入场景,容器中就会自动配置好这个场景的核心组件。至于为什么后面说。
默认的包扫描规则
- @SpringBootApplication 标注的类就是主程序类
- SpringBoot只会扫描主程序所在的包及其下面的子包
- @SpringBootApplication
- 这个功能就类似帮我们写了component-scan,如果想要配置扫描@SpringBootApplication里面配置
@SpringBootApplication(scanBasePackages = "com.bitzh"),或者用@ComponentScan("com.bitzh")注解
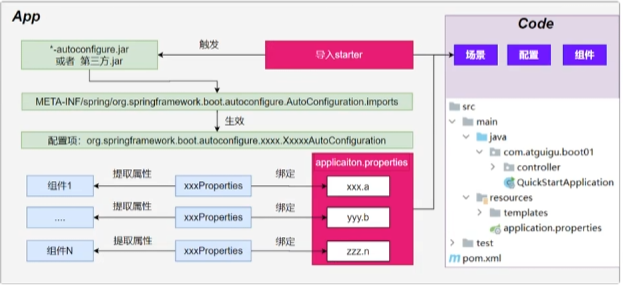
配置默认值
- 配置文件的所有配置项是和某个类的对象值进行一 一绑定的
- 绑定了配置文件中每一项值的类:配置属性类
- 比如:
ServerProperties绑定了所有Tomcat服务器有关的配置 MultipartProperties绑定了所有文件上传相关的配置其他的参照官方文档
按需加载自动配置
- 导入场景
spring-boot-starter-web - 场景启动器除了会导入相关功能依赖以外还导入了
spring-boot-starter,是所有starter的starter,基础核心starter,这个有个包里面有个依赖spring-boot-autoconfigure,然后这个包里面都是各种场景的autoconfigure,自动配置类 - 虽然全场景的自动配置都在
spring-boot-autoconfigure这个包,但是不是全都开启的。- 导入哪个场景就开启哪个场景。
总结:导入场景启动器、触发
spring-boot-autoconfigure这个包的自动配置生效,容器中就会具有相关场景的功能- 导入场景

核心技能
常用注解
SpringBoot摒弃xml配置方式,改为全注解驱动
那么就会有大量的注解了。
1、组件注册
1 | @Configuration 、 @SpringBootConfiguration |
以前写组件
先创建个bean文件
1 | public class User{ |
然后写XML配置文件
1 | //然后通过bean标签注册到容器中 |
现在写组件
创建一个config文件,以前的配置文件,变成了一个配置类
1 | //这个注解跟下面的一样 |
现在就把User注册到容器中了。
那么想要把第三方包的组件注入到容器中
1 | //第一种:先导入POM然后在Configuration类里面 |
总结将bean注入到容器的流程
1、@Configura 编写一个配置类
2、在配置类中,自定义方法给容器中注册组件。配合@Bean注解
3、使用@Import注解导入第三方Bean
2、条件注解
如果注解制定的条件成立,则出发指定行为
@ConfitionalOnXxx
1 | @ConditionalOnClass:如果类路径中存在这个类,则出发指定行为 |
场景:如果存在FastsqlException这个类,就给容器中放一个User组件,叫user01,否则给容器中放一个User组件,叫user02。如果系统中有user02这个组件就给容器中放另外一个user03。
1 |
|
3、属性绑定
1 | @ConfigurationProperties:声明组件的属性和配置文件哪些前缀开始项进行绑定 |
Springboot导入完整流程
1、SpringBoot怎么实现导入一个starter、写一些简单配置,应用就能跑起来,我们无需关心整合。
2、为什么Tomcat的端口号可以配置在application.properties中,并且tomcat能启动成功
3、导入场景后哪些自动配置能生效?
流程:
1、导入starter-web:导入了web开发场景
- 1、场景启动器导入了相关场景的所有依赖:
starter-json、starter-tomcat、springmvc - 2、每个场景启动器都引入了一个
spring-boot-starter,核心场景启动器 - 3、核心场景启动器引入了
springb-boot-autoconfiguration包。 - 4、
springb-boot-autoconfiguration里面囊括了所有场景的所有配置。 - 5、只要这个包下的所有类都能生效,那么相当于SpringBoot官方写好的整合功能就能生效。
- 6、SpringBoot默认扫描不到
springb-boot-autoconfiguration下写好的所有配置类。(这些配置类给我们做了整合操作)
总结:导包的过程就是导入了springb-boot-autoconfiguration,然后里面的配置类都引入了,至于生不生效看后面的。
2、主程序:@SpringBootApplication
- 1、
@SpringBootApplication由三个注解组成@SpringBootConfiguration、@EnableAutoConfiguration、@ComponentScan - 2、SpringBoot默认只能扫描自己主程序所在的包及其下面的子包,扫描不到
spring-boot-autoconfigure包中官方写好的配置类。 - 3、
@EnableAutoConfiguration这个注解就是SpringBoot开启自动配置的核心,- 1、是由
@Import(AutoConfigurationImportSelector.class)提供功能批量给容器中导入组件。 - 2、SpringBoot启动会默认加载152个配置类。
- 3、这152个配置类,来自于
MET-IF一个路径中的文件,也就是上面导入的包的,然后里面有文件配置好152个文件指定 - 项目启动的时候利用
@Import批量导入组件机制把autoconfigure包下的152个自动导入类导入进来 - 这些自动配置类里面会有@Bean放一堆组件,这些组件就能工作了
- 1、是由
总结:SpringBoot默认只扫描主程序的配置类,然后利用@SpringBootApplication注解里面的@EnableAutoConfiguration注解里面的@Import注解导入的152个自动配置类也扫描了。自动配置类都导入了但是不一定生效,里面有@ConditionalOnClass判断,如果有这些类,才会生效。
3、自动配置类
- 1、给容器中使用@Bean放一堆组件
- 2、每个 自动配置类都可能有这个注解
@EnableAutoConfiguration(ServerProperties.class)用来把配置文件中配的指定前置属性封装到xxxProperties属性类中、 - 以Tomcat为例子:把服务器的所有配置都是以
server开头的,配置都封装到了属性类中。
4、写业务,全程无需关心各种整合(底层把整合写好了,而且也生效了)。
核心流程:
1、导入starter,然后就会导入autoconfigure包。
2、autoconfigure包里面有个文件,文件里面指定了所有启动要加载的自动配置类。
3、@EnableAutoConfiguration会自动的把上面自动配置类文件里面写的所有自动配置类都导入进来。xxxAutoConfigureation 是有条件注解进行按需加载
4、这些导入的xxxAutoConfigureation 又给容器中导入一堆组件,这些组件有152个,组件都是从xxxProperties中提取属性值
5、xxxProperties又是和配置文件进行绑定。
效果:导入stater、修改配置文件,就能修改底层行为。
如何学好SpringBoot
框架的框架,底层基于Spring。能调整每一个场景的底层行为。100%项目一定会用到底层自定义
类似于摄影:
傻瓜照相机:自动配置好
单反:教具、光圈、快门、感光度….
傻瓜+单反:
1、理解 自动配置原理
a.导入starter -> 生效xxxAutoConfiguration -> 组件 -> xxxProperties -> 配置文件
2、理解 其他框架底层
a.拦截器
3、可以随时 定制化任何组件
a.配置文件
b.自定义组件
核心:这个场景自动配置导入了哪些组件,我们能不能Autowired进来使用,如果用不了,能不能通过修改配置,改变组件的一些默认参数,需不需要自己完全定义这个组件,场景定制化非常重要。
最佳实战:
- 选场景:导入到项目
- 官方:starter
- 第三方:去仓库搜
- 写配置:改配置文件关键项
- 数据库参数(链接地址,账号密码等)
- 分析这个场景给我们导入了哪些能用的组件
- 自动装配这些组件进行后续使用
- 不满意Boot提供的自动配好的组件
- 定制化
- 改配置
- 自定义组件
- 定制化
整合redis为案例
选场景:官方提供了,直接导入
spring-boot-starter-date-redis写配置:然后去看RedisAutoConfiguration里面然后看到里面的EnableConfigurationProperties,然后发现里面的配置都写在RedisProperties.class里面,然后进去配置文件看看有哪些配置。
分析组件
- 分析到RedisAutoConfiguration给容器中放了
StringRedisTemplete - 给业务代码中自动装配
StringRedisTemplete
- 分析到RedisAutoConfiguration给容器中放了
定制化
- 修改配置文件
- 自定义组件,自己给容器中放一个
StringRedisTemplete
YAML配置文件
1 | #k: v #这个是注释,大小写敏感,k: v中间有空格,属性有层级关系,下一行就是子属性 |
支持的写法:
示例:
1 |
|
那么这个想要用YML绑定
1 | person: |
小细节
1、符合驼峰命名的名字推荐写成:birth-day
2、文本:单引号不会转义比如\n就是普通字符,但是双引号会转义会识别成换行符
3、短竖线下面的文本可以存储大文本 | 会保留文本格式
4、用> 表示大文本,会压缩 换行变成空格
5、用三个 - 可以分隔文档更美观
日志配置
首先我们先梳理清楚市面上的日志框架,然后要理清规范, 项目开发不要编写sout,应该用日志记录信息
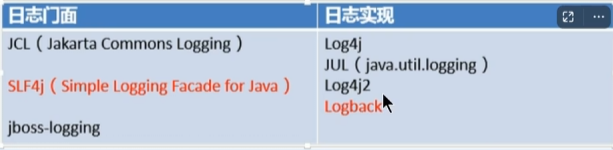
日志门面,就像它的名字一样,是一个“接口层”或“统一入口”,它不负责实际的日志输出,而是提供一套标准的 API,让开发者可以使用一致的方式写日志代码。
日志实现就是真正干活的组件,它负责:
- 把日志消息格式化
- 决定输出到控制台、文件、网络等
- 控制日志级别(debug/info/warn/error)
- 管理日志滚动、归档等
Spring使用commons-logging作为内部日志,但底层日志实现是开放的。可对接其他日志框架。
Spring5以后commons-logging被spring直接自己写了。底层是有判断逻辑的,如果导入Log4j就用Log4j等等。
Springboog3支持jul,log4j2,logback。SpringBoot提供了默认的控制台输出配置,也可以配置输出为文件。Logback是默认使用的。
虽然日志框架很多,但是我们使用SpringBoot的默认配置就能工作的很好。
SpringBoot是怎么把日志默认配置好的
首先pom依赖会导入场景,比如web场景,然后每个场景启动器都会有spring-boot-starter。
然后在核心场景里面,引入了日志的所有功能spring-boot-starter-logging
默认使用Logback + sl4j 组合作为默认底层日志
以前说自动配置都在AutoConfigure里面,但是日志是系统一启动就要用的,而xxxAutoConfigureation是系统启动好了以后放好的组件,后来用的。
日志是利用监听器机制配置好的。ApplicationListener。
日志所有的配置都可以通过修改配置文件实现。以logging开始的所有配置都是日志的配置。
核心的监听器机制后面详细说
日志格式
默认输出格式:
- 时间和日期:毫秒级精度
- 日志级别:ERROR、WARN、INFO、DEBUG、or TRACE
- 进程ID
---:消息分隔符- 线程名:使用【】包含
- Logger名:通常是产生日志的类名
- 消息:日志记录的内容
注意:Logback没有FATAL级别,对应的是ERROR
默认值:参照spring-boot包additional-spring-configuration-metadata.json文件
可修改为:%d{yyyy-MM-dd HH:mm:ss} %-5level [%thread] %logger{15} ===> %msg%n
或者在cmd命令里面利用java的jdk命令jps也能看运行的进程
回归到使用
如果想在业务里面写日志
1 |
|
日志级别
由低到高:ALL、TRACE、DEBUG、INFO、WARN、ERROR、FATAL、OFF
- 只会打印制定级别以及以上级别的日志
- ALL:打印所有日志
- TRACE:追踪框架详细流程日志,一般不使用
- DEBUG:开发调试细节日志
- INFO:关键,感兴趣信息日志
- WARN:警告但不是错误的信息日志,比如:版本过时
- ERROR:业务错误日志,比如出现各种异常
- FATAL:之命错误日志,比如jvm系统崩溃
- OFF:关闭所有日志记录
不指定级别的所有类,都是用root制定的级别作为默认级别
SpringBoot日志默认级别是INFO
1、在application.yml中配置logging.level制定日志级别
1 | #默认所有日志没有精确指定级别就使用root的默认级别 |
2、level可取值范围
1 |
|
3、制定日志文件
1 | logging: |
4、文件归档与滚动切割
首先日志文件会越来越大,所以就出现了这个功能
归档:每天的日志单独存到一个文件中
切割:每个文件10MB,超过大小切割成另外一个文件。
1、每天的日志应该独立分割出来存档。如果使用logback (SpringBoot默认整合)。可以通过yml文件指定日志滚动规则。
2、如果是其他日志系统,需要自行配置,比如添加log4j2.xml或者log4j2-spring.xml
3、支持的滚动规则设置如下
| 配置项 | 描述 |
|---|---|
logging.logback.rollingpolicy.file-name-pattern |
必填。定义归档日志文件的命名模式,支持时间(如 %d{yyyy-MM-dd})和索引(如 %i)。例如:${LOG_FILE}.%d{yyyy-MM-dd}.%i.gz。该模式决定了日志如何按时间或大小滚动并压缩。 |
logging.logback.rollingpolicy.max-file-size |
单个日志文件的最大大小,超过后触发滚动(仅在文件名模式中包含 %i 时生效)。例如:10MB。 |
logging.logback.rollingpolicy.max-history |
保留的归档日志文件最大天数(或周期数)。超过此天数的旧日志会被自动删除。例如:30 表示保留最近30天的日志。 |
logging.logback.rollingpolicy.total-size-cap |
所有归档日志文件的总大小上限。超过后会删除最旧的归档文件。例如:1GB。 |
logging.logback.rollingpolicy.clean-history-on-start |
应用启动时是否清理过期的归档日志(true/false)。默认为 false。 |
自定义配置
通常我们配置yml就够了,但是如果想要用以前的自定义logback配置,就直接把logback.xml放到resources下面,然后springboot就会用自己的logbcak的配置了。
但是文件名spring更推荐logback-spring.xml这种格式,这样spring就能控制的了。
如果放log4j2,可以改文件名为log4j2-spring.xml
最佳实战:自己要写配置,配置文件名加上xx-spring.xml
切换日志组合
如果不想要logback想要切换log4j2,那么需要利用maven的就近原则。
首先我们之前导入spring-boot-starter-web里面有核心场景,但是我们再导入spring-boot-starter然后我们利用排除<exclusions>排除掉logback
1 | <dependency> |
2、Web开发
SpringBoot的Web开发能力,由SpringMVC提供。
1、Web场景
我们要学好整个web开发场景,我们要先了解springboot对springmvc提供了哪些场景,如果想要修改如何灵活配置,如何定制组件等等。
首先要了解自动配置了什么
1、整合配置场景
1 | <dependency> |
2、引入了autoconfigure功能
3、@EnableAutoConfiguration注解使用@Import(AutoConfigurationImportSelector.class)批量导入组件,加载META-INF/spring/%s.imports,也就是说方法底层写了一个%s的占位符,这个占位符可以通过掺入的形参来获取值,并替换掉这个占位符,那么我们导入了web包,实际上加载了
4、META-INF/spring/org.springframwork.boot.autoconfigure.AutoConfiguration.imports文件中配置的所有组件。然后进去看这个文件里面写了很多自动配置的包名。
5、所有自动配置类如下
| 自动配置类 | 说明 |
|---|---|
org.springframework.boot.autoconfigure.web.servlet.ServletWebServerFactoryAutoConfiguration |
自动配置内嵌 Servlet 容器(Tomcat/Jetty/Undertow) |
org.springframework.boot.autoconfigure.web.servlet.DispatcherServletAutoConfiguration |
配置 DispatcherServlet(Spring MVC 核心) |
org.springframework.boot.autoconfigure.web.servlet.WebMvcAutoConfiguration |
自动配置 Spring Web MVC(视图解析、静态资源、拦截器等) |
org.springframework.boot.autoconfigure.web.servlet.HttpEncodingAutoConfiguration |
配置字符编码过滤器(解决中文乱码) |
org.springframework.boot.autoconfigure.web.servlet.MultipartAutoConfiguration |
支持文件上传(multipart/form-data) |
org.springframework.boot.autoconfigure.web.servlet.error.ErrorMvcAutoConfiguration |
配置 MVC 错误页面和异常处理 |
org.springframework.boot.autoconfigure.websocket.servlet.WebSocketServletAutoConfiguration |
Servlet 环境下的 WebSocket 支持 |
org.springframework.boot.autoconfigure.websocket.servlet.WebSocketMessagingAutoConfiguration |
WebSocket + STOMP 消息代理支持 |
然后还有响应式的类
| 自动配置类 | 说明 |
|---|---|
org.springframework.boot.autoconfigure.web.reactive.ReactiveWebServerFactoryAutoConfiguration |
配置响应式内嵌服务器(Netty/Tomcat/Jetty/Undertow Reactive) |
org.springframework.boot.autoconfigure.web.reactive.HttpHandlerAutoConfiguration |
配置 HttpHandler(WebFlux 底层入口) |
org.springframework.boot.autoconfigure.web.reactive.WebFluxAutoConfiguration |
自动配置 Spring WebFlux(路由、编解码、静态资源等) |
org.springframework.boot.autoconfigure.web.reactive.ReactiveMultipartAutoConfiguration |
响应式文件上传支持 |
org.springframework.boot.autoconfigure.web.reactive.WebSessionIdResolverAutoConfiguration |
配置 WebSession ID 解析 |
org.springframework.boot.autoconfigure.web.reactive.error.ErrorWebFluxAutoConfiguration |
WebFlux 的全局错误处理 |
org.springframework.boot.autoconfigure.websocket.reactive.WebSocketReactiveAutoConfiguration |
响应式 WebSocket 支持 |
6、这些自动配置类又绑定了配置文件的一堆配置项
- 1、SpringMVC的所有配置以spring.mvc开头
- 2、Web场景的通用配置以
spring.web开头 - 3、文件上传配置以
spring.servlet.multipart开头 - 4、服务器的配置以
server开头 比如:编码方式
7、默认配置Web效果
Spring Boot 的自动配置提供了以下功能:
- 注入
ContentNegotiatingViewResolver和BeanNameViewResolver的 Bean,方便视图解析。 - 支持静态资源的访问,静态资源放在static文件夹下即可直接访问。
- 自动注册
Converter、GenericConverter和Formatter的 Bean,适配常见的数据类型转换和格式化需求。 - 支持
HttpMessageConverters,方便返回json等数据类型(方法只要是对象就转换为json)。 - 自动注册
MessageCodesResolver,方便国际化及错误消息处理。 - 支持静态的
index.html页面。 - 自动使用
ConfigurableWebBindingInitializerBean,实现消息处理,数据绑定(就比如接受前端传来的超文本数据放在对象里面),类型转化、数据校验 等功能。
重要:
- 如果想要保持 boot mvc 的默认配置,并且自定义更多的mvc配置,如:interceptors,formatters,view controllers等。可以使用@Configuration注解添加一个WebMvcConfigurer类型的配置类,并不要标注@EnableWebMvc
- 如果想要保持boot mvc的默认配置,但要自定义核心组件实例,比如:RequestMappingHandlerMapping,RequestMappingHandlerAdapter或ExceptionHandlerExceptionResolver,给容器中放一个WebMvcRegistrations组件即可
- 如果想全面接管Spring MVC,@Configuration标注一个配置类,并加上@EnableWebMvc注解,实现WebMvcConfigurer接口
所以用springboot进行web开发有三种方式
| 全自动 | 直接编写控制器逻辑 | 全部使用自动配置默认效果 | |
|---|---|---|---|
| 手自一体 | @Configuration + 配置 WebMvcConfigurer + 配置WebMvcRegistrations | 不要标注@EnableWebMvc | 自动配置效果,手动设置部分功能,定义MVC底层组件 |
| 全手动 | @Configuration + 配置 WebMvcConfigurer | 标注@EnableWebMvc | 禁用自动配置效果,全手动设置 |
总结:给容器中写一个配置类 @Configuration 继承 WebMvcConfigurer 但是不要标注 @EnableWebMvc,实现手自一体的效果
现在开始了解规则
2、静态资源
0、主要研究WebMvcConfiguration原理
1、生效条件
1 |
|
2、效果
1、放了两个Filter:
HiddenHttpMethodFilter:页面表单提交Rest请求(GET、POST、PUT、DELETE)
FromContentFilter:表单内容Filter,GET(数去放URL后面)、POST(数据放请求体内)请求可以携带数据,PUT、DELETE的请求体数据会被忽略
2、给容器中放了WebMvcConfigurer组件,给SpringMVC添加各种定制功能。
这里放了很多底层规则,所有的 功能最终会和配置文件绑定
WebMvcProperties.class: spring.mvc开头配置文件
WebProperties.class: spring.web开头配置文件
1 |
|
3、WebMvcConfigurer接口
提供了配置SpringMVC底层的所有组件入口
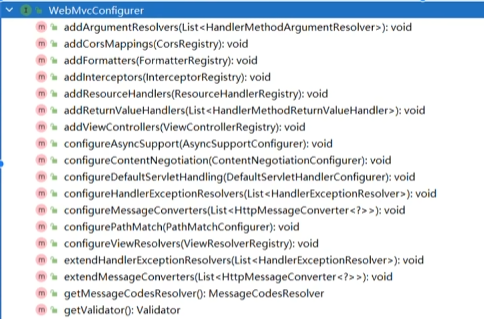
1 | 参数解析器(controller上的所有参数都要解析) |
4、静态资源规则源码
1 | public void addResourceHandlers(ResourceHandlerRegistry registry) { |
首先可以看到这个源码里面addResourceHandler调用了两次,添加了两种静态资源规则。
5、 EnableWebMvcConfiguration 源码
1 | //SpringBoot 给容器中放 WebMvcConfigurationSupport 组件。 |
HandlerMapping : 根据请求路径 /a 找那个handler能处理请求
a. WelcomePageHandlerMapping :
ⅰ. 访问 /** 路径下的所有请求,都在以前四个静态资源路径下找,欢迎⻚也⼀样
ⅱ. 找 index.html :只要静态资源的位置有⼀个 index.html ⻚⾯,项⽬启动默认访问
6、为什么容器中放一个WebMvcConfigurer就能生效
- WebMvcAutoConfiguration 是⼀个⾃动配置类,它⾥⾯有⼀个 EnableWebMvcConfiguration
- EnableWebMvcConfiguration 继承与 DelegatingWebMvcConfiguration ,这两个都 ⽣效
DelegatingWebMvcConfiguration利⽤ DI 把容器中 所有WebMvcConfigurer注⼊进来- 别⼈调⽤
DelegatingWebMvcConfiguration的⽅法配置底层规则,⽽它调⽤所有 WebMvcConfigurer 的配置底层⽅法。
总结:Spring Boot 通过一个“委托代理类”自动聚合所有 WebMvcConfigurer 实现,并统一调用它们的方法。
第一步:自动配置入口 —— WebMvcAutoConfiguration
- Spring Boot 启动时,会加载
WebMvcAutoConfiguration(条件满足时)。 - 这个类是 Spring MVC 的自动配置类,负责设置默认的视图解析器、消息转换器、静态资源处理等。
第二步:关键角色 —— DelegatingWebMvcConfiguration
在 WebMvcAutoConfiguration 内部,有一个静态内部类:而DelegatingWebMvcConfiguration 是真正的核心:
第三步:依赖注入聚合所有 WebMvcConfigurer
@Autowired List<WebMvcConfigurer> configurers
→ Spring 容器会自动把所有类型为WebMvcConfigurer的 Bean 收集到一个 List 中。- 然后交给
WebMvcConfigurerComposite(一个组合器)管理。
静态资源映射规则
1、默认规则
1、静态资源映射规则在WebMvcConfiguration中进行了定义:
规则一:访问 /webjars/** 路径就去classpath:/META-INF/resources/webjars/下找资源
maven导入依赖比如导入vue相关js,相关的js就进来了,,然后访问webjars对应路径就能访问对应js了。
但是这个不常用
规则二:访问:/**路径就去静态资源默认的四个位置找资源
"classpath:/META-INF/resources/",
"classpath:/resources/",
"classpath:/static/",
"classpath:/public/"
也就是放在类路径下的这四个位置就能访问静态资源。
类路径就是java包下面或者resoutces包下面就是两个类路径。
2、静态资源缓存规则
3、规则三:静态资源默认都有缓存规则的设置。
a. 所有缓存的设置,直接通过配置文件: spring.web
b. cachePeriod:缓存周期,多久不用找服务器要新的。默认没有,以秒为单位
c. cacheControl:HTTP缓存控制,默认无,缓存大体分为私有缓存和共享缓存 HTTP 缓存 - HTTP | MDN
d. useLastModified:是否使用最后一次修改。注意:Last-Modified首部,只是告诉浏览器,要想使用缓存,必须每次带该首部去服务器验证,通过就响应304,不通过就返回完整资源,并重写设置Last-Modified
如果浏览器访问了一个静态资源
index.js,如果这个资源没有发生变化,下次访问的视乎就可以直接让浏览器用自己缓存中的东西,而不用给服务器发请求。
1 | registration.setCachePeriod(this.getSeconds(this.resourceProperties.getCache().getPeriod())); |
欢迎页
欢迎页规则在 WebMvcAutoConfiguration中进行了定义:
1、在静态资源目录下找index.html
2、没有就在templates下找index模版页
Favicon
- 在静态资源⽬录下找 favicon.ico
缓存实验
上面讲解了三种静态资源规则,无论哪种规则都配了三个方法来控制缓存,
一个是setCacheControl,
一个是SetCachePeriod,
一个是setUseLastModified,
然后这三个方法都要通过resourceProperties来绑定配置项,
那么就去里面看有什么配置项,
然后看到里面的配置项是spring.web开头的,
然后看这个类配什么信息,
可以配locale国际化信息,第二个配resources,然后resource里面配置静态资源策略,然后resources里面可以配
1 | staticLocations 静态资源的路径 |
那么我们看了源码之后就会配置,然后我们想要配置cache,又可以点进去看源码,看cache里面需要配什么
1 | spring: |
上面就了解了默认规则如何了解以及配置了,下面开始自定义规则了
2、自定义静态资源规则
自定义静态资源路径,自定义缓存规则
有两种自定义静态资源的方式,以静态资源为例看源码,他绑定了两个一个是上面的webProperties,一个是webMvc
1、配置方式
所以说以后想要自定义规则一个就是改spring.web的跟上面一样,一个是修改spring.mvc的配置。
现在这里搞清楚,这两个能配哪些?
1 | #1spring.web |
小提示:
1 | spring.web.resources.static-locations=classpath:/a/,classpath:/b/,classpath:/static/ |
总结:
spring.mvc : 配置静态资源访问前缀路径
spring.web:配置
静态资源目录
静态资源缓存策略
2、代码方式
所有代码的方式,都应该写一个配置类,然后放到一个包下。
容器中只要有⼀个 WebMvcConfigurer 组件。配置的底层⾏为都会⽣效
@EnableWebMvc //禁⽤boot的默认配置
1 | //第一种写法利用实现,重写 |
3、路径匹配
Spring5.3 之后加⼊了更多的 请求路径匹配的实现策略;
以前只⽀持 AntPathMatcher 策略, 现在提供了 PathPatternParser 策略。并且可以让我们指定 到底使⽤那种策略。
1、Ant风格路径用法
Ant ⻛格的路径模式语法具有以下规则:
1 | *:表示任意数量的字符。 |
2、模式切换
AntPathMatcher 与 PathPatternParser
● PathPatternParser 在 jmh 基准测试下,有 6~8 倍吞吐量提升,降低 30%~40%空间分配 率
● PathPatternParser 兼容 AntPathMatcher语法,并⽀持更多类型的路径模式
● PathPatternParser “**” 多段匹配的⽀持仅允许在模式末尾使⽤
1 |
|
总结:
使⽤默认的路径匹配规则,是由 PathPatternParser 提供的
如果路径中间需要有 **,替换成ant⻛格路径
1 | # 改变路径匹配策略: |
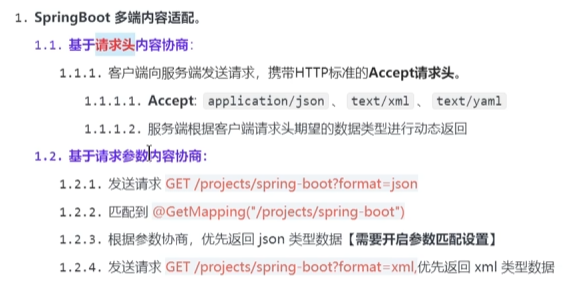
4、内容协商
一套系统适配多端数据返回
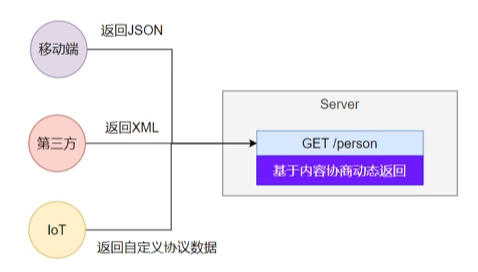
1、多端内容适配
1、默认规则
基于请求头的内容协商是默认开启的,基于请求参数的是默认关闭的
2、效果演示
请求同一个接口,可以返回json和xml不同格式数据
首先我们导入web的启动器里面默认引入了json包,然后默认是利用jackson包的功能
1 | <dependency> |
然后默认是返回json数据的,但是如果加上jackson的注解并且开启基于请求参数的内容协商就能实现内容协商的功能。
1 | // 可以写出为xml⽂档 |
3、开启基于请求参数的内容协商
1 | #开启基于请求参数的内容协商功能。默认参数名:format。默认此功能不开启 |
那如果后面还想返回Yml呢?那么我们就需要了解内容协商的底层原理
2、自定义内容返回
下面演示如何自定义组件了
1、增加Yaml返回支持
之前,我们看EnableWebMvcConfiguration里面写了支持的返回格式里面没有,那么我们如果要添加,就先看EnableWebMvcConfiguration,然后发现EnableWebMvcConfiguration继承了DelegatingWebMvcConfiguration,然后这个又继承了WebMvcConfigurationSupport(也就是最终继承的是这个),然后看了里面没有支持yml的,有xml所以之前导个包,然后配置一下就能支持了,但是这里底层没有支持yaml,所以我们需要自定义了。
首先导入依赖
1 | <dependency> |
把对象写出成YAML
1 | //测试类 |
现在能在测试类里进行转化,后面就是要进行配置,告知springboot,存在一种新格式叫yaml
编写配置
1 | #新增⼀种媒体类型 |
增加 HttpMessageConverter 组件,专⻔负责把对象写出为yaml格式
1 |
|
1 | public class MyYamlHttpMessageConverter extends AbstractHttpMessageConverter<Object>{ |
2、思考:如何增加其他
第一步:配置媒体类型的支持。
spring.mvc.contentnegotiation.media-types.yaml=text/yaml
第二步:编写对应的HttpMessageConverter。
按照上面的示例
第三步:把MessageConverter加入到底层。
容器中放一个webMvcConfigurer组件并配置底层的MessageConverter
3、内容协商原理-HttpMessageConverter
HttpMessageConverter怎么工作?何时工作?定制
HttpMessageConverter来实现多端内容协商编写
WebMvcConfigurer提供的configureMessageConverters底层,修改底层的HttpMessageConverter就行了。
实现上我们利用WebMvcConfigurer 提供的 configureMessageConverters ,然后自定义这个configureMessageConverters 就能修改底层的HttpMessageConverter 就行了。但是为什么?那么我们先了解@ResponseBody的原理
1、@ReeponseBody 由 HttpMessageConverter 处理
标注了
@ReeponseBody的返回值 将会由支持他的HttpMessageConverter写给浏览器
如果controller方法的返回值标注了@RespomseBody注解
流程:
1、请求进来,先到了 DispatcherServlet的 doDispatch()进行处理
2、找到一个 HandlerAdapter适配器
3、然后我们标注了GetMapping,然后匹配到了 RequestMappingHandlerAdapter 来执行,调用invokeHandlerMethod()方法来执行。
4、在目标方法执行之前,准备好两个东西
a. HandlerMethodArgumentResolver : 参数解析器,确定目标方法每个参数值
b. HandlerMethodReturnValueHandler : 返回值处理器,确定目标方法的反追只该怎么写出去。
5、RequestMappingHandlerAdapter 里面的invokeAndHandle(webReques,mavContainer) 真正执行目标方法
6、目标方法执行完成,会返回 返回值对象
7、找到一个合适的返回值处理器 HandlerMethodReturnValueHandler
8、最终找到 RequestResponseBodyMethodProcessor 能处理 标注了 @ResponseBody 注解的⽅法
9、RequestResponseBodyMethodProcessor调⽤ writeWithMessageConverters ,利用
MessageConverter 把返回值写出去
上面解释:
@ResponseBody由HttpMessageConverter处理,下面解释HttpMessageConverter如何处理的
2、HttpMessageConverter 会先进行内容协商
1、遍历所有的 MessageConverter 看谁支持这种内容类型的数据
2、默认的 MessageConverter 有很多Converter
3、 最终因为要 json 所以 MappingJackson2HttpMessageConverter ⽀持写出json
4、 jackson⽤ ObjectMapper 把对象写出去
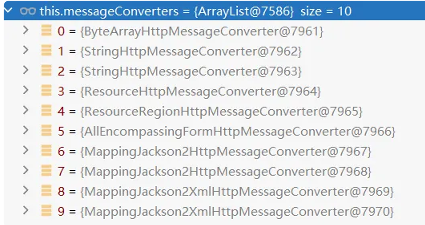
3、WebMvcAutoConfiguration 提供几种默认 HttpMessageConverters
1 | EnableWebMvcConfiguration 通过 addDefaultHttpMessageConverters 添加了默认的 MessageConverter,如下: |
系统提供默认的MessageConverter 功能有限,仅⽤于json或者普通返回数据。额外增加新的内容协商 功能,必须增加新的 HttpMessageConverter
那么就自然想到,导入相关的POM包然后编写配置,增加相应的Converter就可以了。
4、WebMvcConfigurationSupport
提供了很多的默认设置。
判断系统中是否有相应的类:如果有,就加入相应的HttpMessageConverter
5、模板引擎
由于 SpringBoot 使⽤了嵌⼊式 Servlet 容器。所以 JSP 默认是不能使⽤的。
如果需要服务端⻚⾯渲染,优先考虑使⽤ 模板引擎
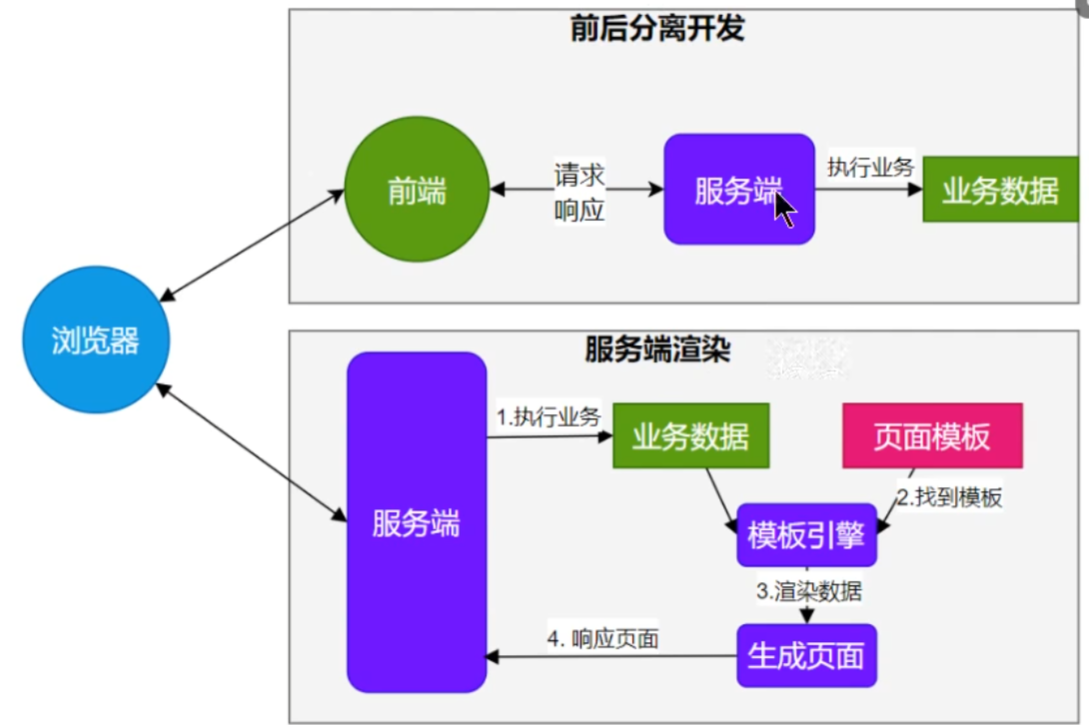
上面是前后端分离开发,下面是前后端不分离开发。
模板引擎⻚⾯默认放在 src/main/resources/templates
SpringBoot 包含以下模板引擎的⾃动配置
FreeMarker
Groovy
Thymeleaf
Mustache
1、Thymeleaf整合
1 | <dependency> |
⾃动配置原理
- 开启了
org.springframework.boot.autoconfigure.thymeleaf.ThymeleafAutoConfiguration⾃动配置 - 属性绑定在 ThymeleafProperties 中,对应配置⽂件 spring.thymeleaf 内容
- 所有的模板⻚⾯默认在 classpath:/templates ⽂件夹下
- 默认效果
- 所有的模板⻚⾯在 classpath:/templates/ 下⾯找
- 找后缀名为 .html 的⻚⾯
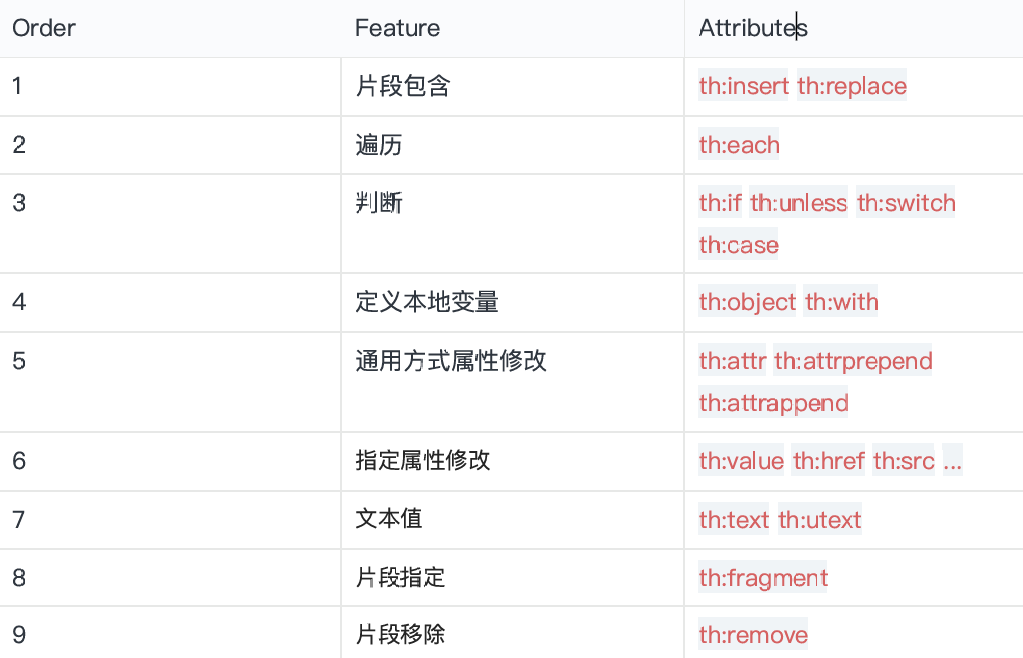
2、基础语法
1、核心用法
th:xxx :动态渲染制定的html标签属性值或者th指令(遍历、判断等)
1 | th:text 标签内文本值渲染 |
例如
1 | <p th:text="${content}">原内容</p> |
表达式:用来动态取值
1 | ${} 变量取值,使用model共享给页面的值都直接用${} |
系统工具&内置对象
1 | param :请求参数对象 |
2、语法示例
1 | 表达式: |
3、属性设置
1 | 1.th:href="@{/product/list}" |
案例:
1 | <p th:text="${content}">原内容</p> |
4、遍历
语 法: th:each=” 元素名 , 迭代状态 : ${ 集合 }”
1 | <tr th:each="prod : ${prods}"> |
1 | iterStat 有以下属性: |
5、判断
th:if
1 | <a |
th:switch
1 | <div th:switch="${user.role}"> |
6、属性优先级
片段》遍历》判断
1 | <ul> |
7、行内写法
[[...]] or [(...)]
1 | <p>Hello, [[${session.user.name}]]!</p> |
8、变量选择
1 | <div th:object="${session.user}"> |
等同于
1 | <div> |
9、模板布局
1 | 定义模板: th:fragment |
1 | <footer th:fragment="copy">© 2011 The Good Thymes Virtual Grocery</footer> |
10、devtools
1 | <dependency> |
修改⻚⾯后; ctrl+F9 刷新效果; java代码的修改,如果 devtools 热启动了,可能会引起⼀些bug,难以排查
6、国际化
国际化的⾃动配置参照 MessageSourceAutoConfiguration
实现步骤:
Spring Boot 在类路径根下查找 messages资源绑定⽂件。⽂件名为: messages.properties
多语⾔可以定义多个消息⽂件,命名为 messages_ 区域代码 .properties 。如:
a. messages.properties :默认
b. messages_zh_CN.properties :中⽂环境
c. messages_en_US.properties :英语环境
在程序中可以⾃动注⼊ MessageSource 组件,获取国际化的配置项值
- 在⻚⾯中可以使⽤表达式 #{} 获取国际化的配置项值
1 | //国际化取消息⽤的组件 |
通常是开发两套系统,不然就是配两套properties,一个中文一个英文然后分别绑定。
7、错误处理
1、默认机制
1 | 错误处理的⾃动配置都在 ErrorMvcAutoConfiguration 中, |
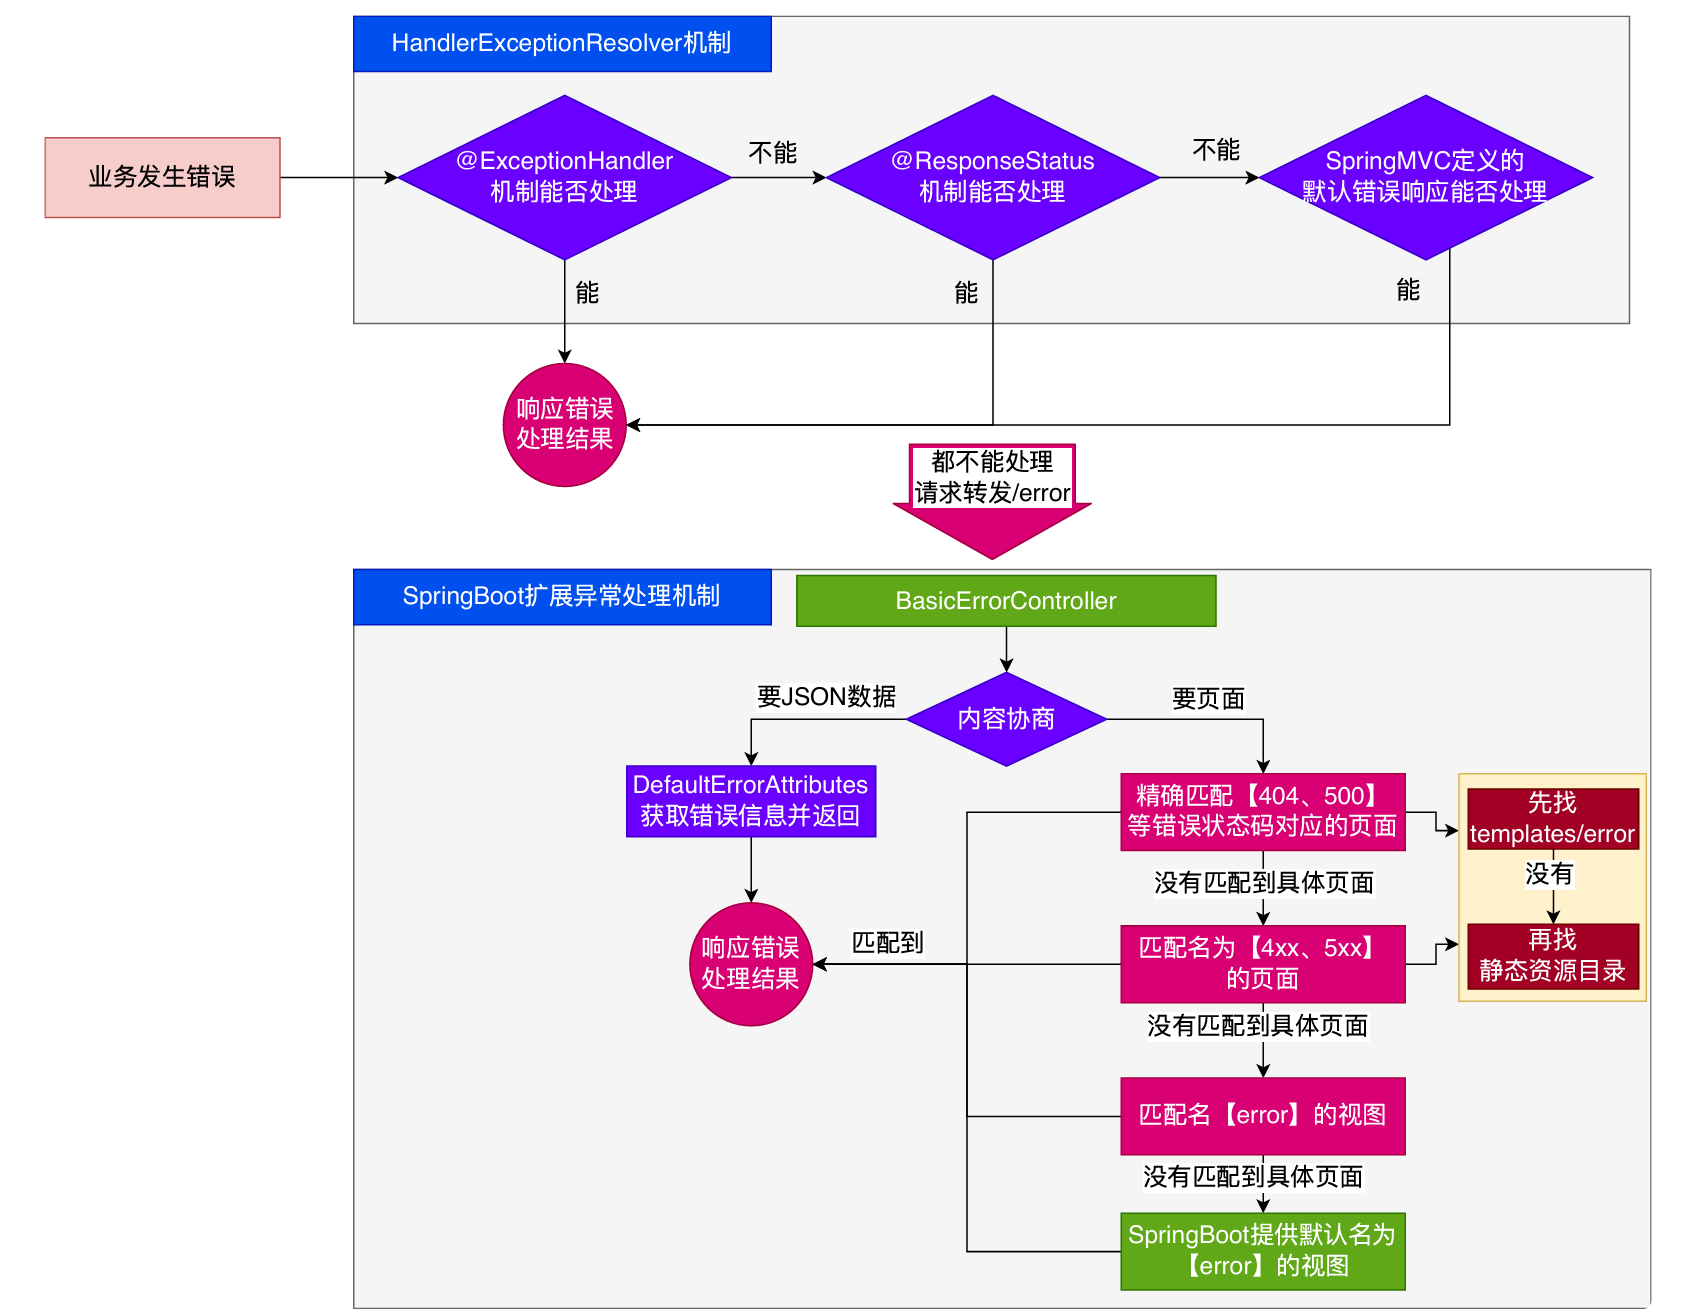
我们可以在配置文件里面配置错误路径,当发生错误以后,错误的请求转发的路径。
1 | server.error.path=/error |
发⽣错误以后,转发给/error路径,SpringBoot在底层写好⼀个 BasicErrorController的组件,专⻔ 处理这个请求
1 | //返回HTML |
如果要响应页面,错误页面是这么解析到的
1 | //1、解析错误的⾃定义视图地址 |
容器中专门有⼀个错误视图解析器
1 |
|
SpringBoot解析错误页的默认规则
1 |
|
容器中有一个默认的名为 error 的 View,提供了默认白页的功能
1 |
|
封装了JSON格式的错误信息
1 |
|
规则:
1、解析一个错误页
a. 如果发生了 500、404、503、403 这些错误
如果有模板引擎,默认在 classpath:/templates/error/精确码.html
如果没有模板引擎,在静态资源文件夹下找 精确码.html
b.如果匹配不到 精确码.html ,这些精确的错误页面,就去找5xx.html,4xx.html 模糊匹配
如果有模板引擎,默认在 classpath:/templates/error/5xx.html
如果没有模板引擎,在静态资源文件夹下找 5xx.html
2、如果模板引擎路径templates下有error.html页面,就直接渲染
2、自定义错误响应
1、自定义json响应
使 ⽤@ControllerAdvice + @ExceptionHandler 进⾏统⼀异常处理
2、自定义页面响应
根据boot的错误页面规则,自定义页面模板
3、最佳实战
- 前后分离
- 后台发生的所有错误,使 ⽤
@ControllerAdvice+@ExceptionHandler进⾏统⼀异常处理
- 后台发生的所有错误,使 ⽤
服务端页面渲染
不可预知的一些HTTP码错误,服务器或者客户端的错误
- 给
classpath:templates/error/下面,放一个精确的错误码页面,500.html,404.html - 给
classpath:templates/error/下面,放常用模糊匹配的错误码页面
- 给
发生业务错误
- 核心业务,每一种错误都应该代码控制,跳转到自己的错误页。
- 通用业务,利用通用错误页面,直接返回通用错误页面
页面、JSON,可用的Model数据如下

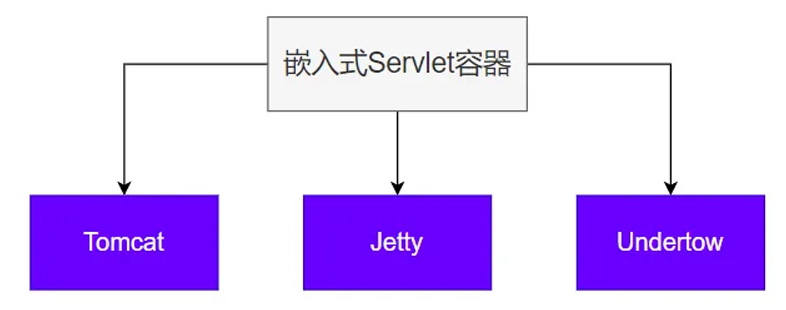
8、嵌入式容器
servlet容器,管理、运行Servlet组件(Servlet,Filter,Listerner)的环境,一般指服务器
1、自动配置原理
- SpringBoot 默认嵌⼊Tomcat作为Servlet容器。
- ⾃动配置类是 ServletWebServerFactoryAutoConfiguration , EmbeddedWebServer FactoryCustomizerAutoConfiguration
- ⾃动配置类开始分析功能。
xxxxAutoConfiguration
首先分析ServletWebServerFactoryAutoConfiguration
1 |
|
1、ServletWebServerFactoryAutoConfiguration自动配置了嵌入式容器场景
2、绑定了 ServerProperties配置类,所有和服务器有关的配置 server开头的配置里面。(server开始的都是嵌入式容器 服务器的配置)
3、ServletWebServerFactoryAutoConfiguration 导⼊了 嵌⼊式的三⼤服务器 tomcat、Jetty 、 Undertow
a. 导⼊ Tomcat 、 Jetty 、 Undertow 都有条件注解。系统中有这个类才⾏(也就是导了 包)
b. 默认 Tomcat 配置⽣效。给容器中放 TomcatServletWebServerFactory
c. 都给容器中 ServletWebServerFactory 放了⼀个 web服务器⼯⼚(造web服务器的)
d. web服务器⼯⼚ 都有⼀个功能, getWebServer 获取web服务器
e. TomcatServletWebServerFactory 创建了 tomcat。
ServletWebServerFactory什么时候会创建webServer出来。ServletWebServerApplicationContextioc容器,启动的时候会调⽤创建web服务器- Spring容器刷新(启动)的时候,会预留⼀个时机,刷新⼦容器。
refresh()容器刷新 (容器启动)会预留一个时机,容器刷新十二步刷新⼦容器会调⽤onRefresh()
总结:Web场景的Spring容器启动,在onRefresh的时候,会调用创建web服务器的方法。
web服务器的创建是通过webServerFactory搞定的。容器中会根据导了什么包,条件注解,启动相关的服务器配置,比如默认嵌入式的tomcat工厂,然后创建tomcat服务器。
2、自定义
案例
切 换服务器
1 | <properties> |
3、最佳实践
用法:
- 修改
server相关配置就可以修改服务器的参数 - 通过给容器中放一个
ServletWebServerFactory,来禁用掉SpringBoot默认放的服务器工厂,实现自定义嵌入任意服务器。
9、全面接管SpringMVC
SpringBoot 默认配置好了 SpringMVC 的所有常⽤特性。
如果我们需要全⾯接管SpringMVC的所有配置并禁⽤默认配置,仅需要编写⼀个 WebMvcConfigurer 配置类,并标注 @EnableWebMvc 即可
全⼿动模式
@EnableWebMvc : 禁⽤默认配置
WebMvcConfigurer 组件:定义MVC的底层⾏为
1、WebMvcAutoConfiguration 到底⾃动配置了哪些规则
SpringMVC ⾃动配置场景给我们配置了如下所有默认⾏为
1、WebMvcAutoConfiguration web场景的⾃动配置类
1.1. ⽀持RESTful的filter:HiddenHttpMethodFilter
1.2. ⽀持⾮POST请求,请求体携带数据:FormContentFilter
1.3. 导⼊ EnableWebMvcConfiguration :
1.3.1. RequestMappingHandlerAdapter
1.3.2. WelcomePageHandlerMapping :欢迎⻚功能⽀持(模板引擎⽬录、静态资源⽬录 放index.html),项⽬访问/ 就默认展示这个⻚⾯.
1.3.3. RequestMappingHandlerMapping :找每个请求由谁处理的映射关系
1.3.4. ExceptionHandlerExceptionResolver :默认的异常解析器
1.3.5. LocaleResolver :国际化解析器
1.3.6. ThemeResolver :主题解析器
1.3.7. FlashMapManager :临时数据共享
1.3.8. FormattingConversionService : 数据格式化 、类型转化
1.3.9. Validator : 数据校验 JSR303 提供的数据校验功能
1.3.10. WebBindingInitializer :请求参数的封装与绑定
1.3.11. ContentNegotiationManager :内容协商管理器
1.4. WebMvcAutoConfigurationAdapter 配置⽣效,它是⼀个 义mvc底层组件
1.4.1. 定义好 WebMvcConfigurer ,定 WebMvcConfigurer 底层组件默认功能;所有功能详⻅列表
1.4.2. 视图解析器: InternalResourceViewResolver
1.4.3. 视图解析器: BeanNameViewResolver ,视图名(controller⽅法的返回值字符串)就 是组件名
1.4.4. 内容协商解析器: ContentNegotiatingViewResolver
1.4.5. 请求上下⽂过滤器: RequestContextFilter : 任意位置直接获取当前请求
1.4.6. 静态资源链规则
1.4.7. ProblemDetailsExceptionHandler :错误详情
1.4.7.1. SpringMVC内部场景异常被它捕获:
1.5. 定义了MVC默认的底层⾏为: WebMvcConfigurer
| 配置方法 | 核心参数 | 功能描述 | Spring Boot 默认提供 |
|---|---|---|---|
| addFormatters | FormatterRegistry |
格式化器:支持属性上 @NumberFormat 和 @DateTimeFormat 的数据类型转换 |
GenericConversionService |
| getValidator | 无 | 数据校验:校验 @Controller 上使用 @Valid 标注的参数合法性 |
需要导入 starter-validation |
| addInterceptors | InterceptorRegistry |
拦截器:拦截收到的所有请求 | 无 |
| configureContentNegotiation | ContentNegotiationConfigurer |
内容协商:支持多种数据格式返回,需要配合支持这种类型的 HttpMessageConverter |
支持 JSON |
| configureMessageConverters | List<HttpMessageConverter<?>> |
消息转换器:标注 @ResponseBody 的返回值会利用 MessageConverter 直接写出去 |
8 个,支持 byte、string、multipart、resource、json |
| addViewControllers | ViewControllerRegistry |
视图映射:直接将请求路径与物理视图映射,用于无 Java 业务逻辑的直接视图页渲染 | 无 <mvc:view-controller> |
| configureViewResolvers | ViewResolverRegistry |
视图解析器:逻辑视图转为物理视图 | ViewResolverComposite |
| addResourceHandlers | ResourceHandlerRegistry |
静态资源处理:静态资源路径映射、缓存控制 | ResourceHandlerRegistry |
| configureDefaultServletHandling | DefaultServletHandlerConfigurer |
默认 Servlet:可以覆盖 Tomcat 的 DefaultServlet,让 DispatcherServlet 拦截 / |
无 |
| configurePathMatch | PathMatchConfigurer |
路径匹配:自定义 URL 路径匹配,可以自动为所有路径加上指定前缀,比如 /api |
无 |
| configureAsyncSupport | AsyncSupportConfigurer |
异步支持: | TaskExecutionAutoConfiguration |
| addCorsMappings | CorsRegistry |
跨域: | 无 |
| addArgumentResolvers | List<HandlerMethodArgumentResolver> |
参数解析器: | MVC 默认提供 |
| addReturnValueHandlers | List<HandlerMethodReturnValueHandler> |
返回值解析器: | MVC 默认提供 |
| configureHandlerExceptionResolvers | List<HandlerExceptionResolver> |
异常处理器: | 默认 3 个: 1. ExceptionHandlerExceptionResolver 2. ResponseStatusExceptionResolver 3. DefaultHandlerExceptionResolver |
| getMessageCodesResolver | 无 | 消息码解析器:国际化使用 | 无 |
数据处理类
| 功能 | 配置方法 | 默认实现 |
|---|---|---|
| 数据格式化 | addFormatters() |
GenericConversionService |
| 数据校验 | getValidator() |
需手动配置 |
| 消息转换 | configureMessageConverters() |
8 种转换器 |
| 内容协商 | configureContentNegotiation() |
JSON 支持 |
视图处理类
| 功能 | 配置方法 | 默认实现 |
|---|---|---|
| 视图映射 | addViewControllers() |
无 |
| 视图解析 | configureViewResolvers() |
ViewResolverComposite |
| 静态资源 | addResourceHandlers() |
ResourceHandlerRegistry |
请求处理类
| 功能 | 配置方法 | 默认实现 |
|---|---|---|
| 拦截器 | addInterceptors() |
无 |
| 参数解析 | addArgumentResolvers() |
MVC 默认 |
| 路径匹配 | configurePathMatch() |
无 |
| 跨域支持 | addCorsMappings() |
无 |
异常与国际化
| 功能 | 配置方法 | 默认实现 |
|---|---|---|
| 异常处理 | configureHandlerExceptionResolvers() |
3 个解析器 |
| 国际化 | getMessageCodesResolver() |
无 |
| 异步支持 | configureAsyncSupport() |
TaskExecutionAutoConfiguration** |
Servlet 处理
| 功能 | 配置方法 | 默认实现 |
|---|---|---|
| 默认 Servlet | configureDefaultServletHandling() |
无 |
| 返回值处理 | addReturnValueHandlers() |
MVC 默认 |
2、@EnableWebMvc 禁⽤默认⾏为
- @EnableWebMvc 给容器中导⼊ DelegatingWebMvcConfiguration 组件,他是 WebMvcConfigurationSupport
- WebMvcAutoConfiguration 有⼀个核⼼的条件注解, @ConditionalOnMissingBean(Web MvcConfigurationSupport.class) ,容器中没有 WebMvcConfigurationSupport , WebMvcAutoConfiguration 才⽣效.
- @EnableWebMvc 导⼊ WebMvcConfigurationSupport 导致 WebMvcAutoConfiguration 失效。导致禁⽤了默认⾏为
@EnableWebMVC 禁⽤了 Mvc的⾃动配置
WebMvcConfigurer 定义SpringMVC底层组件的功能类
10、最佳实战
所以用springboot进行web开发有
三种方式
| 全自动 | 直接编写控制器逻辑 | 全部使用自动配置默认效果 | |
|---|---|---|---|
| 手自一体 | @Configuration + 配置 WebMvcConfigurer + 配置WebMvcRegistrations | 不要标注@EnableWebMvc | 自动配置效果,手动设置部分功能,定义MVC底层组件 |
| 全手动 | @Configuration + 配置 WebMvcConfigurer | 标注@EnableWebMvc | 禁用自动配置效果,全手动设置 |
总结:给容器中写一个配置类 @Configuration 继承 WebMvcConfigurer 但是不要标注 @EnableWebMvc,实现手自一体的效果
两种模式
1、 前后分离模式 : @RestController 响应JSON数据
2、前后不分离模式 :@Controller + Thymeleaf模板引擎
11、Web新特性
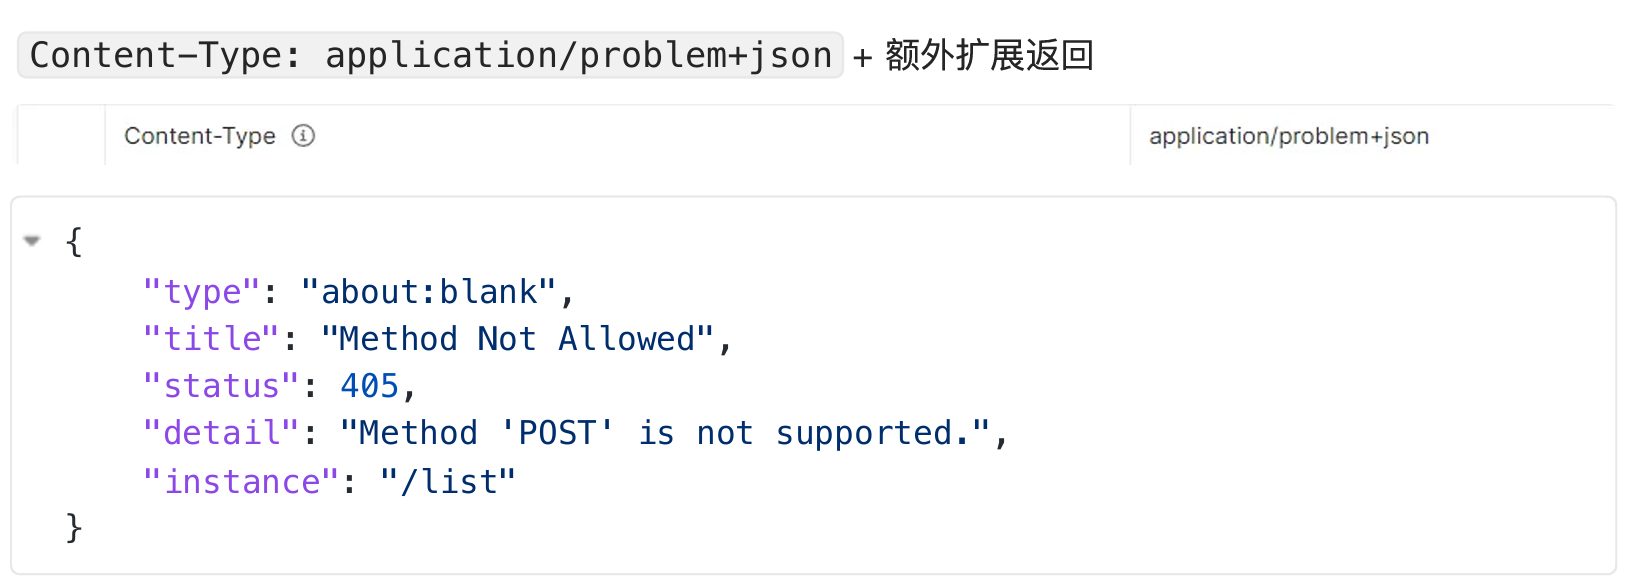
1、Problemdetails
错误信息返回新格式
原理:
1 |
|
- ProblemDetailsExceptionHandler 是⼀个 @ControllerAdvice 集中处理系统异常
- 处理以下异常。如果系统出现以下异常,会被SpringBoot⽀持以 RFC 7807 规范⽅式返回错误 数据
1 |
没开启的效果:默认响应错误的json。状态码405.
开启ProblemDetails返回, 使⽤新的MediaType Content-Type: application/problem+json + 额外扩展返回
2、函数式Web
用的不多,仅做了解。
SpringMVC 5.2 以后 允许我们使⽤函数式的⽅式,定义Web的请求处理流程。
函数式接⼝
Web请求处理的⽅式:
- @Controller + @RequestMapping :耦合式 (路由、业务耦合)
- 函数式Web:分离式(路由集中管理起来、和业务分离)
1、场景
场景:User RESTful - CRUD
GET /user/1 获取1号⽤户
GET /users 获取所有⽤户
POST /user 请求体携带JSON,新增⼀个⽤户
PUT /user/1 请求体携带JSON,修改1号⽤户
DELETE /user/1 删除1号⽤户
2、核心类
- RouterFunction
- RequestPredicate
- ServerRequest
- ServerResponse
3、示例
1 | import org.springframework.context.annotation.Bean; |
请求处理器
1 | import org.springframework.stereotype.Component; |
3、数据访问
整合SSM场景
SpringBoot 整合 Spring 、 SpringMVC 、 MyBatis 进⾏数据访问场景开发
1、创建SSM整合项目
1 | <dependency> |
2、配置数据源
1 | spring.datasource.url=jdbc:mysql://192.168.200.100:3306/demo |
安装MyBatisX 插件,帮我们⽣成Mapper接⼝的xml⽂件即可
3、配置MyBatis
1 | #指定mapper映射⽂件位置 |
4、CRUD编写
编写Bean
1 |
|
编写Mapper
1 | public interface UserMapper { |
使⽤ mybatisx 插件,
快速⽣成MapperXML
1 | <!--上面接口的全类名和namespace对应好--> |
但是现在SpringBoot还不知道我们的Mapper接口是让MyBatis来做代理对象进行增删改查的。
所以在主启动类里面使用注解
1 | //1、告诉MyBatis,扫描哪个接口 |
测试CRUD
5、自动配置原理
SSM整合总结:
导⼊ mybatis-spring-boot-starter
配置数据源信息
配置mybatis的 mapper 接⼝扫描 与 xml 映射⽂件扫描
编写bean,mapper,⽣成xml,编写sql 进⾏crud。事务等操作依然和Spring中⽤法⼀样
效果:
a. 所有sql写在xml中
b. 所有 mybatis 配置 写在 application.properties 下⾯
jdbc 场景的⾃动配置 :
mybatis-spring-boot-starter 导⼊ 数据库的场景 spring-boot-starter-jdbc ,jdbc是操作数据库的场景
Jdbc 场景的⼏个⾃动配置 :
1、org.springframework.boot.autoconfigure.jdbc.DataSourceAutoConfiguration
数据源的⾃动配置
所有和数据源有关的配置都绑定在 DataSourceProperties
默认使⽤ HikariDataSource
2、org.springframework.boot.autoconfigure.jdbc.JdbcTemplateAutoConfiguration
给容器中放了 JdbcTemplate 操作数据库
3、org.springframework.boot.autoconfigure.jdbc.JndiDataSourceAutoConfiguration
4、org.springframework.boot.autoconfigure.jdbc.XADataSourceAutoConfiguration
基于XA⼆阶提交协议的分布式事务数据源
5、org.springframework.boot.autoconfigure.jdbc.DataSourceTransactionManagerAutoConfiguration ⽀持事务
具有的底层能⼒:数据源、 JdbcTemplate 、事务
MyBatisAutoConfiguration :配置了MyBatis的整合流程
mybatis-spring-boot-starter 导⼊ mybatis-spring-boot-autoconfigure ( mybatis 的⾃动配置包)
默认加载两个⾃动配置类:
org.mybatis.spring.boot.autoconfigure.MybatisLanguageDriverAutoConfiguration
org.mybatis.spring.boot.autoconfigure.MybatisAutoConfiguration
必须在数据源配置好之后才配置
给容器中 SqlSessionFactory 组件。创建和数据库的⼀次会话
给容器中 SqlSessionTemplate 组件。操作数据库
MyBatis的所有配置绑定在 MybatisProperties
每个Mapper接⼝的代理对象是怎么创建放到容器中。详⻅@MapperScan原理:
利⽤ @Import(MapperScannerRegistrar.class) 批量给容器中注册组件。解析指 定的包路径⾥⾯的每⼀个类,为每⼀个Mapper接⼝类,创建Bean定义信息,注册到容器中。
这里Mapper的代理对象只是为了注入ioc,mybatis执行时根据mapperRegistry的mapper信息再基于原型模式和jdk动态代理每次都生成mapper的代理类
如何分析哪个场景导⼊以后,开启了哪些⾃动配置类。 找: classpath:/META-INF/spring/org.springframework.boot.autoconfigure. AutoConfiguration.imports ⽂件中配置的所有值,就是要开启的⾃动配置类,但是每个 类可能有条件注解,基于条件注解判断哪个⾃动配置类⽣效了。
6、快速定位生效的配置
1 | #开启调试模式,详细打印开启了哪些⾃动配置 |
7、整合其他数据源
1、Druid数据源
暂不⽀持 SpringBoot3
导⼊ druid-starter
写配置
分析⾃动配置了哪些东⻄,怎么⽤
1 | #数据源基本配置 |
4、基础特性
1、SpringApplication
1.1 自定义banner
启动时候的图标就是banner
1 | #类路径添加banner.txt或设置 |
定制banner网站: https://www.bootschool.net/ascii
1.2自定义SpringApplication
然后在主启动里面每次都是SpringApplication.run,现在我们要研究这个。
1 | //主程序类 |
1.3FluentBuilder API
1 | //主程序类 |
2、Profiles
环境隔离能力:快速切换开发、测试、生产环境
步骤:
1、标识环境,指定哪些组件、配置在那个环境生效
2、切换环境:这个环境对应的所有组件和配置就应该生效
2.1使用
2.1.1 指定环境
- Spring Profiles 提供一种 隔离配置 的方式,使其仅在 特定环境 生效
- 任何
@Component,@Configuration或者@ConfigurationProperties可以使用@Profile标记,来指定何时被加载 【容器中的组件都可以被@Profile标记】
1 | //1、标识环境 |
2.1.2 激活环境
1 | 2、激活环境 |
2.1.3 环境包含
注意:
spring.profiles.active 和 spring.profiles.default 只能⽤到 ⽆ profile 的⽂件中,如果在 application-dev.yaml中编写就是⽆效的
也可以额外添加⽣效⽂件,⽽不是激活替换。⽐如:
```properties
包含制定环境,不管你激活哪个环境,这个都要有,总是要生效的
spring.profiles.include[0]=common
spring.profiles.include[1]=local1
2
3
4
5
6
7
8
9
10
11
12
13
14
15
16
17
18
最佳实战:
⽣效的环境 = 激活的环境/默认环境 + 包含的环境
项⽬⾥⾯这么⽤
基础的配置 mybatis 、 log 、 xxx :写到包含环境中
需要动态切换变化的 db 、 redis :写到激活的环境中
##### 2.2Profile 分组
创建prod组,指定包含db和 mq配置
```text
spring.profiles.group.prod[0]=db
spring.profiles.group.prod[1]=mq
使⽤--spring.profiles.active=prod,就会激活 prod,db,mq配置⽂件
2.3 Profile配置文件
application-{profile}.properties 可以作为指定环境的配置⽂件。
激活这个环境,配置就会⽣效。最终⽣效的所有配置是
`application.properties ` :主配置⽂件,任意时候都⽣效
application-{profile}.properties :指定环境配置⽂件,激活指定环境⽣效
profile优先级 > application
3、外部化配置
场景:线上应⽤如何快速修改配置,并应⽤最新配置?
SpringBoot 使⽤ 配置优先级 + 外部配置 简化配置更新、简化运维。 只需要给 jar 应⽤所在的⽂件夹放⼀个 application.properties 最新配置⽂件,重 启项⽬就能⾃动应⽤最新配置
3.1 配置优先级
Spring Boot 允许将配置外部化,以便可以在不同的环境中使⽤相同的应⽤程序代码。
我们可以使⽤各种外部配置源,包括 Java Properties⽂件、 YAML⽂件、 环境变量 和 命令⾏参数。
@Value可以获取值,也可以⽤ @ConfigurationProperties将所有属性绑定到 java object中
以下是 SpringBoot 属性源加载顺序。 后⾯的会覆盖前⾯的值。由低到⾼,⾼优先级配置覆盖低 优先级
- 默认属性(通过
SpringApplication.setDefaultProperties指定的) @PropertySource指定加载的配置(需要写在@Configuration类上才可⽣效)- 配置⽂件(
application.properties/yml等) RandomValuePropertySource⽀持的random.*配置(如:@Value("${random.int}"))- OS 环境变量
- Java 系统属性(
System.getProperties()) - JNDI 属性(来⾃
java:comp/env) ServletContext初始化参数ServletConfig初始化参数SPRING_APPLICATION_JSON属性(内置在环境变量或系统属性中的 JSON)- 命令⾏参数
- 测试属性。(
@SpringBootTest进⾏测试时指定的属性) - 测试类
@TestPropertySource注解 - Devtools 设置的全局属性。
( $HOME/.config/spring-boot)
结论:配置可以写到很多位置,常⻅的优先级顺序:
命令⾏ > 配置⽂件 > springapplication 配置
配置⽂件优先级如下:(后⾯覆盖前⾯)
1、 jar 包内的 application.properties/yml
2、jar 包内的 application-{profile}.properties/yml
3、jar 包外的 application.properties/yml
4、 jar 包外的 application-{profile}.properties/yml
如果 建议:⽤⼀种格式的配置⽂件。 .properties 和 结 .yml 同时存在 , 则 .properties 优先
结论: 包外 > 包内 ; 同级情况: profile 配置 > application 配置
所有参数均可由命令⾏传⼊,使⽤ --参数项 = 参数值 ,将会被添加到环境变量中,并优先于 置⽂件 。 ⽐如 java -jar app.jar --name="Spring" ,可以使⽤ server.port=8000 @Value("${name}")获取
演示场景:
包内: application.properties server.port=8000
包内: application-dev.properties server.port=9000
包外: application.properties server.port=8001
包外: application-dev.properties server.port=9001
启动端⼝?:命令⾏ > 9001 > 8001 > 9000 > 8000
3.2 外部配置
SpringBoot 应⽤启动时会⾃动寻找 application.properties和 application.yaml位置,进⾏加载。
顺序如下:(后⾯覆盖前⾯)
- 类路径: 内部
a. 类根路径
b. 类下 /config包
当前路径(项⽬所在的位置)
a. 当前路径
b. 当前下 /config⼦⽬录
c. /config⽬录的直接⼦⽬录
最终效果:优先级由⾼到低,前⾯覆盖后⾯
命令⾏ > 包外config直接⼦⽬录 > 包外config⽬录 > 包外根⽬录 > 包内⽬录
同级⽐较:
profile配置 > 默认配置
properties配置 > yaml配置
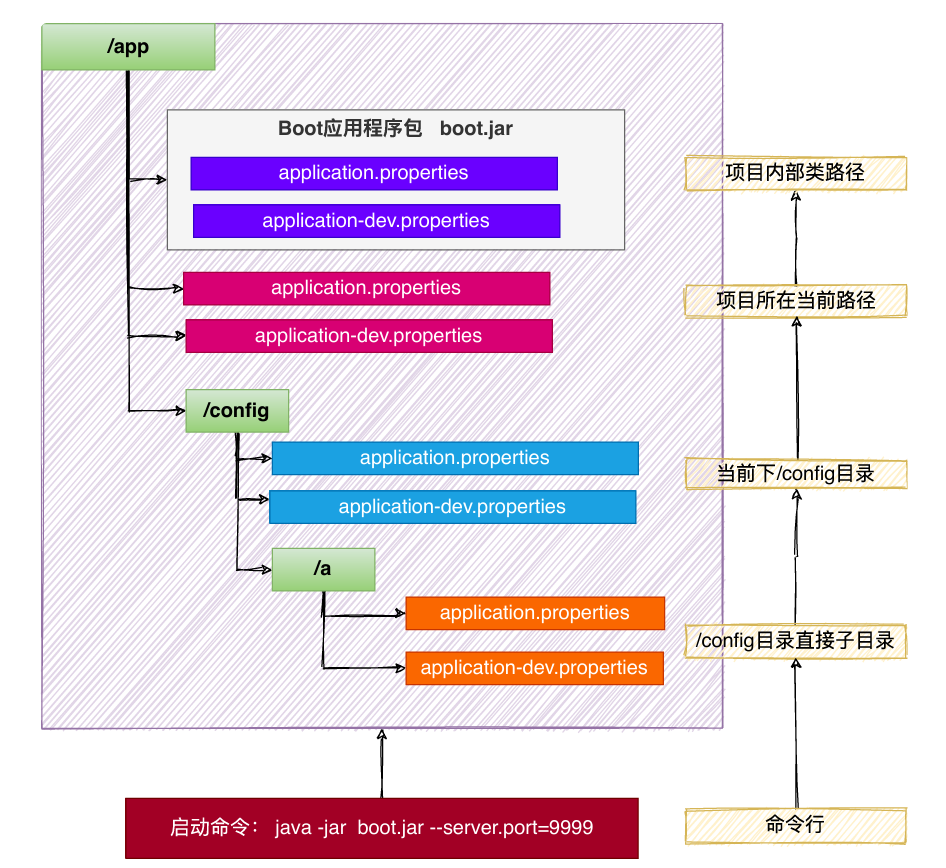
规律:最外层的最优先。
命令⾏ > 所有 包外 > 包内 config⽬录 > 根⽬录 profile > application
配置不同就都⽣效(互补),配置相同⾼优先级覆盖低优先级
3.3 导入配置
使⽤ spring.config.import可以导⼊额外配置
1 | spring.config.import=my.properties |
⽆论以上写法的先后顺序, my.properties的值总是优先于直接在⽂件中编写的
3.4 属性占位符
配置⽂件中可以使⽤ ${name:default}形式取出之前配置过的值。
1 | app.name=MyApp |
4、单元测试-JUnit5
4.1 整合
SpringBoot 提供⼀系列测试⼯具集及注解⽅便我们进⾏测试。 spring-boot-test提供核⼼测试能⼒, 置。 我们只需要导⼊ spring-boot-test-autoconfigure 提供测试的⼀些⾃动配 spring-boot-starter-test即可整合测试
1 | <dependency> |
spring-boot-starter-test 默认提供了以下库供我们测试使⽤
1 | JUnit 5 |
4.2 测试
4.2.0 组件测试
直接 @Autowired 容器中的组件进行测试
4.2.1 注解
Junit5的注解和Junit4的注解有所变化
https://junit.org/junit5/docs/current/user-guide/#writing-tests-annotations
1 | @Test :表示⽅法是测试⽅法。但是与JUnit4的@Test不同,他的职责⾮常单⼀不能声明任何属性,拓展的测试将会由Jupiter提供额外测试 |
4.2.2 断言
| 断言方法 | 作用说明 |
|---|---|
assertEquals(expected, actual) |
判断两个对象或原始类型是否相等(调用 equals() 方法进行比较) |
assertNotEquals(expected, actual) |
判断两个对象或原始类型是否不相等 |
assertSame(expected, actual) |
判断两个对象引用是否指向同一个对象(使用 == 比较引用) |
assertNotSame(expected, actual) |
判断两个对象引用是否指向不同的对象 |
assertTrue(condition) |
判断给定的布尔表达式是否为 true |
assertFalse(condition) |
判断给定的布尔表达式是否为 false |
assertNull(object) |
判断给定的对象引用是否为 null |
assertNotNull(object) |
判断给定的对象引用是否不为 null |
assertArrayEquals(expectedArray, actualArray) |
判断两个数组是否内容相等(逐元素比较) |
assertAll(() -> {...}, () -> {...}, ...) |
组合多个断言,即使其中某个失败,其余也会继续执行(常用于一次性验证多个条件) |
assertThrows(expectedExceptionClass, executable) |
验证执行某段代码时是否抛出指定类型的异常 |
assertTimeout(Duration, executable) |
验证某段代码是否在指定时间内完成执行,超时则测试失败 |
fail(message) |
强制使测试失败,通常用于验证“本不该执行到此处”的逻辑 |
4.2.3 嵌套测试
JUnit 5 可以通过 Java 中的内部类和@Nested 注解实现嵌套测试,从⽽可以更好的把相关的测 试⽅法组织在⼀起。在内部类中可以使⽤@BeforeEach 和@AfterEach 注解,⽽且嵌套的层次 没有限制。
1 | import org.junit.jupiter.api.*; |
4.2.4 参数化测试
参数化测试是JUnit5很重要的⼀个新特性,它使得⽤不同的参数多次运⾏测试成为了可能,也为 我们的单元测试带来许多便利。
利⽤@ValueSource等注解,指定⼊参,我们将可以使⽤不同的参数进⾏多次单元测试,⽽不需要 每新增⼀个参数就新增⼀个单元测试,省去了很多冗余代码。
@ValueSource: 为参数化测试指定⼊参来源,⽀持⼋⼤基础类以及String类型,Class类型 @NullSource: 表示为参数化测试提供⼀个null的⼊参
@EnumSource: 表示为参数化测试提供⼀个枚举⼊参
@CsvFileSource:表示读取指定CSV⽂件内容作为参数化测试⼊参
@MethodSource:表示读取指定⽅法的返回值作为参数化测试⼊参(注意⽅法返回需要是⼀个流)
1 |
|
5、核心原理
有助于理解SpringBoot的底层行为
1、事件和监听器
1、生命周期监听
场景:监听应用的 生命周期
1、监听器-SpringApplicationRunListener
⾃定义
SpringApplicationRunListener来监听事件;1.1. 编写
SpringApplicationRunListener实现类1.2. 在
META-INF/spring.factories中配置org.springframework.boot.Spri ngApplicationRunListener= ⾃⼰的 Listener,还可以指定⼀个有参构造器,接 受两个参数(SpringApplication application, String[] args)1.3. springboot 在 spring-boot.jar 中配置了默认的 Listener,如下
现在我们来自定义Listener来模拟框架做的事情,从而弄清楚框架做了什么
1
2
3
4
5
6
7
8
9
10
11
12
13
14
15
16
17
18
19
20
21
22
23
24
25
26
27
28
29
30
31
32
33
34
35
36
37
38
39
40
41
42
43
44
45
46
47
48
49
50
51/**
* 自定义 SpringApplicationRunListener,用于监听 Spring Boot 启动各阶段
*
* 必须提供带 SpringApplication 和 String[] 参数的构造函数(Spring Boot 反射调用)
*/
public class MySpringApplicationRunListener implements SpringApplicationRunListener {
private final SpringApplication application;
private final String[] args;
// ⚠️ 必须提供此构造函数!Spring Boot 通过反射调用
public MySpringApplicationRunListener(SpringApplication application, String[] args) {
this.application = application;
this.args = args;
}
public void starting() {
System.out.println("【引导阶段】starting: 应用开始启动,BootstrapContext 已创建");
}
public void environmentPrepared(ConfigurableEnvironment environment) {
System.out.println("【引导阶段】environmentPrepared: 环境已准备完成(配置已加载),但 IOC 容器尚未创建");
}
public void contextPrepared(ConfigurableApplicationContext context) {
System.out.println("【启动阶段】contextPrepared: IOC 容器已创建,主配置类尚未加载,引导上下文即将关闭");
}
public void contextLoaded(ConfigurableApplicationContext context) {
System.out.println("【启动阶段】contextLoaded: 主配置类已加载,但容器尚未刷新(Bean 还没创建)");
}
public void started(ConfigurableApplicationContext context) {
System.out.println("【启动阶段】started: 容器已刷新(所有 Bean 已创建),但 Runner 尚未执行");
}
public void ready(ConfigurableApplicationContext context) {
System.out.println("【启动阶段】ready: 所有 Runner 已执行完毕,应用完全就绪,开始运行!");
}
public void failed(ConfigurableApplicationContext context, Throwable exception) {
System.out.println("【异常】启动失败: " + (exception != null ? exception.getMessage() : "未知错误"));
}
}现在我们编写好了实现类,然后就要根据他的1.2步骤的要求进行配置了
src/main/resources/META-INF/spring.factories1
2
3# META-INF/spring.factories
org.springframework.boot.SpringApplicationRunListener=\
com.example.listener.MySpringApplicationRunListener然后启动应用看看打印顺序,就知道流程了。
1
2
3
4
5
6
7
8
9
10
11
12Listener先要从META-INF/spring.factories 读到找到所有注册的 SpringApplicationRunListener 实现类,并在启动早期就实例化它们,用于监听后续生命周期事件。
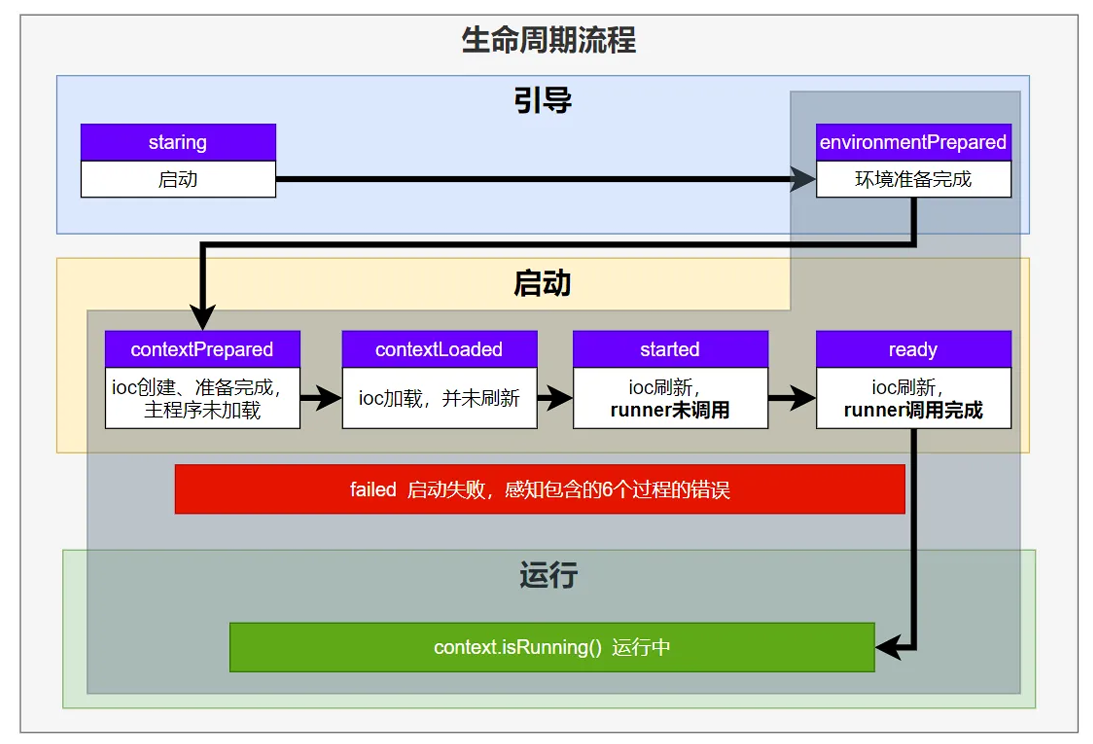
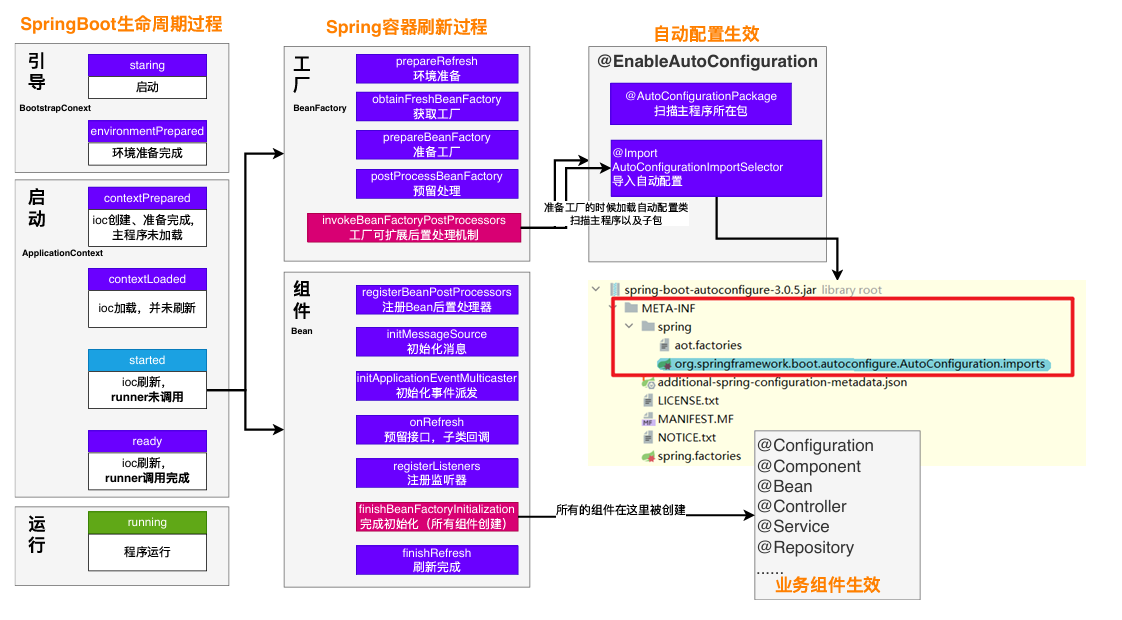
1、引导:利⽤BootstrapContext 引导整个项⽬启
starting:应⽤开始,SpringApplication的run⽅法⼀调⽤,只要有了BootstrapContext 就执⾏
environmentPrepared:环境准备好(把启动参数等绑定到环境变量中),但是ioc还没有创建;【调⼀次】
2、启动:
contextPrepared:ioc容器创建并准备好,但是sources(主配置类)没加载。并关闭引导上下⽂;组件都没创建【调⼀次】
contextLoaded:ioc容器加载。主配置类加载进去了。但是ioc容器还没刷新(我们的bean没创建)。
截⽌以前,ioc容器⾥⾯还没造bean呢
started:ioc容器刷新了(所有bean造好了),但是runner 没调⽤。
ready: ioc容器刷新了(所有bean造好了),所有 runner 调⽤完了。
3、运⾏
以前步骤都正确执⾏,代表容器running看这个流程,还会有很多疑问runner是什么?加载是什么意思?
1
这里的“加载”指的是:将你的 @Configuration 类、@Component 类等 Spring Bean 定义(BeanDefinition)注册到 IOC 容器中,但此时 Bean 尚未被实例化(即没调用构造函数或 @PostConstruct)。

2、事件触发时机
1、各种回调监听器
BootstrapRegistryInitializer : 感知特定阶段:感知引导初始化 ,这个是启动之前
META-INF/spring.factories
创建引导上下⽂ bootstrapContext 的时候触发。
application. addBootstrapRegistryInitializer ();
场景: 进⾏密钥校对授权。
ApplicationContextInitializer: 感知特定阶段: 感知ioc容器初始化 ,这个阶段就是环境准备完成之后
META-INF/spring.factories
application.addInitializers();
ApplicationListener: 感知全阶段:基于事件机制,感知事件。.AOP。环绕通知这些。⼀旦到了哪个阶段可以做别的事
@Bean 或 @EventListener : 事件驱动
`SpringApplication.addListeners(…)` 或 `SpringApplicationBuilder.listeners(…) `
`META-INF/spring.factories `
类似粉丝,只能知道干嘛
SpringApplicationRunListener: 感知全阶段⽣命周期 + 各种阶段都能⾃定义操作; 功能更完善
`META-INF/spring.factories`
类似经理,能全部管理
ApplicationRunner: 感知特定阶段:感知应⽤就绪Ready。卡死应⽤,就不会就绪
@Bean
CommandLineRunner: 感知特定阶段:感知应⽤就绪Ready。卡死应⽤,就不会就绪
@Bean
最佳实战:
如果项⽬启动前做事: BootstrapRegistryInitializer 和 ApplicationContextInitializer
如果想要在项⽬启动完成后做事: ApplicationRunner 和 CommandLineRunner
如果要⼲涉⽣命周期做事: SpringApplicationRunListener
如果想要⽤事件机制: ApplicationListener
2、完整触发流程
springboot启动的期间也会启动事件,刚刚我们理解了启动流程,现在了解启动期间发生的事件。
9 ⼤事件 触发顺序&时机
1、ApplicationStartingEvent:应用启动但没有做任何事情,除了注册 listeners and intializers
2、ApplicationEnvironmentPreparedEvent : Environment准备好,但context未创建。
3、ApplicationContextInitializedEvent: ApplicationContext 准备好, ApplicationContextInitializers 调⽤,但是任何bean未加载
4、ApplicationPreparedEvent : 容器刷新之前,bean定义信息加载
5、ApplicationStartedEvent : 容器刷新完成, runner未调⽤
以下就开始插⼊了探针机制
6、AvailabilityChangeEvent : LivenessState.CORRECT 应⽤存活; 存活探针
7、ApplicationReadyEvent : 任何runner被调⽤
8、AvailabilityChangeEvent :ReadinessState.ACCEPTING_TRAFFIC 就绪探针,可以接请求
9、ApplicationFailedEvent :启动出错
这个存活探针和就绪探针对应k8s云平台,这样就知道应用什么时候可以用了
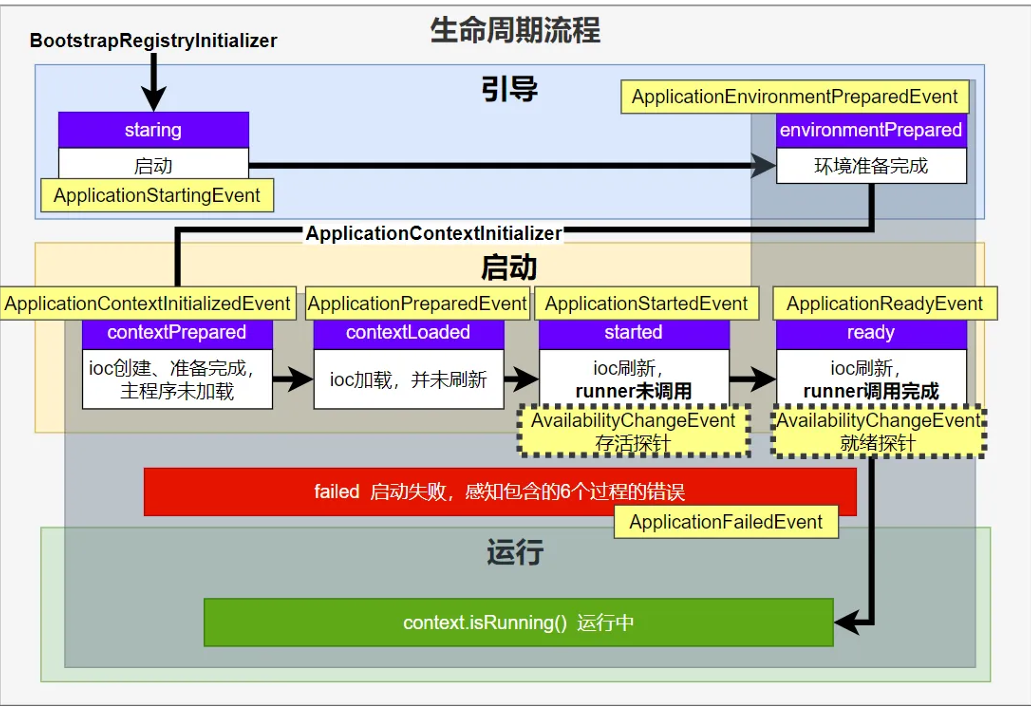
应⽤事件发送顺序如下:
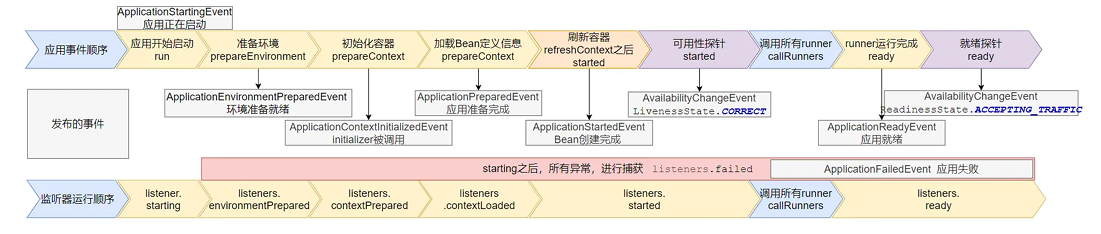
感知应⽤是否存活了:可能植物状态,虽然活着但是不能处理请求。
应⽤是否就绪了:能响应请求,说明确实活的⽐较好。
小总结:就是springtboot启动时会调用几个函数和发布几个事件,触发点就是启动、准备环境后、ioc初始化、主配置类加载、ioc刷新、runner执行之后。
3、SpringBoot事件驱动开发
上面了解了启动流程和流程中的事件,然后有的事件是基于事件驱动开发,那么我们要知道如何基于事件驱动开发的了。
应用启动过程生命周期事件感知(9大事件)、应用运行中事件感知。
- 事件发布:
ApplicationEventPublisherAware或注⼊: ApplicationEventMulticaster - 事件监听:
组件 + @EventListener
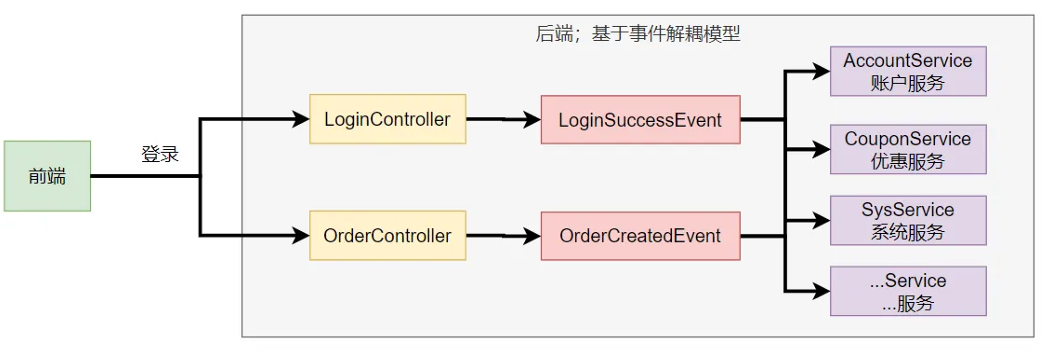
如果不是事件驱动,我们假设登录的时候需要一堆业务,比如用户登录之后,需要自动签到,随机发放优惠卷等等,然后写@Autowired注入其他的服务然后在登录业务里面一个个调用。
但是如果这种编码方式,如果要增加业务会非常麻烦。
设计模式:对新增开放,对修改关闭。
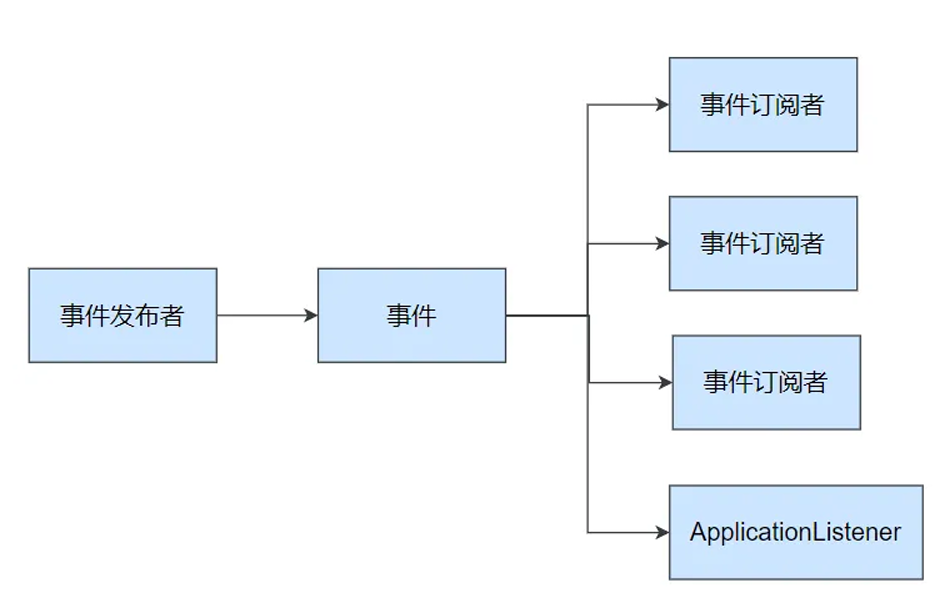
事件发布者
1 | /** |
事件订阅者
1 |
|
整个案例如下:事件是广播形式的
1 | //实体类:UserEntity.java |
2、自动配置原理
1、入门理解
应 ⽤关注的三⼤核⼼:场景、配置、组件
1、自动配置流程

导⼊ starter
依赖导⼊ autoconfigure
寻找类路径下 META-INF/spring/org.springframework.boot.autoconfigure.AutoConfiguration.imports ⽂件
启动,加载所有 ⾃动配置类 xxxAutoConfiguration
a. 给容器中配置功能 组件
b. 组件参数 绑定到 属性类 中。
c. 属 性类 和 xxxProperties 配置⽂件 前缀项绑定
d. @Contional 派⽣的条件注解 进⾏判断是否组件⽣效
效果:
a. 修改配置⽂件,修改底层参数
b. 所有场景⾃动配置好直接使⽤
c. 可以注⼊SpringBoot配置好的组件随时使⽤
2、SPI机制
上面这种都是SPI思想。
Java中的SPI(Service Provider Interface)是⼀种软件设计模式,⽤于在应⽤程序中动态地发现 和加载组件。SPI的思想是,定义⼀个接⼝或抽象类,然后通过在classpath中定义实现该接⼝的类 来实现对组件的动态发现和加载。
SPI的主要⽬的是解决在应⽤程序中使⽤可插拔组件的问题。例如,⼀个应⽤程序可能需要使⽤不 同的⽇志框架或数据库连接池,但是这些组件的选择可能取决于运⾏时的条件。通过使⽤SPI,应 ⽤程序可以在运⾏时发现并加载适当的组件,⽽⽆需在代码中硬编码这些组件的实现类。
在Java中,SPI的实现⽅式是通过在 META-INF/services ⽬录下创建⼀个以服务接⼝全限定名 为名字的⽂件,⽂件中包含实现该服务接⼝的类的全限定名。当应⽤程序启动时,Java的SPI机制 会⾃动扫描classpath中的这些⽂件,并根据⽂件中指定的类名来加载实现类。
通过使⽤SPI,应⽤程序可以实现更灵活、可扩展的架构,同时也可以避免硬编码依赖关系和增加 代码的可维护性。
1 | //步骤 1:定义接口(或抽象类) |
ServiceLoader工作原理
1 | ServiceLoader.load(Robot.class) 的内部流程: |
| 功能 | Java 原生 SPI | Spring Bean 机制 |
|---|---|---|
| 自动发现 | META-INF/services/ |
@ComponentScan |
| 依赖注入 | ❌ 不支持 | ✅ 支持 |
| 条件加载 | ❌ 不支持 | ✅ @Conditional |
| 命名访问 | ❌ 只能遍历 | ✅ @Qualifier, @Primary |
| 生命周期管理 | ❌ 无 | ✅ InitializingBean, DisposableBean |
✅ Spring 本质上是一种更强大的“SPI 实现”。
3、功能开关
⾃动配置:全部都配置好,什么都不⽤管。 ⾃动批量导⼊
项⽬⼀启动,spi⽂件中指定的所有都加载。
@EnableXxxx :⼿动控制哪些功能的开启; ⼿动导⼊。
开启xxx功能
都是利⽤ @Import 把此功能要⽤的组件导⼊进去
2、进阶理解
1、@SpringBootApplication
1 |
|
@SpringBootConfiguration 就是: @Configuration ,容器中的组件,配置类。spring ioc启动就会加载创建这个类对象
@EnableAutoConfiguration:开启⾃动配置
@AutoConfigurationPackage:扫描主程序包:加载⾃⼰的组件
利⽤ @Import(AutoConfigurationPackages.Registrar.class) 想要给容器中导⼊组件。
把主程序所在的包的所有组件导⼊进来。
为什么SpringBoot默认只扫描主程序所在的包及其⼦包?
@Import(AutoConfigurationImportSelector.class):加载所有⾃动配置类:加载starter导⼊的组件
1 | //他的代码是这样写的 |
扫描SPI⽂件: META-INF/spring/org.springframework.boot.autoconfigure.AutoConf iguration.imports
@ComponentScan
组件扫描:排除⼀些组件(哪些不要) ,注意这里也会扫描注册,只是添加了排除路径而已
无脑注册,它不会看 @ConditionalOnMissingBean 等条件
排除前⾯已经扫描进来的 配置类 、和 ⾃动配置类 。因为一个是自己的组件一个是starter的,那么如果自己的组件里面也写了个starter那么就重复注册了两次,而自动配置必须在所有用户 Bean 加载完后,根据条件判断。如果提前把类加载了,自动配置的逻辑就全乱了。
1 |
2、完整启动加载流程
第一阶段:初始化 SpringApplication 实例
当你调用 SpringApplication.run(Main.class, args) 时,后台首先会通过构造函数创建一个 SpringApplication 对象。
- 推断应用类型:判断当前应用是普通项目(None)、Web 项目(Servlet)还是响应式项目(Reactive)。
- 加载初始化器 (Initializers):从 META-INF/spring.factories(或 Spring 3.0+ 的新位置)中读取所有 ApplicationContextInitializer 的实现类。
- 加载监听器 (Listeners):同样从配置文件中读取所有 ApplicationListener。
- 推断主启动类:通过线程栈找到包含 main 方法的那个类,方便后续包扫描。
第二阶段:执行 run() 方法(核心流程)
这是 Spring Boot 启动的最核心部分,包含了环境准备、容器创建和 Bean 注入。
- 开启计时与监听
- 启动 StopWatch:记录启动耗时。
- 获取并启动监听器:从 spring.factories 获取 SpringApplicationRunListeners,并发布“正在启动”的事件(starting)。
- 准备环境 (Environment)
- 封装命令行参数:将 args 封装进 DefaultApplicationArguments。
- 创建并配置 Environment:读取 application.properties/yml 以及环境变量。
- 发布环境准备就绪事件:通知监听器环境已 OK。
- 创建应用上下文 (ApplicationContext)
- 根据第一阶段推断的类型,通过反射创建具体的容器:
- Servlet 应用:AnnotationConfigServletWebServerApplicationContext
- Reactive 应用:AnnotationConfigReactiveWebServerApplicationContext
- 容器预处理 (prepareContext)
- 关联环境:将 Environment 注入容器。
- 应用初始化器:执行之前加载的 Initializers。
- 加载资源:将主启动类(Main Class)注册为 Bean 定义(BeanDefinition),这是后续自动配置的入口。
- 发布上下文准备就绪事件。
- 刷新容器 (refreshContext) —— 最重要的步骤
这一步调用的是 Spring 核心框架的 refresh() 方法,它是 Bean 生命周期的核心:
- 解析配置类:ConfigurationClassPostProcessor 开始工作,解析 @SpringBootApplication,扫描包,解析 @Import。
- 自动配置 (Auto-Configuration):根据 Condition 条件决定哪些配置生效。
- 实例化 Bean:创建所有的单例 Bean(Service, Controller 等)。
- 启动内嵌服务器:如果是 Web 项目,在 onRefresh 阶段会创建并启动 Tomcat/Jetty。
- 容器刷新后处理 (afterRefresh)
- 停止 StopWatch 计时。
- 打印启动成功的日志。
- 发布应用已启动事件。
- 执行 Runner (Call Runners)
- 查找并依次执行实现了 CommandLineRunner 或 ApplicationRunner 接口的类。这通常用于在项目启动后立即执行某些初始化逻辑(如预热缓存)。
3、自定义starter
为什么需要自定义starter
场景:抽取聊天机器⼈场景,它可以打招呼。
效果:任何项⽬导⼊此 starter 都具有打招呼功能,并且问候语中的⼈名需要可以在配置⽂件中修 改
- 创建 ⾃定义 starter 项⽬,引⼊ spring-boot-starter 基础依赖
- 编写模块功能,引⼊模块所有需要的依赖。
- 编写 xxxAutoConfiguration ⾃动配置类,帮其他项⽬导⼊这个模块需要的所有组件
- 编写配置⽂件 META-INF/spring/org.springframework.boot.autoconfigure. AutoConfiguration.imports 指定启动需要加载的⾃动配置
- 其他项⽬引⼊即可使⽤
1、业务代码
1 | //此属性类和配置⽂件指定前缀绑定 |
2、基本抽取
创建starter项⽬,把公共代码需要的所有依赖导⼊
把公共代码复制进来
⾃⼰写⼀个
RobotAutoConfiguration ,给容器中导⼊这个场景需要的所有组件
为什么这些组件默认不会扫描进去?
starter所在的包和 引⼊它的项⽬的主程序所在的包不是⽗⼦层级
别⼈引⽤这个 starter ,直接导⼊这个 RobotAutoConfiguration ,就能把这个场景的组件导⼊进来
功能⽣效
测试编写配置⽂件
3、使用@EnableXxx机制
1 |
|
别⼈引⼊ starter 需要使⽤ @EnableRobot 开启功能
4、完全自动配置
依赖SpringBoot的SPI机制 Java
META-INF/spring/org.springframework.boot.autoconfigure.AutoConfiguration.imports ⽂件中编写好我们⾃动配置类的全类名即可
项⽬启动,⾃动加载我们的⾃动配置类
完整案例
1 | hello-spring-boot-starter/ |
1 | //第一步:创建 Starter 项目(Maven) |
SpringBoot3场景整合
环境准备
0 云服务器
服务器开通,然后安装以下组件
- docker
- redis
- kafka
- prometheus
- grafana
开通阿里云服务器为例
(12 封私信 / 2 条消息) 2026年阿里云免费云服务器及学生云服务器申请图文教程 - 知乎
创建完之后利用MobaXterm连上linux主机。公网IP,然后端口号22(SSH 服务默认监听的端口),用户root
公网想要访问端口号需要设置安全组
1 docker安装
1 | # 1. 安装 yum-utils 工具集(提供 yum-config-manager 命令,用于添加软件仓库配置) |
创建 /prod 文件夹 ,准备以下文件
2 prometheus.yml
1 | # Prometheus 全局配置 |
3 docker-compose.yml
1 | # Docker Compose 配置版本(3.9 兼容大部分 Docker 版本,稳定性强) |
4 启动环境
如果失败配置镜像加速
1 | docker compose -f docker-compose.yml up -d |
5 验证
- redis: 你的ip:6379
- 填写表单,下载可视化工具
- redisinsight
pom导入
1 | <dependency> |
配置yaml
1 | spring.application.name=boot3-09-redis |
编写业务
编写controller
1 |
|
主启动
测试成功。
Redis整合
Redis自动配置原理
META-INF/spring/org.springframework.boot.autoconfigure.AutoConfiguration.imports中 导⼊了RedisAutoConfiguration、RedisReactiveAutoConfiguration和RedisRepositoriesAutoConfiguration。所有属性绑定在RedisProperties中RedisReactiveAutoConfiguration属于响应式编程,不⽤管。RedisRepositoriesAutoConfiguration属于 JPA 操作,也不⽤管RedisAutoConfiguration配置了以下组件LettuceConnectionConfiguration: 给容器中注⼊了连接⼯⼚LettuceConnectionFactory,和操作 redis 的客户端DefaultClientResources。RedisTemplate: 可给 redis 中存储任意对象,会使⽤ jdk 默 认序列化⽅式。StringRedisTemplate: 给 redis 中存储字符串,如果要存对象,需要开发⼈员⾃ ⼰进⾏序列化。key-value都是字符串进⾏操作
定制化
1、序列化机制
为什么需要序列化机制?
因为如果我们想给redis传入对象,使用RedisTemplate中的方法,那么会利用默认的序列化机制导致传入到redis的对象是乱码,为了统一,我们统一转为json存储,那么就需要序列化机制了。另外对象想要在网络传输需要实现序列化接口。
那么如果想要改掉序列化机制,我们可以自定义edisTemplate
新建一个配置类config包下AppRedisConfiguration
1 | /** |
2、redis客户端
RedisTemplate、StringRedisTemplate: 操作redis的⼯具类
要从redis的连接⼯⼚获取链接才能操作redis
Redis客户端
Lettuce: 默认
Jedis:可以使⽤以下切换
1 | <dependency> |
修改配置
1 | spring.data.redis.host=redisIP |
| 对比维度 | Jedis | Lettuce |
|---|---|---|
| 线程模型 | 非线程安全(单线程独占使用),多线程环境下需配合连接池(如 JedisPool)使用,否则会出现并发问题 | 线程安全(基于 Netty 实现异步非阻塞 I/O,采用共享连接模式),多线程可安全共享一个连接实例,无需额外封装连接池(底层已优化连接管理) |
| I/O 模型 | 同步阻塞 I/O,每次 Redis 操作都会阻塞当前线程,直到获取响应结果 | 异步非阻塞 I/O(底层依赖 Netty 框架),支持异步、响应式编程(适配 Spring WebFlux),操作不会阻塞当前线程,性能更高 |
| 功能支持 | 功能简洁,仅支持 Redis 基础命令操作,不支持 Redis 集群(Cluster)、哨兵(Sentinel)等高级特性的原生封装(需额外依赖第三方工具) | 功能丰富,原生支持 Redis 集群(Cluster)、哨兵(Sentinel)、管道(Pipeline)、发布订阅(Pub/Sub)等高级特性,还支持 Redis 6.0+ 的 RESP3 协议、ACL 权限控制等新特性 |
| 连接管理 | 简单的连接池管理(JedisPool),配置相对繁琐,连接复用效率一般 | 基于 Netty 实现高效连接管理,支持自动重连、连接池优化、TCP 连接复用,管理更智能,性能损耗更低 |
| 编程范式 | 仅支持同步编程,代码编写风格简洁直观,符合传统同步开发习惯 | 支持同步、异步(Callback/Future)、响应式(Reactive)三种编程范式,适配现代分布式系统的开发需求(如 Spring Cloud/Spring WebFlux) |
| 依赖与轻量性 | 轻量级组件,依赖极少,打包后体积小,学习成本低 | 依赖 Netty 框架(异步 I/O 核心依赖),打包后体积略大,学习成本稍高(需了解异步 / 响应式编程思想) |
接口文档
OpenAPI 3 与 Swagger
Swagger 可以快速⽣成实时接⼝⽂档,⽅便前后开发⼈员进⾏协调沟通。遵循 OpenAPI 规范。 ⽂档:https://springdoc.org/v2/
1、OpenAPI 3 架构
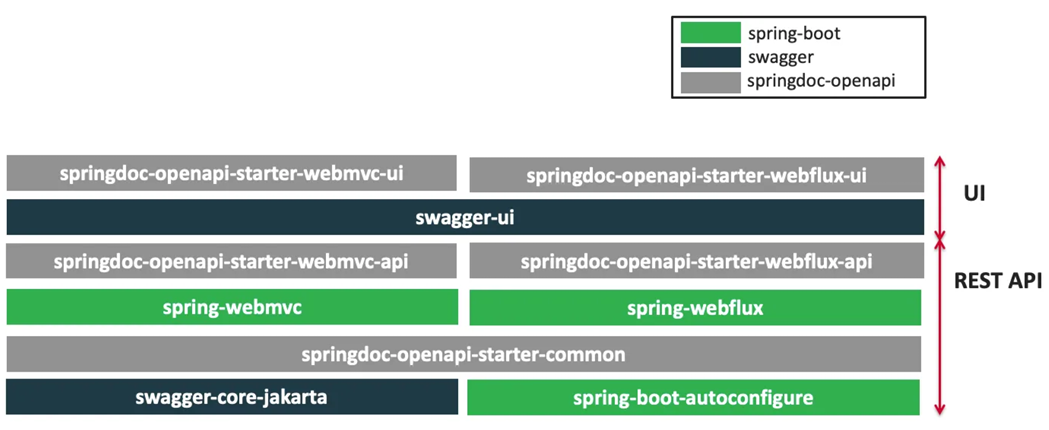
2、整合
1 | <dependency> |
配置
1 | # /api-docs endpoint custom path 默认 /v3/api-docs |
3、使用
1、常用注解
| 注解名称 | 标注位置 | 作用描述 |
|---|---|---|
@Tag |
controller 类 | 标识 controller 的整体作用(用途说明) |
@Parameter |
方法参数 | 标识单个参数的作用(参数说明) |
@Parameters |
方法 | 对方法的多个参数进行多重说明(批量参数描述) |
@Schema |
model 层的 JavaBean(类 / 属性) | 描述模型的整体作用及每个属性的含义、约束等 |
@Operation |
controller 中的方法 | 描述单个接口方法的作用(接口用途、功能说明) |
@ApiResponse |
controller 中的方法 | 描述接口的单个响应状态码、响应信息、响应模型等 |
2、Docket配置
这个就是让swagger-ui的界面更加好看,比如一个部门类里面的注释在一起,员工类的注释在一起
1 |
|
3、OpenAPI配置
上面的是分组配置,这个是总的介绍类似于文档梗概
1 |
|
远程调用
RPC(Remote Procedure Call):远程过程调⽤
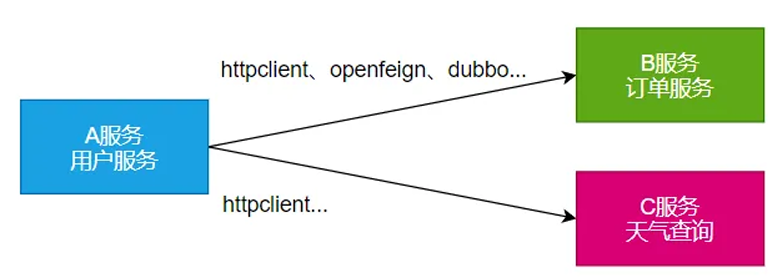
本地过程调⽤: a(); b(); a() { b();}: 不同⽅法都在同⼀个JVM运⾏
远程过程调用
服务提供者:
服务消费者:
通过连接对⽅服务器进⾏请求\响应交互,来实现调⽤效果
API / SDK 的区别是什么?
api:接⼝(Application Programming Interface)
○ 远程提供功能;
sdk:⼯具包(Software Development Kit)
○ 导⼊jar包,直接调⽤功能即可
开发过程中,我们经常需要调⽤别⼈写的功能
如果是内部微服务,可以通过依赖cloud、注册中⼼、openfeign等进⾏调⽤
如果是外部暴露的,可以发送 http 请求、或遵循外部协议进⾏调⽤
SpringBoot 整合提供了很多⽅式进⾏远程调⽤
轻量级客户端⽅式
RestTemplate: 普通开发
WebClient: 响应式编程开发
Http Interface: 声明式编程
Spring Cloud分布式解决⽅案⽅式
Spring Cloud OpenFeign
第三⽅框架
Dubbo
gRPC
WebClient
非阻塞、响应式HTTP客户端
由于这是响应式编程了,后面也会讲解,现在只是演示一下。首先引入spring reactive web了,导入spring-boot-starter-webflux场景
然后开始创建controller,但是访问天气的功能不是我们写的,我们调用别人的api , 这应该怎么写呢?
首先完成好controller,在service里面定义好方法,然后写完controller的流程,再写service服务。
现在需要service利用HTTP客户端发送请求,首先理解发送请求需要做什么?
发请求:
请求⽅式: GET\POST\DELETE\xxxx
请求路径: /xxx
请求参数:aa=bb&cc=dd&xxx
请求头: aa=bb,cc=ddd
请求体:
现在我们知道了要做什么,那么我们利用WebClient发送请求。
首先创建WebClient
创建 WebClient ⾮常简单:
WebClient.create()
WebClient.create(String baseUrl)
还可以使⽤ WebClient.builder() 配置更多参数项:
uriBuilderFactory: ⾃定义 UriBuilderFactory ,定义 baseurl.
defaultUriVariables: 默认 uri 变量.
defaultHeader: 每个请求默认头. 131
defaultCookie: 每个请求默认 cookie.
defaultRequest: Consumer ⾃定义每个请求.
filter: 过滤 client 发送的每个请求
exchangeStrategies: HTTP 消息 reader/writer ⾃定义.
clientConnector: HTTP client 库设置.
URI(Uniform Resource Identifier,统一资源标识符)
本质是「用来唯一标识某个资源的字符串」,它的核心作用是「识别资源」,只负责告诉我们「这个资源是谁」,不保证能通过它获取到该资源。
URL(Uniform Resource Locator,统一资源定位符)
本质是「用来定位某个资源并指明如何访问该资源的字符串」,它的核心作用是「定位 + 访问」,不仅能标识资源,还能提供访问该资源的完整路径(协议、主机、端口等)。
1 |
|
HTTP Interface
Spring 允许我们通过定义接⼝的⽅式,给任意位置发送 http 请求,实现远程调⽤,可以⽤来简 化 HTTP 远程访问。
也是导入spring-boot-starter-webflux场景,如果访问的次数多,每次都要定义客户端,然后发送请求会很麻烦。
那么我们可以用接口的方式来更抽象的编写。
定义接口
1 | public interface WeatherInterface { |
编写service
1 |
|
当前方案仅针对 WeatherInterface 做了封装,还能通过「通用化模板封装 + 可配置化扩展」,实现对任意 HTTP 接口(如 UserInterface、OrderInterface 等)的复用,彻底消除不同业务接口的重复配置逻辑。
原理就是把创建工厂抽出,然后就可以不断的利用一个工厂来创建不同的代理类了
1 | /** |
消息服务
消息队列-场景
1、异步
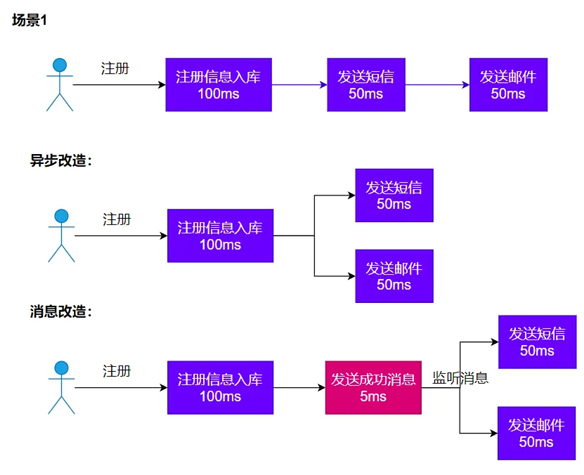
2、解耦
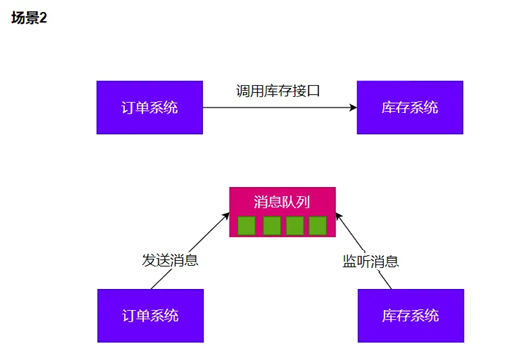
3、削峰

4、缓冲
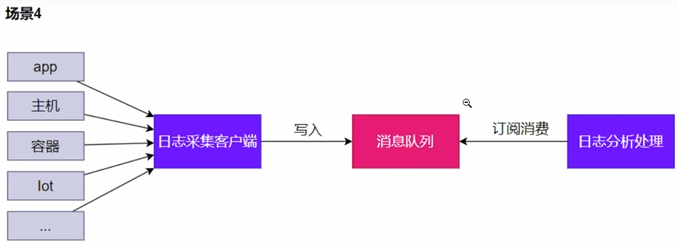
缓冲(Buffering)解决速率不匹配问题
削峰 防止系统在流量高峰时过载崩溃,提高系统的可用性和稳定性。
消息队列-Kafka
这里利用之前环境准备的Kafka来使用。
1、消息模式
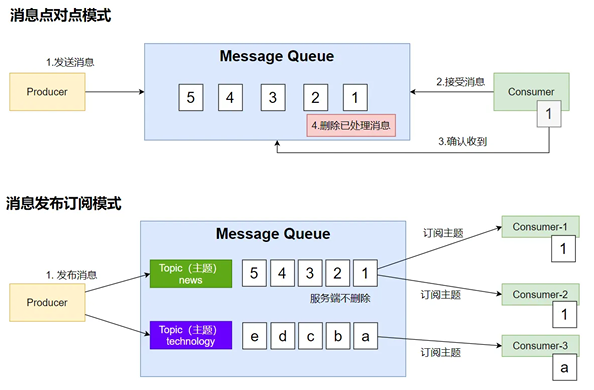
点对点就是发微信一样:一对一发消息
消息发布订阅模式就是群发消息,在Kafka里面可以定制主题,类比报纸,有新华日报,人民日报等不同主题,然后人们可以订报纸,然后如果有报纸到了就发送给所有订阅的人手上,然后Kafka会记录每个订阅者的偏移量,记录每个人消费到哪了,利用广播订阅的话,服务端是不会删除消息的。(后续是否会删除消息可以具体配置规则)
2、Kafka工作原理
Kafka想要真正的发消息他是这么做的:
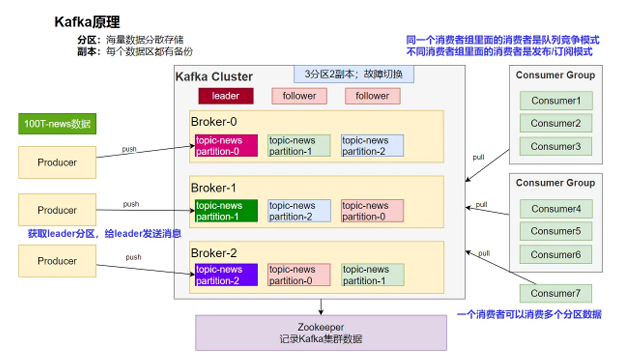
首先有一个生产者一个消费者,未来可能都会有很多。
首先我们思考如果我们想要发消息,现在消息巨大,只启动一台服务器肯定是不够的,所以Kafka引入了两个概念:分区 、 副本
分区:海量数据分散存储 Kafka可以为每个主题分区,然后根据数据的哈希计算比如,得到数据在哪个区。
副本:每个数据区都有备份 为了高可用,每个分区2个副本,图上显示的是3分区2副本,然后0号分区的副本在1号分区和2号分区里面这样保证额高可用
那么以后生产者想要发送消息,所有消息会先看发送给哪个分区,会先获取主分区称为leader分区,所有集群的信息都由Zookeeper进行管理,这个时候想给主分区发消息,如果主分区炸了,zookeeper会帮你在其他分区选一个作为主分区,然后给主分区发送就行。消费者也有很多,引入一个概念消费者组,如果很多消费者是同一组,同一个组里的消费者是竞争关系(c1消费了1分区,c2就不能消费1分区,去消费2分区去了),不同消费者组里面的消费者是发布/订阅模式,也就是会计算偏移量不影响。
3、SpringBoot整合
1 | <dependency> |
新用一个中间件,可以看他的自动配置类,从而知道他需要的配置
自动配置原理
kafka ⾃动配置在 KafkaAutoConfiguration
- 容器中放了 KafkaTemplate 可以进⾏消息收发
- 容器中放了 KafkaAdmin 可以进⾏ Kafka 的管理,⽐如创建 topic 等
- kafka 的配置在 KafkaProperties中
- @EnableKafka可以开启基于注解的模式
然后配置
1 | spring.kafka.bootstrap-servers=你的IP:9092 |
这里利用测试类进行测试整合
发送消息
1 |
|
一个坑:在本地访问kafka访问失败了说不知道这个kafka
1 | 我们之前配置了这个 spring.kafka.bootstrap-servers=服务器IP:9092 |
修改 C:\Windows\System32\drivers\etc\hosts ⽂件,配置 服务器IP kafka
如果想要发送对象发送,会发现失败,因为序列化规则问题默认是字符串序列化器,所以需要配置为统一为JSON的序列化器。
1 | #值的序列化器 |
或者把对象换成字符串也行,如果key也是对象,那么也要配置序列化器或者换成字符串。
监听消息
之前实现往kafka主题里面发送消息,现在需要从主题里面监听到新来的消息,再消费消息。
配置Topic
1 | 首先在主启动里启动Kafka的注解功能@EnableKafka |
消息监听
1 |
|
小结
1 | KafkaAutoConfiguration提供以下功能: |
Web安全
Apache Shiro
Spring Security
⾃研:Filter
Spring Security
只要是安全框架就要关注三个方面
1、安全架构
1、认证:Authentication
who are you?
登录系统,⽤户系统
2、授权:Authorization
what are you allowed to do?
权限管理,⽤户授权
3、攻击防护
XSS(Cross-site scripting)
CSRF(Cross-site request forgery)
CORS(Cross-Origin Resource Sharing)
SQL注⼊ …
上面两个怎么实现的,是要设计一套完整的权限模型
扩展:权限模型
主流的权限模型有两个。
1、RBAC(Role Based Access Controll)
如果是RBAC一般有这些三张表,用户表,角色表,权限表,然后为了多对多,每个表之间也有中间表。
1 | ⽤户(t_user) |
2、ACL(Access Controll List)
1 | 直接⽤户和权限挂钩 |
1 |
|
2、Spring Security原理
1、过滤器链架构
Spring Security利⽤ FilterChainProxy 封装⼀系列拦截器链,实现各种安全拦截功能
Servlet三⼤组件:Servlet、Filter、Listener
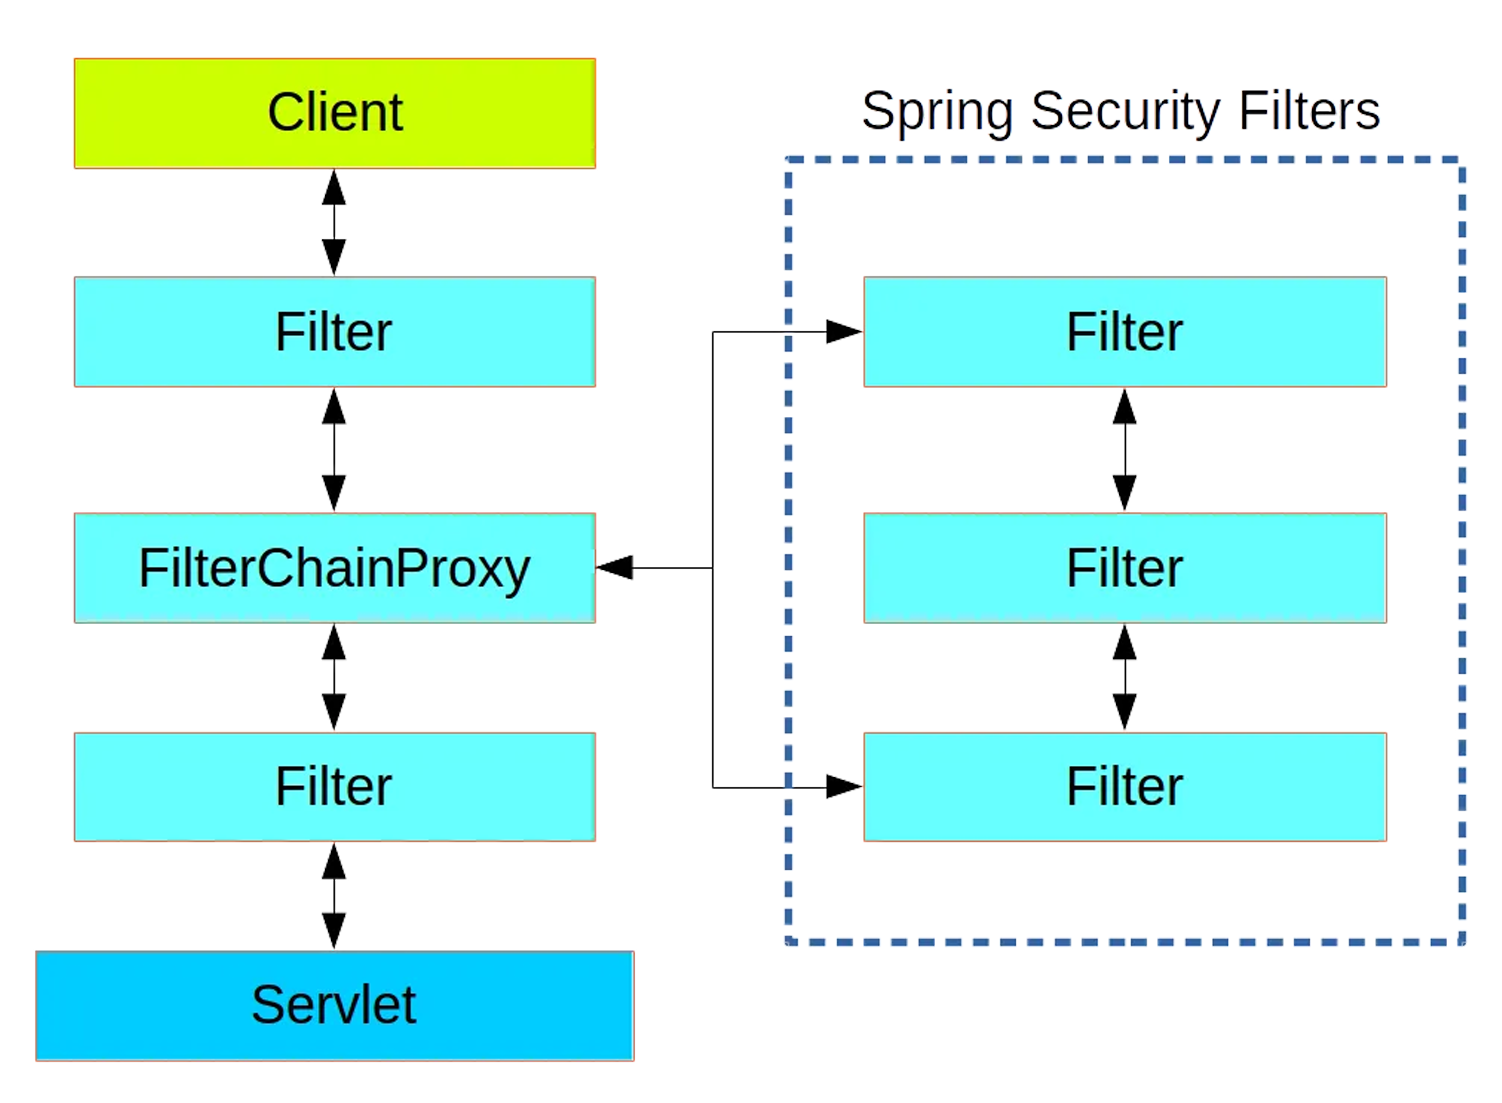
2、FilterChainProxy
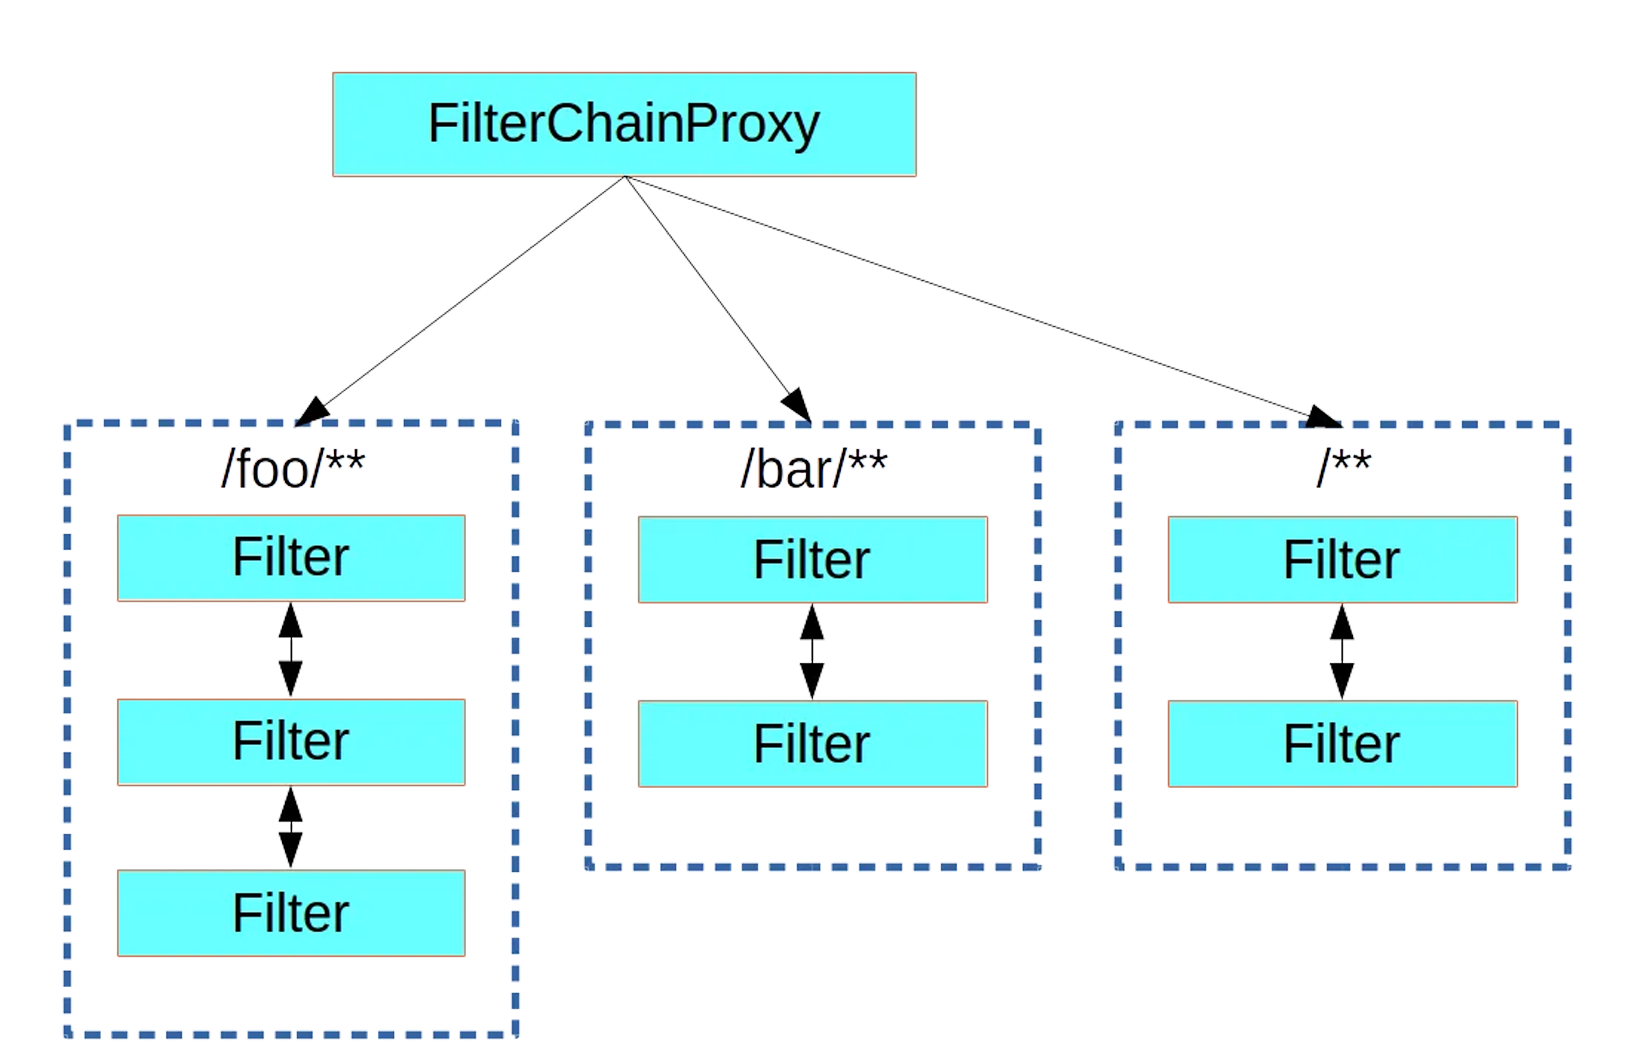
3、SecurityFilterChain
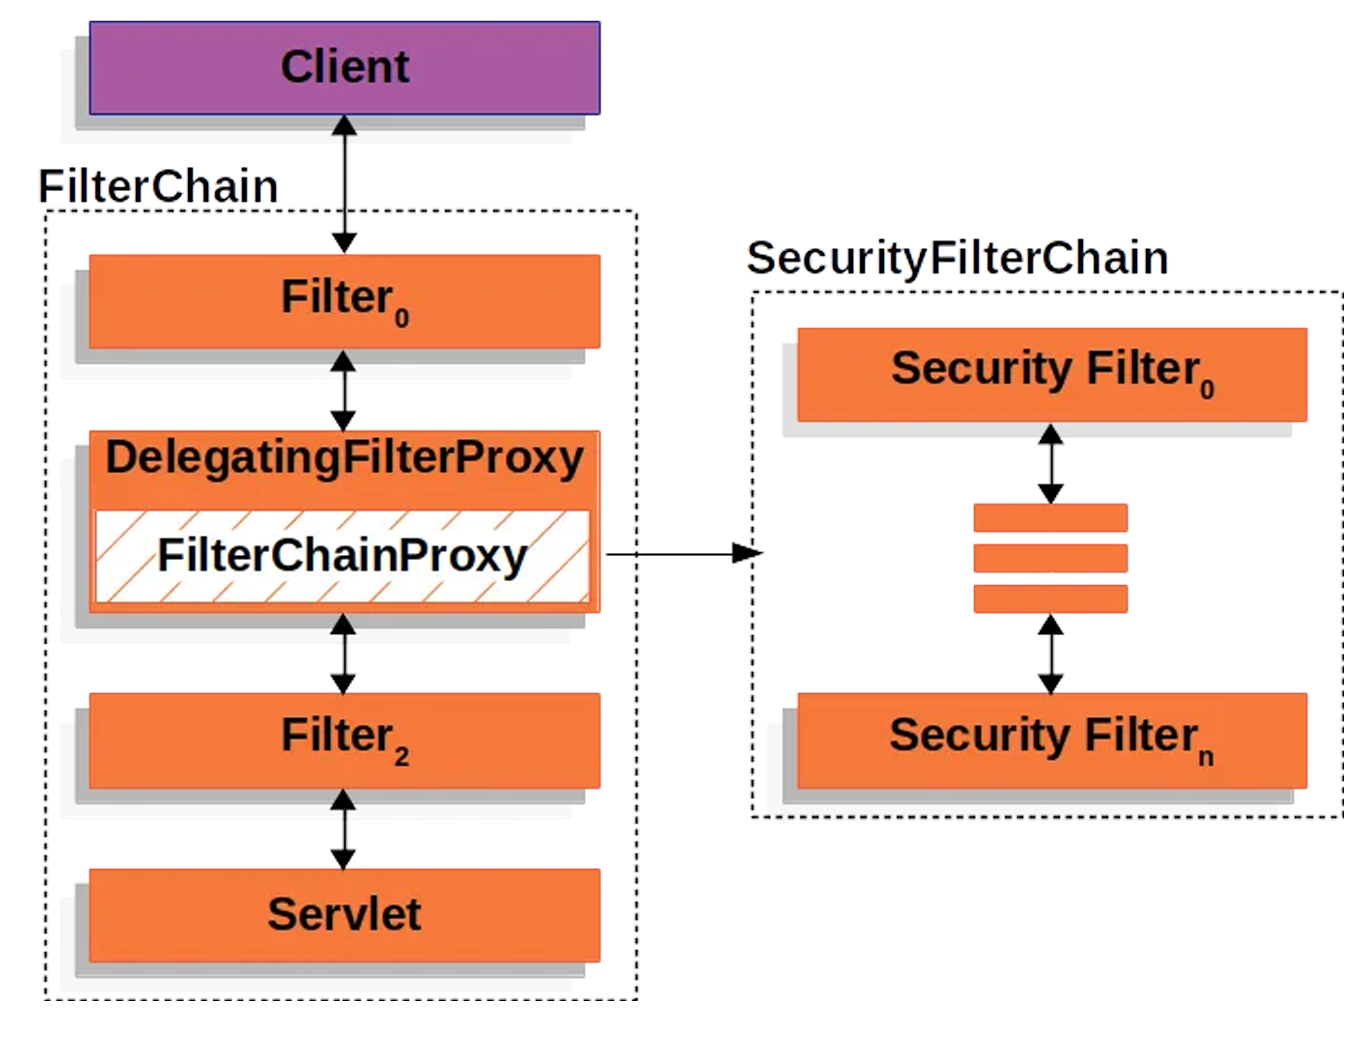
3、使用
所以SpringSecurity其实就是很多个过滤器,后面想要使用的话,需要用到两个配置类。
1、HttpSecurity
1 |
|
2、MethodSecurity
1 |
|
核心
1 | WebSecurityConfigurerAdapter |
4、实战
1、引入依赖
1 | <dependency> |
1 | Sercurity场景的自动配置类引入了: |
写一个index.html然后发现,开启了登录认证,也就是所有未登录的都需要经过登录页才能使用功能。
想要自定义这个规则就需要自定义配置类
1 |
|
现在首页都能访问,然后其他任何功能都要使用默认的登录表单,现在不想用默认的登录表单。
1 |
|
1 |
|
1 |
|
现在还有问题就是账号密码都是security提供的,这些都配置在了配置类里面
1 | spring.security.user.name=zs |
这个是写死的,但是我们可以用@Bean注解注入一个对应的UserDetailService就行了,然后这个可以自己写查询数据库即可。
1 | //这里模拟很多用户,只是提供了用户放在内存里面,这里模拟一下,并且这里的密码都要加密 |
1 | //配合注解实现权限授权 |
也就是说我们使用SpringSecurity需要
1 | 1、自定义请求授权规则 http.authorizeHttpRequests |
可观测性
可 观测性 Observability
对线上应⽤进⾏观测、监控、预警…
健康状况【组件状态、存活状态】Health
运⾏指标【cpu、内存、垃圾回收、吞吐量、响应成功率…】Metrics
链路追踪 …
1、SpringBoot Actuator
实战
1、场景引入
1 | <dependency> |
导入了这个场景,没有任何配置直接启动程序,然后访问任何一个应用的actuator,就会返回信息
1 | 访问 localhost:8080/actuator |
如果还想要观测更多的指标,我们需要暴露所有的观测端点
2、暴露指标
1 | management: |
3、访问数据
1 | 访问 http://localhost:8080/actuator;展示出所有可以⽤的监控端点 |
Endpoint
在springboot中有一个核心概念叫Endpoint也就是端点。只要把所有的观测端点暴露出来,就能看到所有的指标。
Actuator 端点(Endpoint)是 Spring Boot 提供的标准化接口(默认以 HTTP 接口形式暴露,也支持 JMX),用于监控应用运行状态、查询配置信息、执行管理操作(如线程 dump、堆 dump 等),通常访问路径为 http://{应用IP}:{应用端口}/{基础路径}/{端点名称}(默认基础路径为 /actuator,可通过 management.endpoints.web.base-path 自定义)。
1、常用端点
| 端点名称(Endpoint) | 中文描述 | 核心功能 | 依赖 / 前置条件 | 访问形式(默认) |
|---|---|---|---|---|
metrics |
应用指标端点 | 暴露当前应用的所有「性能指标」信息,包括:1. 系统指标(CPU 使用率、内存占用、磁盘使用)2. 应用指标(QPS、响应时间、线程数、缓存命中率)3. 自定义指标(可通过 Spring Boot Metrics 自定义业务指标) | 无额外依赖(Spring Boot 核心自带) | GET http://ip:port/actuator/metrics(查看所有指标名称)GET http://ip:port/actuator/metrics/{指标名}(查看指定指标详情,如 actuator/metrics/jvm.memory.used) |
threaddump |
线程转储端点 | 执行应用线程转储,返回所有线程的当前状态:1. 线程 ID、线程名称、线程状态(RUNNABLE/BLOCKED/WAITING 等)2. 线程堆栈信息(用于排查线程死锁、线程阻塞、CPU 飙高等问题) | 无额外依赖 | GET http://ip:port/actuator/threaddump |
heapdump |
堆转储端点 | 生成并返回应用的 hprof 格式堆转储文件(内存快照),用于排查:1. 内存泄漏问题2. 内存溢出(OOM)原因3. 大对象占用内存异常等问题 |
其他关键端点
| 端点名称(Endpoint) | 中文描述 | 核心功能 | 依赖 / 前置条件 |
|---|---|---|---|
auditevents |
审核事件端点 | 暴露应用的审核事件信息(如用户登录、权限变更等审计日志) | 需要 AuditEventRepository 组件 |
beans |
Bean 列表端点 | 显示应用中所有 Spring 管理的 Bean 完整列表(含 Bean 名称、类型、依赖关系等) | 无额外依赖 |
caches |
缓存信息端点 | 暴露应用中所有可用的缓存(如 Redis/Caffeine 缓存)及缓存状态 | 无额外依赖(需应用配置了缓存组件) |
conditions |
自动配置条件端点 | 显示 Spring Boot 自动配置的所有条件信息,包括配置「匹配成功」或「匹配失败」的具体原因(用于排查自动配置不生效问题) | 无额外依赖 |
configprops |
配置属性端点 | 显示所有 @ConfigurationProperties 注解绑定的配置属性(如自定义配置、框架默认配置) |
无额外依赖 |
env |
环境变量端点 | 暴露 Spring 应用的 ConfigurableEnvironment 信息,包括:系统环境变量、JVM 系统属性、应用配置文件(application.yml/properties)中的配置等 |
无额外依赖 |
flyway |
Flyway 迁移端点 | 显示已应用的所有 Flyway 数据库版本迁移记录(如迁移脚本名称、执行时间、状态等) | 需要 1 个或多个 Flyway 组件(需引入 Flyway 依赖) |
health |
健康检查端点 | 显示应用运行状况信息(核心监控端点),包括:应用自身状态、依赖组件状态(数据库、Redis、MQ 等是否可用),支持「简单模式」(仅返回 UP/DOWN)和「详细模式」(返回所有依赖状态详情) | 无额外依赖(依赖组件需对应配置) |
httptrace |
HTTP 跟踪端点 | 显示最近 100 条 HTTP 请求 - 响应的跟踪信息(如请求路径、请求方法、响应状态码、响应时间等) | 需要 HttpTraceRepository 组件 |
info |
应用信息端点 | 显示自定义的应用信息(如应用名称、版本、作者等,可通过 info.xxx 配置) |
无额外依赖 |
integrationgraph |
Spring Integration 图端点 | 显示 Spring Integration 的组件拓扑图(用于可视化集成流程) | 需要引入 spring-integration-core 依赖 |
loggers |
日志配置端点 | 1. 查看应用中所有日志器(Logger)的当前日志级别(如 ROOT、指定包路径的日志级别)2. 动态修改日志级别(无需重启应用,即可调整日志输出粒度) | 无额外依赖 |
liquibase |
Liquibase 迁移端点 | 显示已应用的所有 Liquibase 数据库版本迁移记录(功能同 Flyway,均为数据库版本管理) | 需要 1 个或多个 Liquibase 组件(需引入 Liquibase 依赖) |
mappings |
请求映射端点 | 显示应用中所有 @RequestMapping 注解绑定的 HTTP 请求路径(含接口路径、请求方法、对应控制器方法等,用于快速查询接口映射关系) |
无额外依赖(适用于 Spring MVC/WebFlux 应用) |
scheduledtasks |
定时任务端点 | 显示应用中所有通过 @Scheduled 注解配置的定时任务(含任务执行表达式、执行状态等) |
无额外依赖(需应用配置了定时任务) |
sessions |
会话管理端点 | 检索和删除 Spring Session 支持的用户会话(如分布式会话) | 1. 需为基于 Servlet 的 Web 应用2. 需引入 Spring Session 依赖并配置 |
shutdown |
应用关闭端点 | 触发应用正常关闭(优雅停机),避免强制关闭导致的数据丢失 | 1. 默认禁用,需通过 management.endpoint.shutdown.enabled=true 开启2. 仅支持 POST 请求 |
startup |
启动步骤端点 | 显示 ApplicationStartup 收集的应用启动步骤数据(如各组件启动耗时,用于排查应用启动缓慢问题) |
需要配置 BufferingApplicationStartup(通过 SpringApplication 配置) |
jolokia |
JMX 暴露端点 | 通过 HTTP 协议暴露应用的 JMX Bean(无需直接连接 JMX 端口,便于远程监控 JMX 指标) | 1. 需引入 jolokia-core 依赖2. 不适用于 Spring WebFlux 应用 |
logfile |
日志文件端点 | 返回应用日志文件的内容(支持分段下载,通过 HTTP Range 标头指定获取的日志片段) |
需配置 logging.file.name 或 logging.file.path 属性(指定日志文件路径 / 名称) |
prometheus |
Prometheus 指标端点 | 以 Prometheus 服务器可抓取的格式暴露应用指标(用于 Prometheus + Grafana 实现监控可视化和告警) | 需要引入 micrometer-registry-prometheus 依赖 |
2、定制端点
健康监控:返回存活、死亡
指标监控:次数、率
1、HealthEndpoint
先创建了一个组件MyHahaComponent,然后要监控这个组件的组件MyHahaHealthIndicator只要后缀是Indicator的都是监控的,然后必须实现健康监控的接口HealthIndicator,只用重写一个方法health。
第二种方法是继承抽象健康检查方法
1 |
|
1 |
|
然后开启详细信息开启配置
1 | management: |
自定义指标
上面是自定义监控,这里是自定义指标
2、MetricesEndpoint
假设有一个组件有个haha方法,然后我们想监控这个方法被调用多少遍
有一个 controller 调用 组件的haha方法
1 |
|
2、监控案例落地
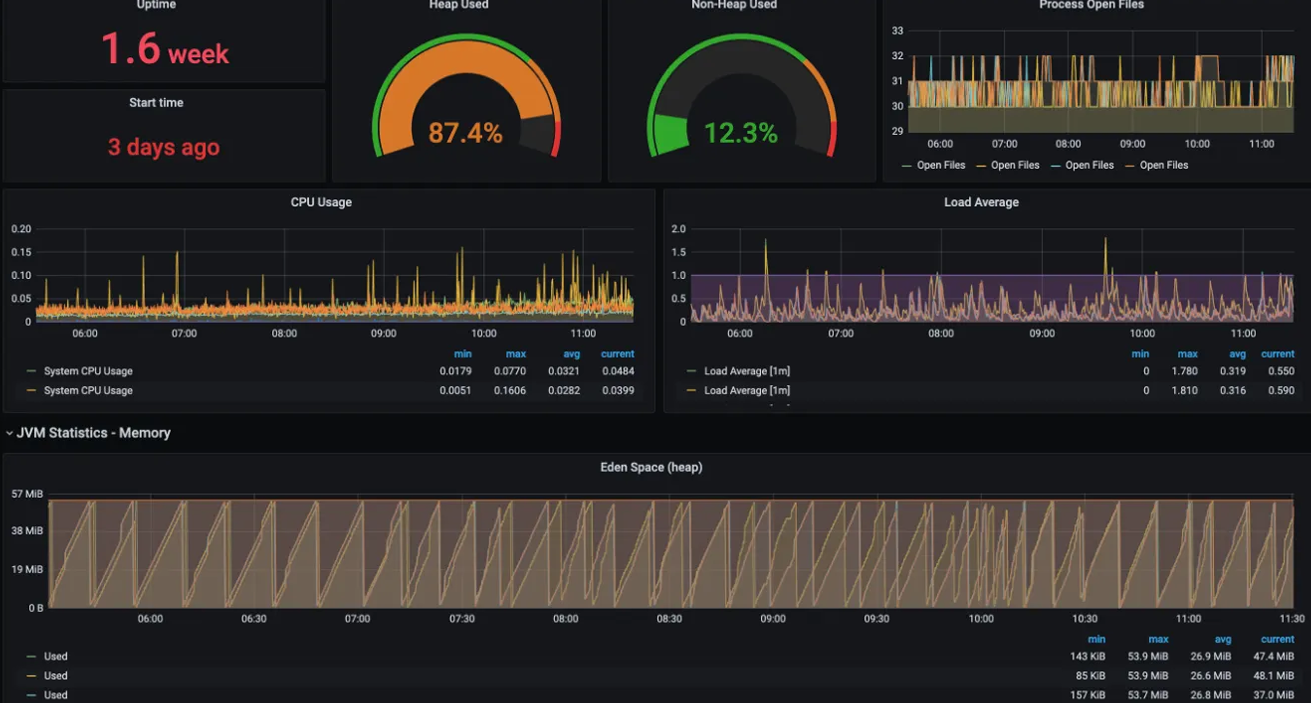
现在我们能暴露很多监控数据了,如果想要监控数据显示好看,要么就是前端写一套页面。
要么就是用企业常用的 基于 Prometheus + Grafana
原理如下
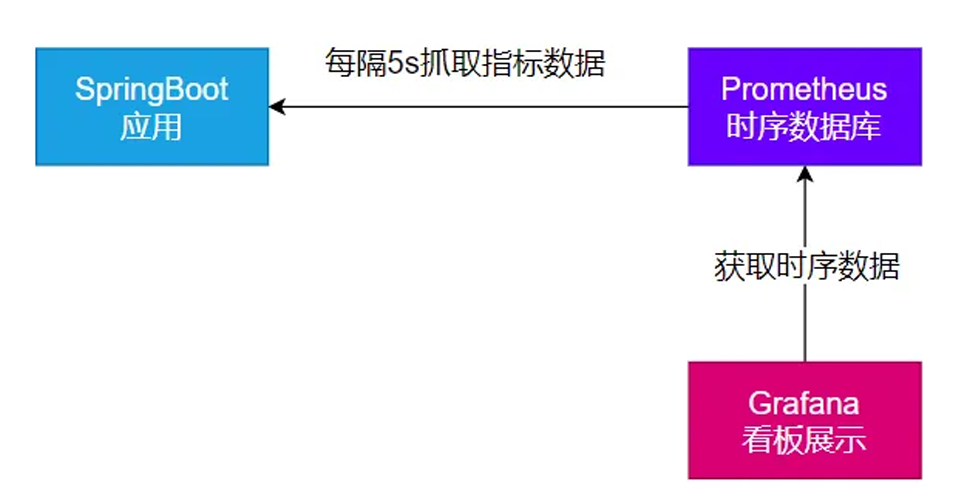
1、安装 Prometheus + Grafana
1 | 安装prometheus:时序数据库 |
2、导入依赖
现在我们导入依赖,让SpringBoot产生prometheus需要的数据
1 | <dependency> |
导入之后就会直接把之前json的监控数据变成prometheus需要的sql写进数据库里面了
访问: http://localhost:8001/actuator/prometheus 验证,返回 prometheus 格式的所有指标
记得改端口,因为springboot的端口默认8080
然后把springboot应用打包,然后把Jar包安装到服务器里面
1 | 安装上传⼯具,然后输入命令rz就能上传了 |
确认可以访问到:http://服务器公网IP:9999/actuator/prometheus
如果在同一个机器内,可以用之前自定义的私网IP
3、配置 Prometheus 拉取数据
1 | # 修改prometheus.yml 配置⽂件 |
4、配置Grafana监控面板
添加数据源(Prometheus)
添加⾯板。可去 dashboard 市场找⼀个⾃⼰喜欢的⾯板,也可以⾃⼰开发⾯板;Dashboards | Grafana Labs
AOT
AOT:Ahead-of-Time(提前编译):程序执⾏前,全部被编译成机器码
JIT:Just in Time(即时编译): 程序边编译,边运⾏;
AOT 与 JIT
语⾔:
编译型语⾔:编译器
解释型语⾔:解释器
1、Complier 与 Interpreter
Java:半编译半解释
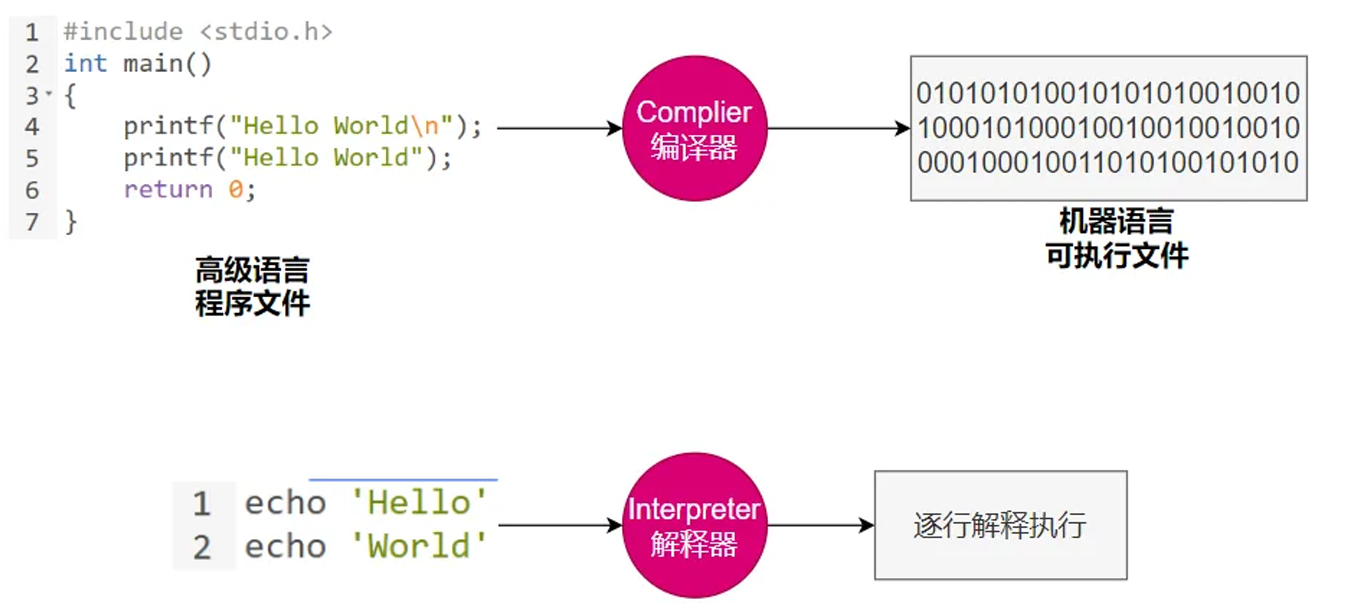
2、AOT与JIT对比
| JIT | AOT | |
|---|---|---|
| 优点 | 1.具备实时调整能⼒ 2.⽣成最优机器指令 3.根据代码运⾏情况优化内存占⽤ |
1.速度快,优化了运⾏时编译时间和内存消耗 2.程序初期就能达最⾼性能 3.加快程序启动速度 |
| 缺点 | 1.运⾏期边编译速度慢 2.初始编译不能达到最⾼性能 |
1.程序第⼀次编译占⽤时间⻓ 2.牺牲⾼级语⾔⼀些特性 |
在 OpenJDK 的官⽅ Wiki 上,介绍了HotSpot 虚拟机⼀个相对⽐较全⾯的、即时编译器(JIT) 中采⽤的优化技术列表。也就是说Java中是都有。
3、JVM架构
JVM: 既有解释器,⼜有编辑器(JIT:即时编译);
.java 到 .class 到 机器码
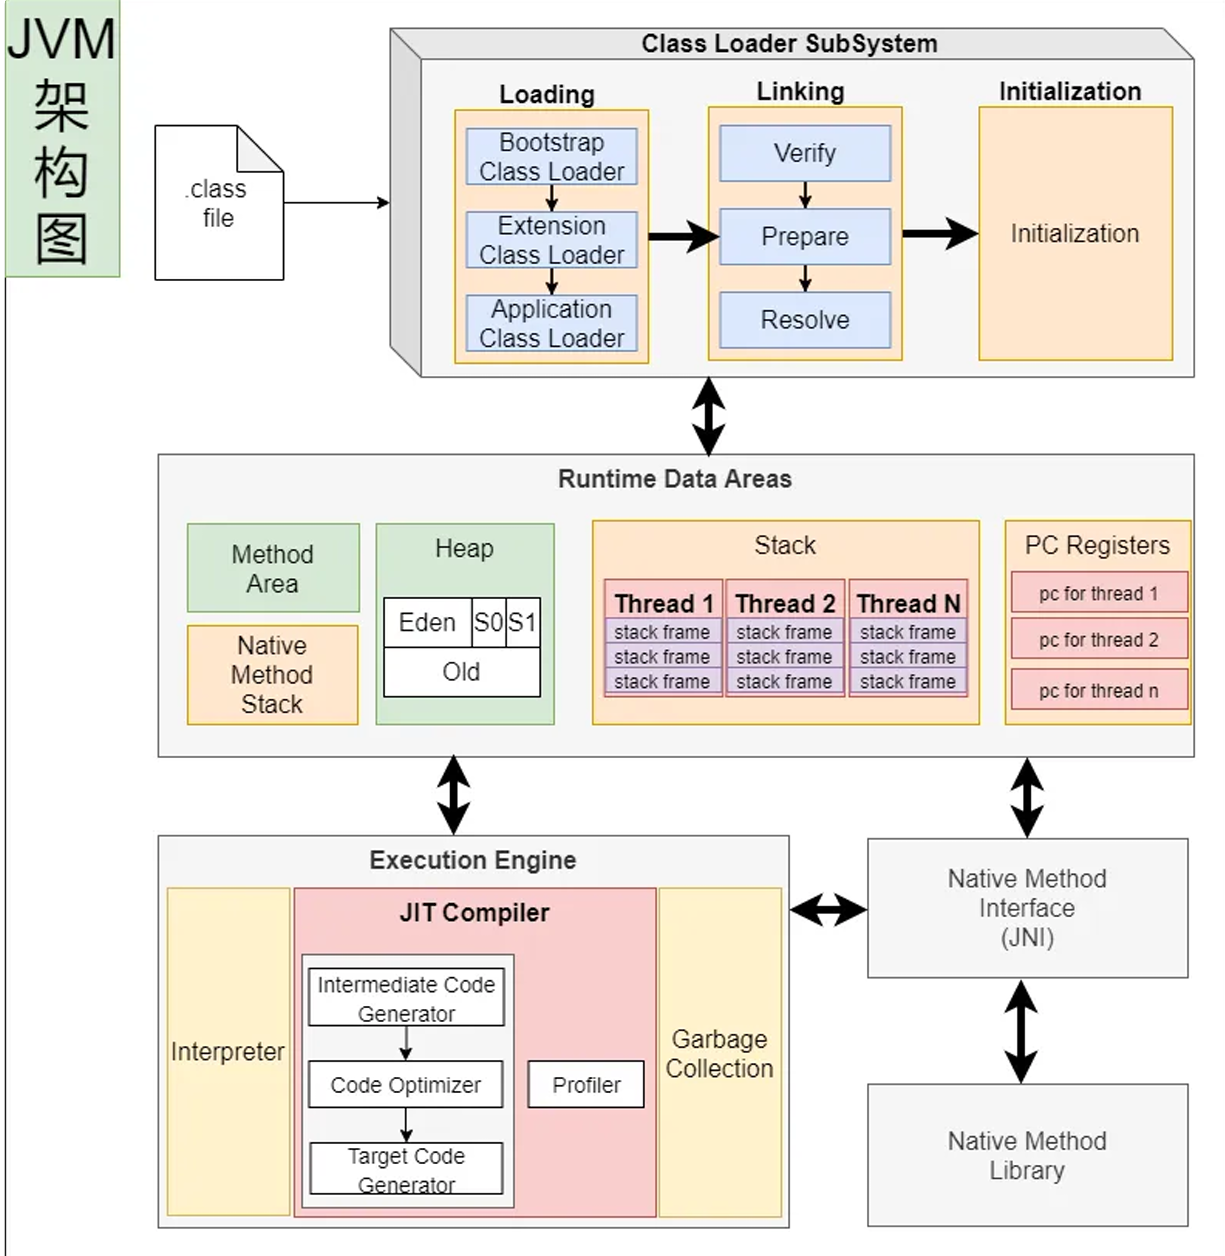
第一步,我们写的 java 代码通过 javac 编译成 .class 文件,但这不算真正的编译。只是一个中间表示层。
第二步,.class文件会被JVM的类加载器加载进去,这里省略讲解类加载过程
第三步,整个数据会加载到运行时数据区,方法到方法区,new 的对象放到堆内存,然后每个线程有栈等,这里也不详细解释。
第四步,真正执行代码的是执行引擎里面有个 Interpreter解释器 JIT编译器
然后这里又涉及到什么时候把 .class编译什么时候不编译,引出下面的Java执行流程
4、Java的执行过程
建议阅读:
美团技术:https://tech.meituan.com/2020/10/22/java-jit-practice-in-meituan.html
1、大概流程
IR 就是中间表示层
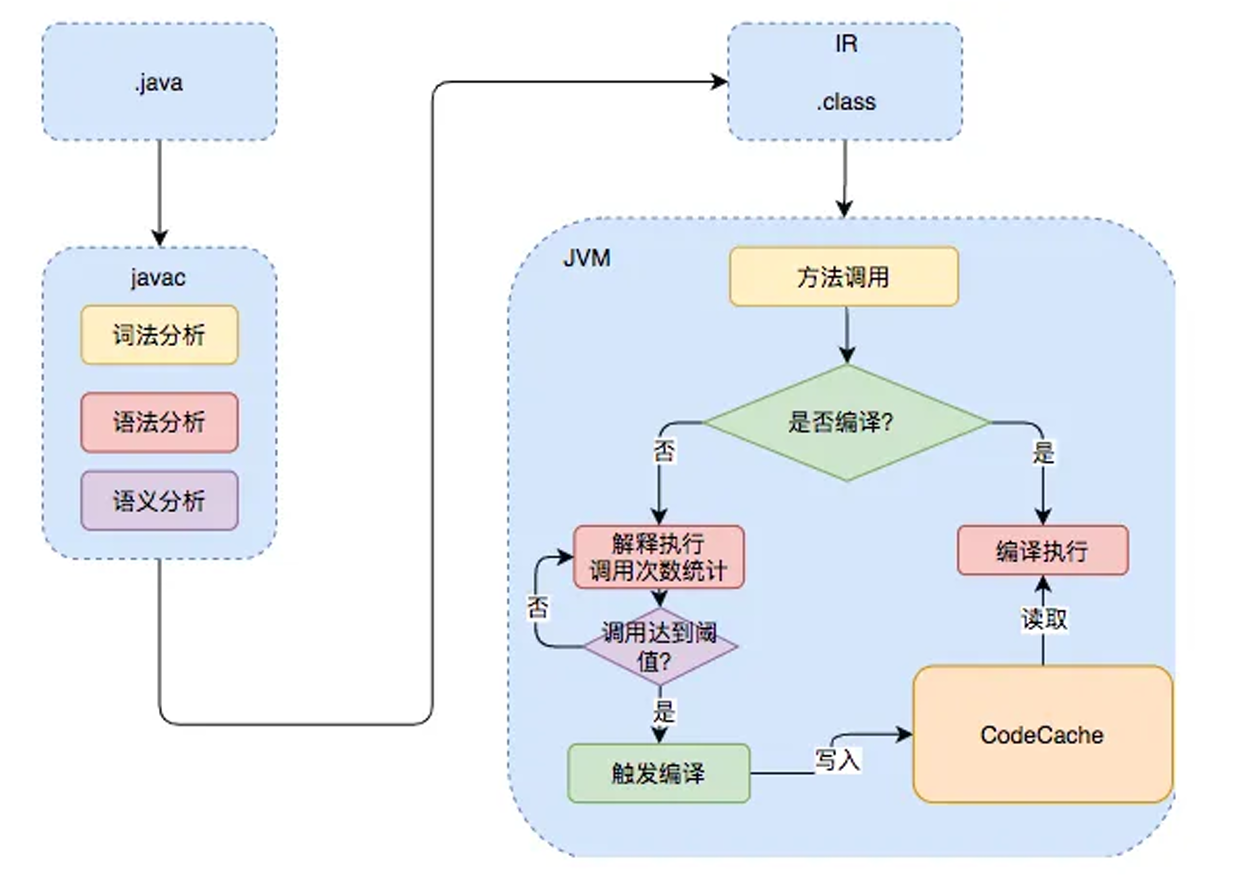
2、详细流程
热点代码:调⽤次数⾮常多的代码

5、JVM编译器
JVM中集成了两种编译器,Client Compiler 和 Server Compiler;
Client Compiler注重启动速度和局部的优化
Server Compiler更加关注全局优化,性能更好,但由于会进⾏更多的全局分析,所以启动速度会 慢。
Client Compiler:
HotSpot VM带有⼀个Client Compiler
这种编译器 C1编译器 启动速度快 ,但是性能⽐较Server Compiler来说会差⼀些。
编译后的机器码执⾏效率没有C2的⾼
Server Compiler:
Hotspot虚拟机中使⽤的Server Compiler有两种: C2 和 Graal 。
在Hotspot VM中,默认的Server Compiler是 C2编译器。
6、分层编译
Java 7开始引⼊了分层编译(Tiered Compiler )的概念,它结合了C1和 C2 的优势,追求启动速度和峰值 性能的⼀个平衡。分层编译将JVM的执⾏状态分为了五个层次。 五个层级 分别是:
解释执⾏。
执⾏不带profiling的C1代码。
执⾏仅带⽅法调⽤次数以及循环回边执⾏次数profiling的C1代码。
执⾏带所有profiling的C1代码。
执⾏C2代码。
profiling就是收集能够反映程序执⾏状态的数据 。其中最基本的统计数据就是⽅法的调⽤次数,以及循环回边的执⾏次数。
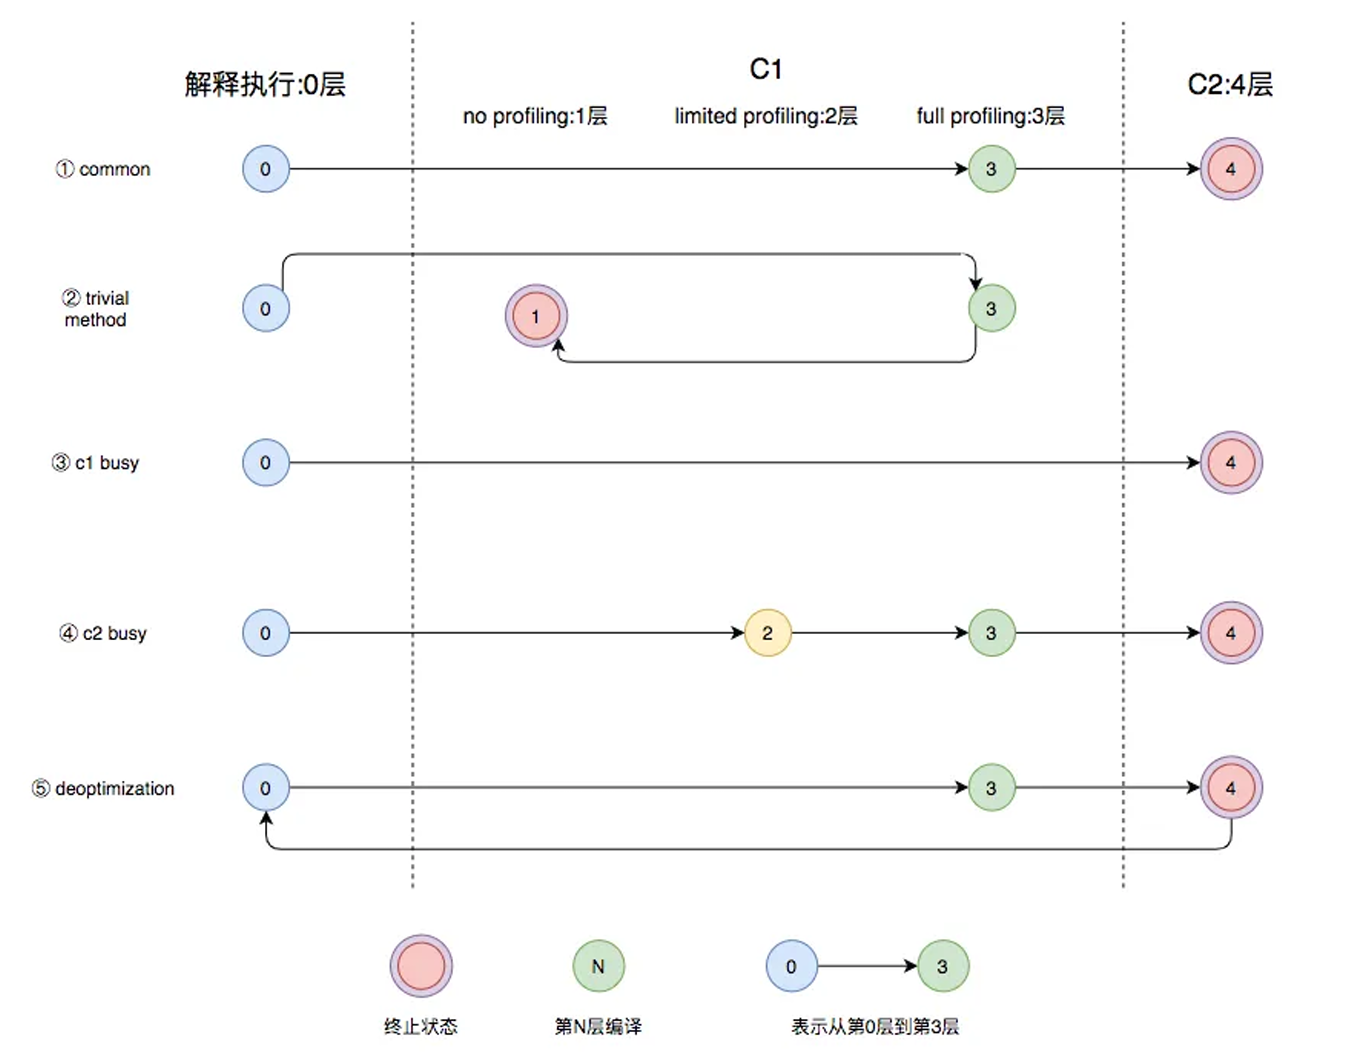
图中第①条路径,代表编译的一般情况:热点方法从解释执行到被 3 层的 C1 编译,最后被 4 层的 C2 编译。
如果方法比较小(比如 Java 服务中常见的 getter/setter 方法),3 层的 profiling 没有收集到有价值的数据,JVM 就会断定该方法对于 C1 代码和 C2 代码的执行效率相同,就会执行图中第②条路径。在这种情况下,JVM 会在 3 层编译之后,放弃进入 C2 编译,直接选择用 1 层的 C1 编译运行。
在 C1 忙碌的情况下,执行图中第③条路径:在解释执行过程中对程序进行 profiling,根据收集到的信息直接由第 4 层的 C2 编译。
前文提到 C1 中的执行效率是 1 层 > 2 层 > 3 层,第 3 层一般要比第 2 层慢 35% 以上,所以在 C2 忙碌的情况下,执行图中第④条路径。这时方法会被 2 层的 C1 编译,然后再被 3 层的 C1 编译,以减少方法在 3 层的执行时间。
如果编译器做了一些比较激进的优化(比如分支预测),在实际运行时发现预测出错,这时就会进行反优化,重新进入解释执行,图中第⑤条执行路径代表的就是这一反优化过程。
总的来说,C1 的编译速度更快,C2 的编译质量更高。分层编译的不同编译路径,是 JVM 根据当前服务的运行情况,寻找服务最佳性能平衡点的过程。从 JDK 8 开始,JVM 默认开启分层编译。
但是现在也有个问题,也就是说 java 程序一开始都是解释运行,会很慢,后面稳定了调用次数多了之后,才会越来越快。
现在云原生,不是一直在一台机器上跑了,就有可能之前的那些热点数据白弄了。
那么为了应对这个我们就需要对 java 进行小改版
最好的效果:
存在的问题:java应⽤如果⽤jar,解释执⾏,热点代码才编译成机器码;初始启动速度慢,初始处理请求数量 少。⼤型云平台,要求每⼀种应⽤都必须秒级启动。每个应⽤都要求效率⾼。
希望的效果:
java应⽤也能提前被编译成机器码,随时急速启动,⼀启动就急速运⾏,最⾼性能
编译成机器码的好处:
另外的服务器还需要安装Java环境
编译成机器码的,可以在这个平台 Windows X64 直接运⾏。
下面就讲解利用 GraalVM 把 java 文件打包成原生镜像
那么我们还要先了解原生镜像:native-image(机器码、本地镜像)
把应⽤打包成能适配本机平台 的可执⾏⽂件(机器码、本地镜像)
GraalVM
GraalVM是⼀个⾼性能的JDK,旨在加速⽤Java和其他JVM语⾔编写的应⽤程序的执⾏,同时还提供 JavaScript、Python和许多其他流⾏语⾔的运⾏时。
GraalVM提供了两种运⾏Java应⽤程序的⽅式:
- 在HotSpot JVM上使⽤Graal即时(JIT)编译器
作为预先编译(AOT)的本机可执⾏⽂件运⾏(本地镜像)。
GraalVM的多语⾔能⼒使得在单个应⽤程序中混合多种编程语⾔成为可能,同时消除了外部语⾔调⽤的成本。
1、架构
2、安装
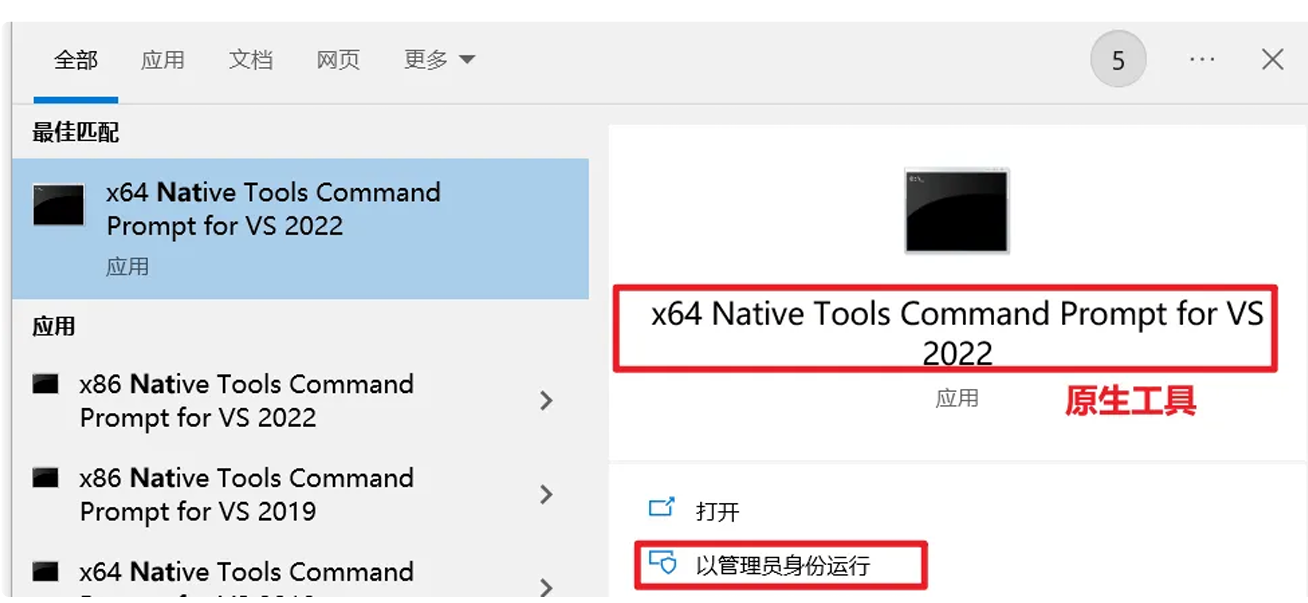
跨 平台提供原⽣镜像原理:
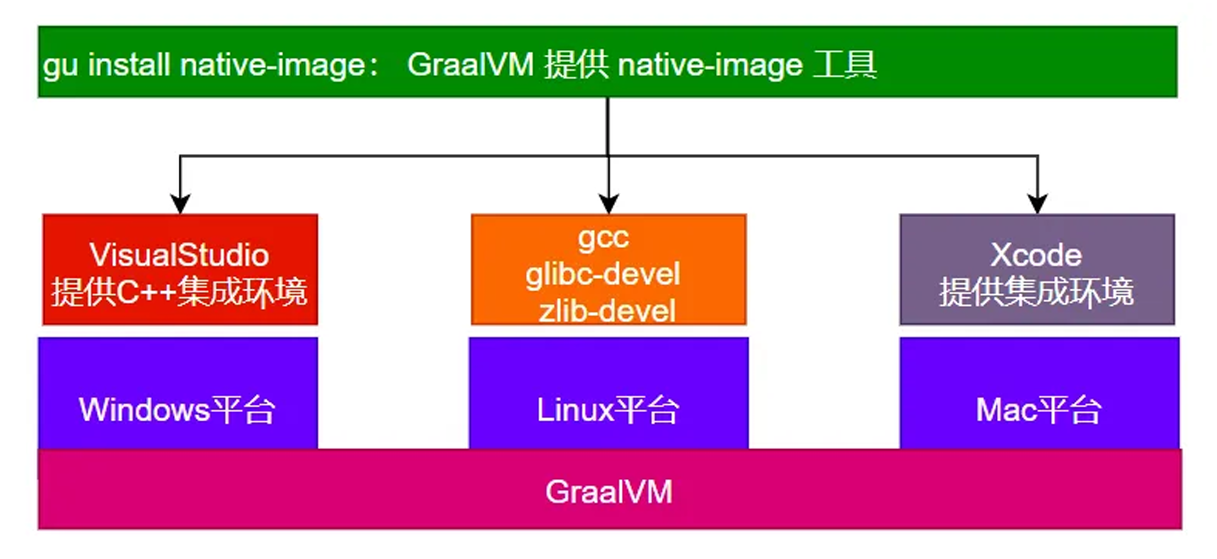
1、安装MicrosoftVisualStudio
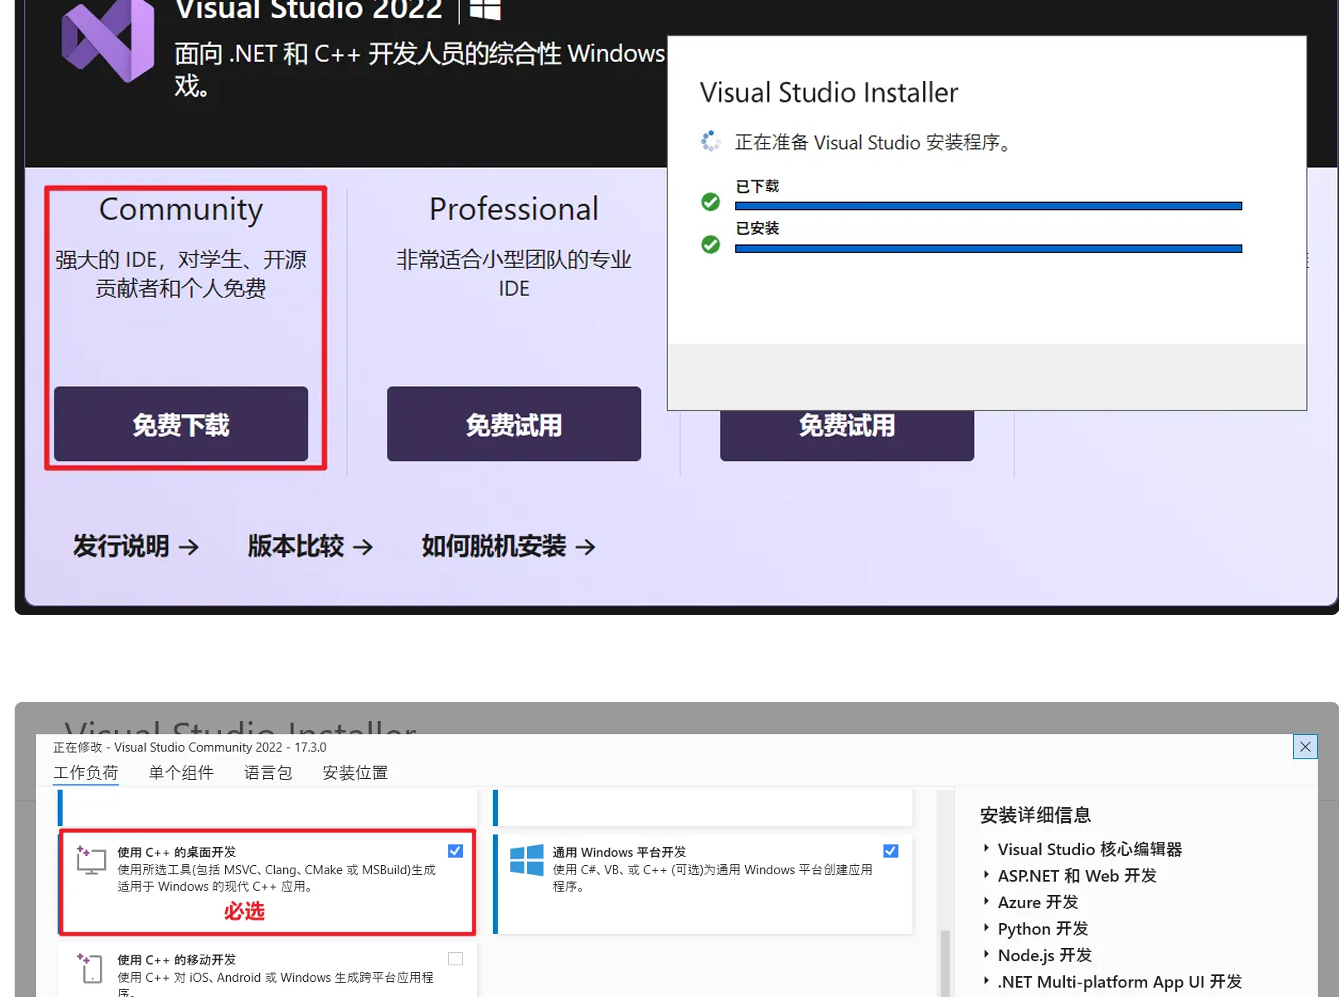
选英文
记住你安装的地址;
2、安装GraalVM
下载 GraalVM + native-image
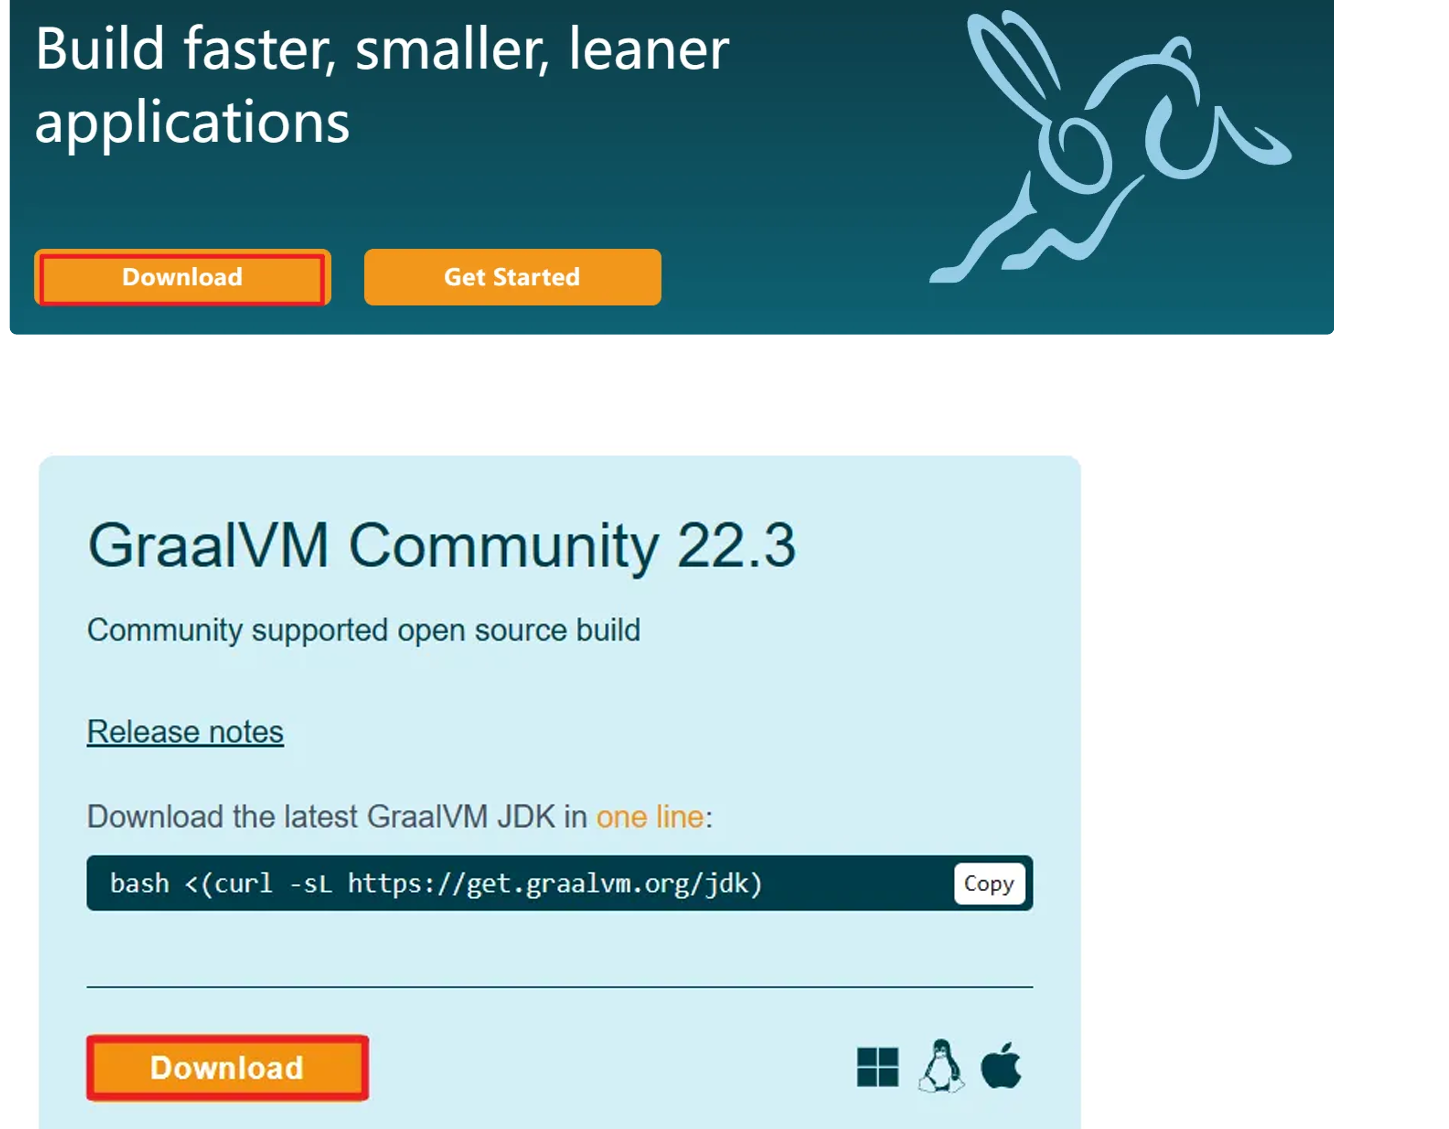
graalvm/graalvm-ce-builds: GraalVM CE binaires built by the GraalVM community
3、配置
1 | 原来 |
3、测试
1、创建项目
创建普通java项⽬。编写HelloWorld类;
使⽤ mvn clean package 进⾏打包
确认jar包是否可以执⾏ java -jar xxx.jar
可能需要给 MANIFEST.MF 添加 Main-Class: 你的主类

遇到这种情况就用压缩文件打开jar包然后在 MANIFEST.MF 添加 Main-Class: 你的主类 然后就好了。
以前没有选择,只能打成 jar 包
现在有 graalVM 我们可以打包成本地镜像(可执行文件):exe或者别的
2、编译镜像
编译为原⽣镜像(native-image):使⽤ native-tools 终端
1 | 从⼊⼝开始,编译整个jar |
3、Linux平台测试
1 | 1、安装gcc等环境 |
并不是所有的Java代码都能支持本地打包
比如反射代码:动态获取构造器,反射创建对象,反射调用方法,这些都不行。因为AOT会损失动态能力。
需要额外处理,要明确提前告知graalvm反射会用到哪些方法、构造器
解决方案:SpringBoot提供了一些注解,提前告知GraalVM。
配置文件也会有问题,因为 jar 包的话里面有配置文件的,但是这个也要额外处理(从相对路径读取)主要是告知GraalVM配置文件需要怎么处理,也可以加配置中心。
一句话:二进制里面不能包含的,不能动态的都得提前处理。
不是所有框架都适配了AOT特性,Spring全系列栈适配OK
4、SpringBoot整合
1、依赖导入
1 | <build> |
2、 ⽣成native-image
1、运⾏aot提前处理命令: mvn springboot:process-aot
2、运⾏native打包: mvn -Pnative native:build
1 | 推荐加上-Pnative |
3、常见问题
1 | 可能提示如下各种错误,⽆法构建原⽣镜像,需要配置环境变量; |
SpringBoot3 改变和新特性
1、⾃动配置包位置变化
META-INF/spring/org.springframework.boot.autoconfigure.AutoConfiguration.im ports
2、jakata api迁移
druid 有问题
3、新特性 - 函数式Web、ProblemDetails
4、GraalVM 与 AOT
5、响应式编程全套
6、剩下变化都是版本升级,意义不⼤
SpringBoot3响应式编程
前置 java8新特性
1、Lambda
Lambda表达式是Java 8 引入的一个重要特性
Lambda表达式可以被视为匿名函数
允许在需要函数的地方以更简洁的方式定义功能
1 | // 函数式接口,只要是函数式接口就能用Lambda简化 |
总结一下:如果不熟悉接口可以先冗余写法,然后再点进接口看能不能简化写法,如果熟悉可以直接用简化写法。
2、Function
在Java中,函数式接口是只包含一个抽象方法的接口,他们是支持Lambda表达式的基础,因为Lambda表达式需要一个 目标类型,这个目标类型必须是一个函数式接口
当我们看一个函数式接口,关注他们的出入参定义,底层的Funtion,定义了两个参数一个T一个R,然后底层能接受一个参数,返回一个参数。
那么根据这个参数的位置就分为了四种
1、有⼊参,⽆出参【消费者】
2、有⼊参,有出参【多功能函数】
3、⽆⼊参,⽆出参【普通函数】
4、⽆⼊参 ,有出参【提供者】
java.util.function包下的所有function定义:
Consumer: 消费者
Supplier: 提供者
Predicate: 断⾔
get/test/apply/accept调⽤的函数⽅法;
3、StreamAPI
最佳实战:以后凡是你写for循环处理数据的统⼀全部⽤StreamAPI进⾏替换;
流是并发还是不并发的?流也是用for循环挨个处理的但是可以用 parallel 变成并发
但是并发后要自行解决并发安全问题。
推荐流的所有操作都是无状态数据。
1 | 无状态(Stateless) 每次请求都独立处理,不依赖也不保存之前的请求信息。 |
Stream所有数据和操作被组合成流管道流管道组成:
⼀个数据源(可以是⼀个数组、集合、⽣成器函数、I/O管道)
零或多个中间操作(将⼀个流变形成另⼀个流)
⼀个终⽌操作(产⽣最终结果)
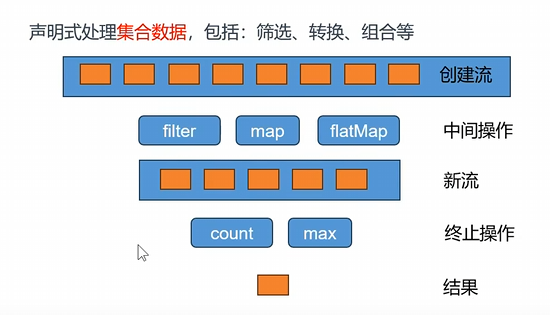
创建流
1 | of builder empty ofNullable generate concat 集合.stream |
常用中间操作
1 | filter:过滤; 挑出我们⽤的元素 |
案例有个Person类,然后过滤出年龄大于18的,这个就是在Filter里面过滤出有用的Person。
然后想要打印每个人的名字,那么就用map,把Person类的流变成名字流,王五,李四等。
然后filtermap,就是把王五拆成王和五等。拿到的其实是元素的深拷贝。
顺序是第一个元素流进所有管道处理后,才会到下一个元素。
终止操作
1 | forEach、forEachOrdered、toArray、reduce、collect、toList、 |
1 | public class StreamDemo { |
声明式:基于事件机制的回调
回调:程序员不是自己调用,而是JVM当发生这个时间系统调用
1、Reactor核心
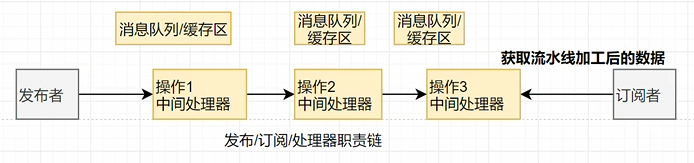
1、Reactor-Stream
1 | Reactive Streams是JVM面向流的库的 标准和规范 |
线程是越多好还是越少好?
现在有4核的CPU,现在有100个线程,那么现在每个核心都有25个线程,线程就要切换,切换保留现场(浪费内存,浪费时间),越多的线程只会产生激烈竞争。
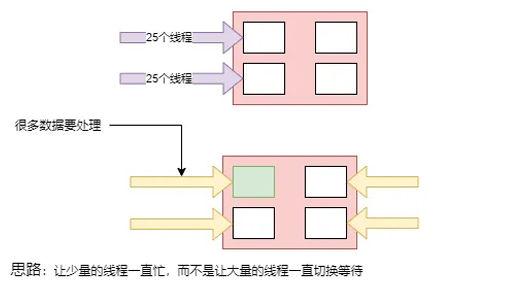
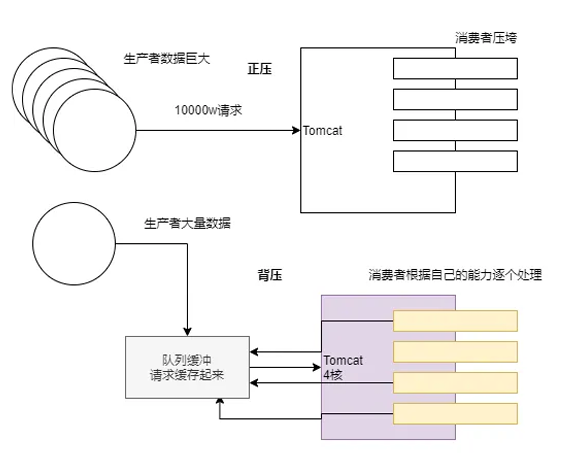
现在只有四个线程,但是都很忙,而不是让大量的线程一直切换。
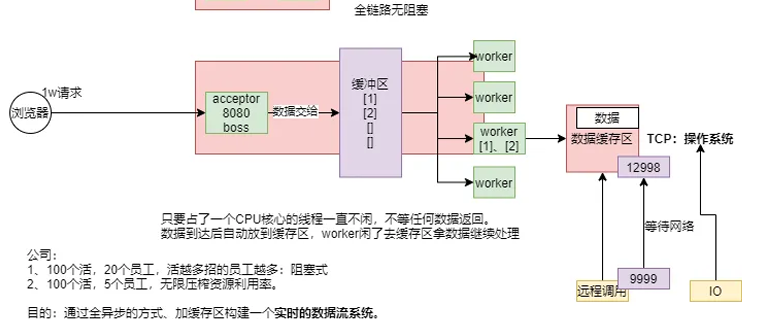
现在Tomcat学聪明了,里面专门有一个线程用来监听的监听8080,然后每一个请求来了都放在缓冲区,学了Netty,这个监听的其实是boss线程,然后后面有几个核心有几个worker线程,然后在缓冲区拿线程,但是拿到了数据1然后再去数据库远程调用,如果失败了就阻塞了,所以调用数据库也有缓冲区,远程调用肯定是TCP,只要数据到达后自动放到缓冲区,worker闲了就去缓冲区拿数据继续处理。
Kafka、MQ能构建出大型分布式响应系统。
缺本地化的消息系统解决方案。
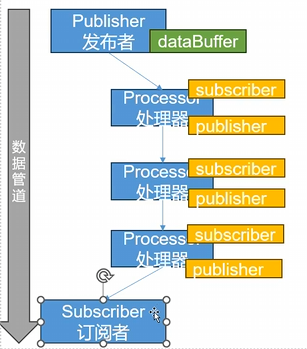
1、让所有的异步线程能互相监听消息,处理消息, 构建实时消息处理流。
那么Java就提供了Reactive Stream
然后在JAVA 9之后在 java.util.concurrent包里面添加了个Flow类,里面就提供了这个方案。
以前是命令式编程:全自定义
现在是响应式编程/声明式编程:声明流、说清楚要干什么、最终结果是要怎么样
1 | API 组件: |
案例一:发布者+订阅者
1 | public class FlowDemo { |
案例二:发布者+订阅者+Processor
1 | public class FlowDemo { |
响应式编程是不是只是异步回调但是流数据是有顺序
1 | 响应式编程: |
万物皆数据
高并发有三宝:缓存、异步、队排好。以前全是手动控制,程序员水平不高很难开发高并发系统,但是后面响应式编程天生高并发,不需要你考虑缓存、异步、队排好,只需要关注如何
高可用有三宝:分片、复制、选领导。
万物皆数据,那么就有两种:单个和多个。单个就是Mono[0 | 1],多个就是Flux
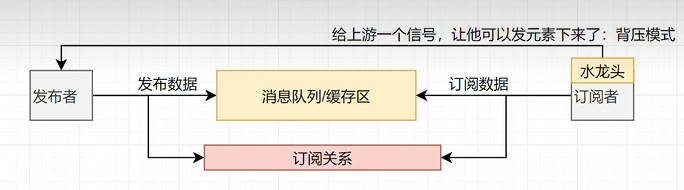
非阻塞的原理就是缓存(用来调速的)+回调
少量线程一直运行 》 大量线程切换等待。
单个就是Mono[0 | 1],多个就是Flux,通过这两个定义响应式数据流,也就是数据。
2、Reactor
要学好响应式编程,先学好两个东西,一个叫Flux,一个叫Mono。然后认清楚一个图,弹珠图
有一个flux,然后发送了三个元素,然后追加一系列操作符,然后变成一个新流。
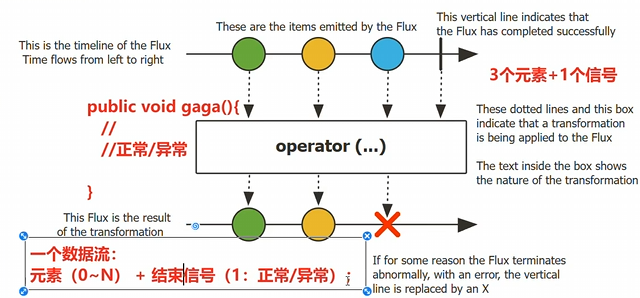
也就是说一个流数据,包含元素 + 结束信号,现在开始体验如何写。
1、导入依赖
1 | <dependencyManagement> |
2、响应式入门,基础API
下面测试一下Flux基础用法
1 | public class FluxDemo { |
下面测试一下Mono基础用法
1 | public class FluxDemo { |
1 | public class FluxDemo { |
小总结
1 | doOnXxx API触发时机 |
3、subscribe
订阅流,流没订阅之前什么都不发生。
1 | public class FluxDemo { |
4、流的取消
消费者调用cancle() 取消流的订阅
Disposable接口
1 |
|
5、背压(Backpressure )和请求重塑(Reshape Requests)
1、buffer:缓冲
1 | Flux<List<Integer>> flux = Flux.range(1, 10) //原始流10个 |
2、limit:限流
1 | Flux.range(1, 1000) |
limitRate(n):控制下游向上游“要数据的速度”(背压限流)buffer(n):把上游的数据“攒成一批”再发给下游(数据聚合)
6、编程方式创建序列Sink
Sink.next 接收器或者水槽,通道
Sink.complete
1 | //同步环境-gennerate |
1 | public class FluxCreateEnhancedAsyncDemo { |
小总结
同步generate和异步create的区别
同步是按顺序执行有个初始化状态,当前状态和同步流程sink来维护顺序
异步就是没有了内置的初始状态和当前状态,当然如果想要线程安全需要手动维护状态,但是需要定义回调函数条件设置,如果满足了某个条件就会由系统主动推送,以及用sink来定义处理流程即可。
7、handle()
⾃ 定义流中元素处理规则
1 | Flux.range(1,10) |
8、自定义线程调度
响应式:响应式编程:全异步、消息、事件回调
默认还是用当前线程,生成整个流,发布流,流操作
调度器其实就是线程池。
1 | public class ReactorPublishOnDemo { |
9、错误处理
命令式编程:常见的错误处理方式
1、Catch and return a static defalut value
捕获异常返回一个静态默认值
1 | try { |
onErrorReturn: 实现上⾯效果,错误的时候返回⼀个值
1、吃掉异常,消费者⽆异常感知
2、返回⼀个兜底默认值
3、流正常完成;
1 | Flux.just(1, 2, 0, 4) |
2、Catch and execute an alternative path with fallback method
吃掉异常,执⾏⼀个兜底⽅法;
1 | try { |
onErrorResume
1、吃掉异常,消费者⽆异常感知
2、调⽤⼀个兜底⽅法
3、流正常完成
1 | Flux.just(1, 2, 0, 4) |
3、Catch and dynamically compute a fallback value
捕获并动态计算⼀个返回值
根据错误返回一个新值。
1 | try { |
1 | .onErrorResume(err -> Flux.error(new BusinessException(err.getMessage()+":炸了"))) |
4、Catch,wrap to a BussinessException,and re-throw
捕获并包装成⼀个业务异常,并重新抛出
1 | try { |
包装重新抛出异常: 推荐⽤ .onErrorMap
1、吃掉异常,消费者有感知
2、抛新异常
3、流异常完成
1 | .onErrorResume(err -> Flux.error(new BusinessException(err.getMessage()+":炸了"))) |
5、Catch, log an error-specific message, and re-throw.
捕获异常,记录特殊的错误⽇志,重新抛出
1 | try { |
1 | Flux.just(1, 2, 0, 4) |
1 | 异常被捕获、做⾃⼰的事情 |
6、Use the finally block to clean up resources or a Java 7 “ try-with-resource” construct.
1 | Flux.just(1, 2, 3, 4) |
7、忽略当前异常,仅通知记录,继续推进
1 | Flux.just(1,2,3,0,5) |
小总结
| 场景 | 命令式写法 | Reactor 操作符 | 是否“吃掉”异常 | 消费者是否感知异常 | 流最终状态 | 典型用途 |
|---|---|---|---|---|---|---|
| 1. 返回静态默认值 | catch { return "DEFAULT"; } |
.onErrorReturn(value) 或 .onErrorReturn(Class, value) |
✅ 是 | ❌ 否 | 正常完成 | 快速兜底,如返回空列表、默认文案 |
| 2. 执行兜底方法(替代流) | catch { return fallback(); } |
.onErrorResume(err → Flux/Mono.just(...)) |
✅ 是 | ❌ 否 | 正常完成 | 调用备用服务、本地缓存、降级逻辑 |
| 3. 动态计算新值(含异常信息) | catch { return Wrapper.fromError(err); } |
.onErrorResume(err → Mono.just(new Wrapper(err))) |
✅ 是 | ❌ 否(除非返回 error) | 正常完成 | 将异常封装为业务对象(如 Result.error(err)) |
| 4. 包装并重新抛出异常 | catch { throw new BizEx("msg", err); } |
.onErrorMap(err → new BusinessException(...)) |
❌ 否 | ✅ 是 | 异常终止 | 统一异常类型、添加上下文、屏蔽底层细节 |
| 5. 记录日志但不处理异常 | catch { log(); throw err; } |
.doOnError(err → log(err)) |
❌ 否 | ✅ 是 | 异常终止 | 监控、审计、调试,不影响异常传播 |
| 6. 清理资源(finally) | try { ... } finally { cleanup(); } |
.doFinally(signalType → cleanup()) |
❌ 不处理异常 | 取决于是否有其他处理 | 正常 or 异常 | 关闭连接、释放锁、统计耗时 |
| 7. 忽略当前错误,继续处理后续元素 | (命令式难以实现) | .onErrorContinue((err, item) → {...}) |
✅ 局部吃掉 | ❌ 后续元素仍可发出 | 正常完成(跳过失败项) | 批处理中容忍个别失败(如导入1000条,998成功) |
10、常用操作
1 | filter、flatMap、concatMap、flatMapMany、transform、defaultIfEmpty、switchIfEmpty、concat、concatWith、merge、mergeWith、mergeSequential、zip、zipWith... |
1 | 常⽤操作 |
filter
1 | //这里直接使用API演示使用方法 |
filterMap
1 |
|
concatMap
1 |
|
transform
1 |
|
empty
1 |
|
merge
1 | /* |
zip
1 | /* |
11、sinks、重试、Context、阻塞API
retry 重试
1 |
|
sinks 管道工具
1 |
|
cache 缓存
1 |
|
Context-API 上下文切换
1 |
|
1 | //Context-API |
2、Spring Webflux
WebFlux:底层完全基于netty+reactor+springweb 完成⼀个全异步⾮阻塞的web响应式框架
底层:异步 + 消息队列(内存) + 事件回调机制 = 整套系统
优点:能使⽤少量资源处理⼤量请求;
0、组件对比
| 功能类别 | Servlet(阻塞式 Web) | WebFlux(响应式 Web) |
|---|---|---|
| 核心 API 功能定位 | 阻塞式 Web 开发标准,基于同步阻塞模型 | 响应式 Web 开发框架,基于异步非阻塞响应式模型 |
| 前端控制器 | DispatcherServlet |
DispatcherHandler |
| 处理器 | Controller(注解式 / 接口式) |
WebHandler / Controller(兼容 Servlet 的Controller注解) |
| 请求 & 响应对象 | ServletRequest、ServletResponse |
ServerWebExchange(封装请求响应)├─ ServerHttpRequest(请求对象)└─ ServerHttpResponse(响应对象) |
| 过滤器 | Filter(常用HttpFilter实现类) |
WebFilter |
| 异常处理器 | HandlerExceptionResolver |
DispatcherExceptionHandler |
| Web 配置注解 | @EnableWebMvc |
@EnableWebFlux |
| 自定义配置接口 | WebMvcConfigurer(用于扩展 Spring MVC 配置) |
WebFluxConfigurer(用于扩展 Spring WebFlux 配置) |
| 接口返回结果 | 任意 Java 对象(如 POJO、String、void 等) | Mono(单个结果)、Flux(多个结果)、任意 Java 对象(兼容传统返回类型) |
| 发送 REST 请求工具 | RestTemplate(阻塞式 REST 客户端) |
WebClient(响应式非阻塞 REST 客户端,可兼容同步调用) |
1、WebFlux
底层基于Netty实现的Web容器与请求/响应处理机制
1、引入
1 | <parent> |
Context 响应式上下⽂数据传递; 由下游传播给上游;
以前: 浏览器 —> Controller —> Service —> Dao: 阻塞式编程 XML
现在: Dao(数据源查询对象【数据发布者】) —> Service —> Controller —> 浏览器: 响应式
⼤数据流程: 从⼀个数据源拿到⼤量数据进⾏分析计算;
ProductVistorDao.loadData()
.distinct()
.map()
.filter()
.handle()
.subscribe();
这种响应式的编写就是从Dao开始了
2、Reactor核心
最原生写法理解底层行为
1 | public class Chapter03WebfluxApplication { |
案例实战
1 |
|
3、DispatcherHandler原理
SpringMVC: DispatcherServlet;
SpringWebFlux: DispatcherHandler
1、请求处理流程
- HandlerMapping:请求映射处理器; 保存每个请求由哪个⽅法进⾏处理
- HandlerAdapter:处理器适配器;反射执⾏⽬标⽅法
- HandlerResultHandler:处理器结果处理器;
SpringMVC: DispatcherServlet 有⼀个 doDispatch() ⽅法,来处理所有请求;
WebFlux: DispatcherHandler 有⼀个 handle() ⽅法,来处理所有请求;
1 | /** |
- 1、请求和响应都封装在 ServerWebExchange 对象中,由handle⽅法进⾏处理
- 2、如果没有任何的请求映射器; 直接返回⼀个: 创建⼀个未找到的错误; 404; 返回 Mono.error;终结流
- 3、跨域⼯具,是否跨域请求,跨域请求检查是否复杂跨域,需要预检请求;
- 4、Flux流式操作,先找到HandlerMapping,再获取handlerAdapter,再⽤Adapter处理请求,期间 的错误由onErrorResume触发回调进⾏处理;
源码中的核⼼两个:
- handleRequestWith: 编写了handlerAdapter怎么处理请求
- handleResult: String、User、ServerSendEvent、Mono、Flux …
1 | /** |
4、注解开发
1、目标方法传参
「目标方法」特指 Controller 中用于处理前端请求的业务方法(即标注了@GetMapping/@PostMapping/@RequestMapping等注解的方法),「目标方法传参」就是给这些 Controller 业务方法定义参数,用于接收、封装请求相关数据或获取 Web 上下文信息。
这些参数分两类,一个是前端主动传递的数据,一类是Web上下文自动封装的对象。
| Controller 方法参数类型 | 参数描述 |
|---|---|
| ServerWebExchange | 封装请求和响应对象的顶层对象;支持自定义获取请求数据、自定义构造响应结果 |
ServerHttpRequest、ServerHttpResponse |
分别对应响应式 Web 的请求对象、响应对象,用于直接操作请求信息和响应结果 |
| WebSession | 用于访问当前用户的 Session 对象,存储 / 获取会话级数据 |
java.security.Principal |
用于获取当前认证用户的身份信息(如用户名、用户标识等) |
org.springframework.http.HttpMethod |
用于获取当前请求的 HTTP 方法(如 GET、POST、PUT、DELETE 等) |
java.util.Locale |
用于获取当前请求的国际化区域信息(如 zh_CN、en_US 等),支持多语言适配 |
java.util.TimeZone、java.time.ZoneId |
用于获取当前请求对应的时区信息,支持时间相关的时区转换处理 |
@PathVariable |
用于绑定 URL 路径中的变量(如/user/{id}中的id),获取路径参数值 |
@MatrixVariable |
用于获取 URL 中的矩阵变量(如/user;name=zhangsan;age=20中的name/age) |
@RequestParam |
用于获取 URL 中的请求参数(如/user?name=zhangsan&age=20中的name/age),支持 GET/POST 请求 |
@RequestHeader |
用于获取 HTTP 请求头中的信息(如Content-Type、User-Agent、Authorization等) |
@CookieValue |
用于获取客户端请求中携带的 Cookie 值(如获取JSESSIONID、自定义 Cookie 等) |
@RequestBody |
用于获取 HTTP 请求体中的数据,通常适配 POST 请求(非表单提交,如 JSON 格式数据),也支持文件上传相关场景 |
HttpEntity<B> |
封装后的 HTTP 请求对象,包含请求头和请求体信息,可统一获取请求的头部和正文数据 |
@RequestPart |
专门用于获取multipart/form-data类型请求中的数据,常用于文件上传场景(获取上传的文件或表单字段) |
java.util.Map、org.springframework.ui.Model、org.springframework.ui.ModelMap |
用于在请求域中存储数据,实现后端向前端(视图)传递数据,三者功能类似,Model 更推荐使用 |
@ModelAttribute |
用于绑定请求参数到 Java 实体对象(表单数据 / 请求参数自动封装为 POJO),也可用于方法级提前封装模型数据 |
Errors、BindingResult |
用于数据校验,封装请求参数绑定或业务校验后的错误信息,需紧跟在被校验对象参数之后 |
SessionStatus + 类级别@SessionAttributes |
@SessionAttributes(类级)用于声明需要存入 Session 的模型数据;SessionStatus用于标记会话状态结束(清除@SessionAttributes声明的会话数据) |
UriComponentsBuilder |
用于构造与当前请求的主机、端口、协议、上下文路径相对应的 URL,方便生成规范的链接地址 |
@SessionAttribute |
用于获取由@SessionAttributes存入 Session 中的数据(仅读取会话数据,不写入) |
@RequestAttribute |
用于获取请求转发过程中,存放在请求域(request.setAttribute)中的数据(仅适用于转发场景) |
| 任意其他参数(基本类型 / 对象类型) | 1. 基本类型:默认等价于标注@RequestParam,自动绑定请求参数;2. 对象类型:默认等价于标注@ModelAttribute,自动封装请求参数为 POJO 对象 |
可省略注解的场景:基本类型 / POJO 类型(按名匹配请求参数)、Web 上下文类类型(框架自动注入)
2、返回值写法
sse和websocket区别:
- SSE:单⼯;通道建立后,只有服务端能主动推送数据,客户端只能被动接收
- websocket:双⼯: 连接建⽴后,可以任何交互;
| Controller 方法返回值类型 / 注解 | 返回值描述 |
|---|---|
@ResponseBody |
把响应数据直接写入响应体;若返回对象类型,会自动序列化为 JSON 格式返回(无需视图解析) |
HttpEntity<B>、ResponseEntity<B> |
HttpEntity:封装响应头和响应体的基础对象;ResponseEntity:增强版,支持快捷自定义响应状态码、响应头、响应内容 |
HttpHeaders |
响应中仅包含响应头信息,无具体的响应体内容(适用于无需返回业务数据,仅需返回响应头的场景) |
ErrorResponse |
用于快速构建标准化的错误响应,简化异常场景下的响应数据封装 |
ProblemDetail |
Spring Boot 3+ 新增,用于构建符合 HTTP 问题详情规范的错误响应,提供更规范的异常信息返回格式 |
String |
遵循传统使用规则:1. 直接返回字符串(非forward:/redirect:):配合模板引擎解析为视图名称2. forward:xxx:转发到指定地址3. redirect:xxx:重定向到指定地址 |
View |
直接返回视图对象,明确指定要渲染的视图,无需依赖视图名称解析 |
java.util.Map、org.springframework.ui.Model |
与传统使用规则一致,用于在请求域中存储数据,传递给前端视图进行渲染(需配合模板引擎使用) |
@ModelAttribute |
与传统使用规则一致,用于将返回值存入模型数据(请求域 / Session),供前端视图获取 |
| Rendering | 新版页面跳转 API,用于指定要渲染的视图、响应状态等,实现页面跳转;不可与@ResponseBody注解同时使用(否则会丧失页面跳转功能,转为返回对象本身) |
void |
仅代表响应完成的信号,无实际业务数据返回;通常用于无需返回内容,仅需完成响应流程的场景 |
Flux<ServerSentEvent>、Observable<ServerSentEvent> 或其他响应式类型 |
用于实现 SSE(Server-Sent Events,服务器推送事件),以 text/event-stream 格式向客户端持续推送数据 |
| 其他未列出的返回值 | 未在上述列表中的所有返回值,均会被当作前端视图的渲染数据(存入请求域),配合模板引擎进行页面渲染 |
5、文件上传
以前
1 | class MyForm { |
现在
1 |
|
6、错误处理
1 |
|
7、RequestContext
8、自定义Flux配置
@EnableWebFlux 注解,开启WebFlux自定义,禁用WebFlux的默认效果,完全自定义
WebFluxConfigurer
容器中注入这个类型的组件,重写底层逻辑
1 |
|
9、Filter
1 |
|
3、R2DBC
Web、⽹络、IO(存储)、中间件(Redis、MySQL)
应⽤开发:
- ⽹络
- 存储:MySQL、Redis
- Web:Webflux
- 前端; 后端:Controller — Service — Dao(r2dbc;mysql)
数据库:
- 导⼊驱动; 以前:JDBC(jdbc、各⼤驱动mysql-connector); 现在:r2dbc(r2dbc-spi、各⼤ 驱动 r2dbc-mysql)
- 驱动:
- 获取连接
- 发送SQL、执⾏
- 封装数据库返回结果
1 | <dependency> |
1、R2dbc
⽤法:
1、导⼊驱动: 导⼊连接池(r2dbc-pool)、导⼊驱动(r2dbc-mysql )
2、使⽤驱动提供的API操作
1 | <dependency> |
1 | import reactor.core.publisher.Mono; |
2、Spring Data R2DBC
提 升⽣产⼒⽅式的 响应式数据库操作
0、整合
1、导入依赖
1 | <!-- https://mvnrepository.com/artifact/io.asyncer/r2dbc-mysql --> |
2、编写配置
1 | spring: |
1、声明式接口:R2dbcRepository
Repository接口
1 |
|
自定义Converter
1 | /** |
配置生效
1 | //开启R2dbc 仓库功能;jpa |
2、编程式组件
- R2dbcEntityTemplate
- DatabaseClient
3、案例练习
1-1 关联查询(图书 - 作者:一本图书对应一个作者)
方式 1:自定义 Converter<Row, Bean> + 注册转换器
- 自定义读取转换器(数据库 → 应用层实体)
1 | /** |
- 注册自定义转换器
1 | /** |
- 使用转换器查询数据
1 | // 调用 Repository 方法(需自定义 @Query 注解指定关联查询 SQL) |
方式 2:编程式封装 - 使用 DatabaseClient(底层 API 方式)
1 | /** |
1-N 关联查询(作者 - 图书:一个作者对应多本图书)
核心实现:DatabaseClient + bufferUntilChanged 分组封装
1 | /** |
最佳实践
| 场景类型 | 推荐实现方式 |
|---|---|
| 基础 CRUD 操作 | 直接继承 R2dbcRepository<T, ID>,使用默认提供的方法(如 save、findAll、deleteById),类似 MyBatis-Plus 基础功能 |
| 单表复杂查询(自定义 SQL) | 使用 @Query 注解在 Repository 接口中自定义 SQL,支持具名参数 / 占位符参数,无需手动封装简单结果集 |
| 多表关联查询(1-1 / 1-N) | 1. 自定义 @Query + @ReadingConverter:通过转换器自动封装关联结果集(优雅简洁)2. DatabaseClient:底层 API,手动封装结果集(灵活,支持复杂 SQL) |
| 结果封装对比(与 MyBatis) | Spring Data R2DBC:Converter / DatabaseClient 手动封装MyBatis:ResultMap 标签配置封装 |
- 简单业务优先使用
R2dbcRepository+@Query,提升开发效率; - 多表关联查询必须自定义结果集封装(无自动映射功能),可选「转换器」或「DatabaseClient」;
- 1-N 关联查询时,需先按主表 ID 排序,再通过
bufferUntilChanged分组,避免数据错乱; - 注意对象比较与数字缓存:Long 类型缓存范围为
-128 ~ 127,自定义对象比较需重写equals方法。
4、Spring Security Reactive
⽬标: SpringBoot + Webflux + Spring Data R2DBC + Spring Security
1、整合
1 | <dependencies> |
2、核心概念说明
应用安全核心能力
- 防止攻击:抵御 DDoS、CSRF、XSS、SQL 注入等常见安全攻击
- 权限控制:管控登录用户的操作范围,防止越权访问
- 传输加密:支持 HTTPS、X509 等加密方式保障传输安全
- 认证授权:支持 OAuth2.0、JWT 等主流认证授权方案
RBAC 权限模型
- 全称:Role Based Access Control(基于角色的访问控制)
- 核心关系:
- 一个用户可关联多个角色
- 一个角色可关联多个权限
- 用户的操作权限 = 其关联所有角色的权限集合
- 控制逻辑:
- 给系统方法配置所需权限 / 角色
- 用户执行方法时,框架自动校验用户是否拥有对应权限 / 角色
- 校验通过则允许执行,否则拒绝访问
权限框架核心流程
- 认证(Authenticate):用户通过账号密码等方式登录系统,验证身份合法性
- 授权(Authorize):查询登录用户的角色与权限,执行方法时校验权限匹配性
- 核心组件:Spring Security 提供认证、授权、安全防护的全套能力
3、代码实现
1、安全配置类
1 | //Spring Security 响应式安全配置类 |
2、自定义用户详情服务
1 | //自定义响应式用户详情服务:从数据库查询用户、角色、权限信息 |
3、测试控制器
1 |
|
4、关键说明
1、核心注解
@EnableReactiveMethodSecurity:开启 WebFlux 响应式环境下的方法级权限控制@PreAuthorize:方法执行前校验权限,支持 SpEL 表达式(hasRole()校验角色、hasAuthority()校验权限)
2、密码处理
- 数据库中存储的是加密后的密码,框架自动使用
PasswordEncoder对比表单明文密码与数据库密文密码 - 角色配置时,
roles()方法自动为角色添加ROLE_前缀,与hasRole()对应;authorities()方法直接指定权限 / 角色(需手动加ROLE_前缀)
3、安全过滤链
SecurityWebFilterChain:WebFlux 响应式环境下的安全配置核心,替代传统 Servlet 环境的SecurityFilterChain- 配置静态资源放行、表单登录、CSRF 关闭等规则,定义资源访问权限


